 Spring Core
# 核心技术
5.3.2
# 1.Ioc容器
# 1.1. Spring Ioc容器和Beans介绍
本章介绍了控制反转(IoC)原理的Spring框架实现。 IoC也称为依赖注入(DI)。 在此过程中,对象仅通过构造函数参数,工厂方法的参数或在构造后或从工厂方法返回后在对象实例上设置的属性来定义其依赖项(即与它们一起使用的其他对象) 。 然后,容器在创建bean时注入那些依赖项。 此过程从根本上讲是bean本身通过使用类的直接构造或诸如服务定位器模式之类的机制来控制其依赖项的实例或位置的逆过程(因此称为控制的反转)。
org.springframework.beans和org.springframework.context包是Spring Framework的IoC容器的基础。BeanFactory接口提供了一种能够管理任何类型对象的高级配置机制。ApplicationContext是BeanFactory的子接口。 它增加了:
- 与Spring AOP功能轻松集成
- 消息资源处理(用于国际化)
- 事件发布
- 应用层特定的上下文,例如Web应用程序中使用的WebApplicationContext
简而言之,BeanFactory提供了配置框架和基本的功能,而ApplicationContext添加了更多企业特定的功能。 ApplicationContext是BeanFactory的完整超集,在本章中仅在Spring的IoC容器描述中使用。
在Spring中,构成应用程序主干并由Spring IoC容器管理的对象称为bean。bean是由Spring IoC容器实例化、组装和管理的对象。否则,bean只是应用程序中众多对象中的一个。bean及其之间的依赖关系反映在容器使用的配置元数据中。
# 1.2. Container介绍
org.springframework.context.ApplicationContext接口代表Spring IoC容器,并负责实例化,配置和组装Bean。 容器通过读取配置元数据获取有关要实例化,配置和组装哪些对象的说明。 配置元数据以XML,Java注解或Java代码表示。 它使您能够表达组成应用程序的对象以及这些对象之间的丰富相互依赖关系。
Spring提供了ApplicationContext接口的几种实现。 在独立应用程序中,通常创建ClassPathXmlApplicationContext或FileSystemXmlApplicationContext的实例。 尽管XML是定义配置元数据的传统格式,但是可以通过提供少量XML配置来声明性地启用对其他元数据格式的支持,从而指示容器将Java注解或代码用作元数据格式。
在大多数应用场景中,不需要显式用户代码即可实例化一个Spring IoC容器的一个或多个实例。 例如,在Web应用程序场景中,应用程序的web.xml文件中的简单八行(约)样板Web描述符XML通常就足够了。 如果您使用Spring Tools for Eclipse(由Eclipse驱动的开发环境),则只需单击几下鼠标或击键即可轻松创建此样板配置。
下图显示了Spring的工作原理的高级视图。 您的应用程序类与配置元数据结合在一起,以便在创建和初始化ApplicationContext之后,您将拥有一个完全配置且可执行的系统或应用程序。

# 1.2.1. 元数据配置
如上图所示,Spring IoC容器使用一种形式的配置元数据。 此配置元数据表示您作为应用程序开发人员如何告诉Spring容器实例化,配置和组装应用程序中的对象。传统上,配置元数据以简单直观的XML格式提供,这是本章大部分用来传达Spring IoC容器的关键概念和功能的格式。
基于XML的元数据不是配置元数据的唯一允许形式。 Spring IoC容器本身与实际写入此配置元数据的格式完全脱钩。 如今,许多开发人员为他们的Spring应用程序选择基于Java代码的配置。
- 基于注解的配置:Spring 2.5引入了对基于注解的配置元数据的支持。
- 基于Java的配置:从Spring 3.0开始,Spring JavaConfig项目提供的许多功能成为核心Spring Framework的一部分。 因此,您可以使用Java而不是XML文件来定义应用程序类外部的bean。 要使用这些新功能,请参见
@ Configuration,@Bean,@Import和@DependsOn注解。
Spring配置由容器必须管理的至少一个(通常是一个以上)bean定义组成。 基于XML的配置元数据将这些bean配置为顶级<beans />元素内的<bean />元素。 Java配置通常在@Configuration类中使用@Bean注释的方法。
这些bean定义对应于组成应用程序的实际对象。 通常,您定义服务层对象,数据访问对象(DAO),表示对象(例如Struts Action实例),基础结构对象(例如Hibernate SessionFactories,JMS队列)等等。 通常,不会在容器中配置细粒度的域对象,因为DAO和业务逻辑通常负责创建和加载域对象。 但是,您可以使用Spring与AspectJ的集成来配置在IoC容器控制之外创建的对象。 请参阅使用AspectJ通过Spring依赖注入域对象。
以下示例显示了基于XML的配置元数据的基本结构:
<?xml version="1.0" encoding="UTF-8"?>
<beans xmlns="http://www.springframework.org/schema/beans"
    xmlns:xsi="http://www.w3.org/2001/XMLSchema-instance"
    xsi:schemaLocation="http://www.springframework.org/schema/beans
        https://www.springframework.org/schema/beans/spring-beans.xsd">

    <bean id="..." class="...">
        <!-- collaborators and configuration for this bean go here -->
    </bean>

    <bean id="..." class="...">
        <!-- collaborators and configuration for this bean go here -->
    </bean>

    <!-- more bean definitions go here -->

</beans>
id属性是一个标识单个bean定义的字符串。它的值指代该对象的引用。class属性定义bean的类型并使用完全限定名。
# 1.2.2. 容器初始化
提供给ApplicationContext构造函数的一个或多个位置路径是资源字符串,这些资源字符串使容器可以从各种外部资源(例如本地文件系统,Java CLASSPATH等)加载配置元数据。
ApplicationContext context = new ClassPathXmlApplicationContext("services.xml", "daos.xml");
<?xml version="1.0" encoding="UTF-8"?>
<beans xmlns="http://www.springframework.org/schema/beans"
    xmlns:xsi="http://www.w3.org/2001/XMLSchema-instance"
    xsi:schemaLocation="http://www.springframework.org/schema/beans
        https://www.springframework.org/schema/beans/spring-beans.xsd">

    <!-- services -->

    <bean id="petStore" class="org.springframework.samples.jpetstore.services.PetStoreServiceImpl">
        <property name="accountDao" ref="accountDao"/>
        <property name="itemDao" ref="itemDao"/>
        <!-- additional collaborators and configuration for this bean go here -->
    </bean>

    <!-- more bean definitions for services go here -->

</beans>
<?xml version="1.0" encoding="UTF-8"?>
<beans xmlns="http://www.springframework.org/schema/beans"
    xmlns:xsi="http://www.w3.org/2001/XMLSchema-instance"
    xsi:schemaLocation="http://www.springframework.org/schema/beans
        https://www.springframework.org/schema/beans/spring-beans.xsd">

    <bean id="accountDao"
        class="org.springframework.samples.jpetstore.dao.jpa.JpaAccountDao">
        <!-- additional collaborators and configuration for this bean go here -->
    </bean>

    <bean id="itemDao" class="org.springframework.samples.jpetstore.dao.jpa.JpaItemDao">
        <!-- additional collaborators and configuration for this bean go here -->
    </bean>

    <!-- more bean definitions for data access objects go here -->

</beans>
在前面的示例中,服务层由PetStoreServiceImpl类和两个JpaAccountDao和JpaItemDao类型的数据访问对象组成(基于JPA对象关系映射标准)。 属性名称元素引用JavaBean属性的名称,而ref元素引用另一个bean定义的名称。 id和ref元素之间的这种联系表达了协作对象之间的依赖性。
# 构造基于XML的元数据
使bean定义跨越多个XML文件可能很有用。 通常,每个单独的XML配置文件都代表体系结构中的逻辑层或模块。您可以使用应用程序上下文构造函数从所有这些XML片段中加载bean定义。 如上一节中所示,此构造函数具有多个Resource位置。 或者,使用<import />元素的一个或多个实例从另一个文件加载bean定义。 以下示例显示了如何执行此操作:
Code
<beans>
    <import resource="services.xml"/>
    <import resource="resources/messageSource.xml"/>
    <import resource="/resources/themeSource.xml"/>

    <bean id="bean1" class="..."/>
    <bean id="bean2" class="..."/>
</beans>
在前面的示例中,外部bean定义是从三个文件加载的:services.xml,messageSource.xml和themeSource.xml。 所有位置路径都相对于执行导入的定义文件,因此,services.xml必须与执行导入的文件位于同一目录或类路径位置,而messageSource.xml和themeSource.xml必须位于该位置下方的资源位置 。 如您所见,斜杠被忽略。 但是,鉴于这些路径是相对的,最好不要使用任何斜线。 根据Spring Schema,导入的文件的内容(包括顶级<beans />元素)必须是有效的XML bean定义。
可以但不建议使用相对路径“ ../”引用父目录中的文件。 这样做会创建对当前应用程序外部文件的依赖。 特别是,不建议对classpath:URL(例如,classpath:../ services.xml)使用此引用,在URL中,运行时解析过程会选择“最近”的classpath根目录,然后查看其父目录。 类路径配置的更改可能导致选择其他错误的目录。您始终可以使用绝对资源路径而不是相对路径:例如,file:C:/config/services.xml或classpath:/config/services.xml。 但是请注意,您正在将应用程序的配置耦合到特定的绝对路径。 通常,最好为这样的绝对路径保留一个间接寻址,例如,通过在运行时针对JVM系统属性解析的“ $ {…}”占位符。
命名空间本身提供了import指令特性。除了普通bean定义之外,Spring提供的XML名称空间的选择中还有其他配置特性,例如context和util命名空间。
# The Groovy Bean Definition DSL(领域特定语言)
作为外部化配置元数据的另一个示例,Bean定义也可以在Spring的Groovy Bean定义DSL中表达,如Grails框架所示。 通常,这种配置位于“ .groovy”文件中,其结构如以下示例所示:
beans {
    dataSource(BasicDataSource) {
        driverClassName = "org.hsqldb.jdbcDriver"
        url = "jdbc:hsqldb:mem:grailsDB"
        username = "sa"
        password = ""
        settings = [mynew:"setting"]
    }
    sessionFactory(SessionFactory) {
        dataSource = dataSource
    }
    myService(MyService) {
        nestedBean = { AnotherBean bean ->
            dataSource = dataSource
        }
    }
}
这种配置样式在很大程度上等同于XML bean定义,甚至支持Spring的XML配置名称空间。 它还允许通过importBeans指令导入XML bean定义文件。
# 1.2.3. 使用容器
ApplicationContext是高级的工厂接口,该工厂能够维护不同bean及其依赖关系的注册表。 通过使用方法T getBean(String name,Class <T> requiredType),可以检索bean的实例。
// create and configure beans
ApplicationContext context = new ClassPathXmlApplicationContext("services.xml", "daos.xml");

// retrieve configured instance
PetStoreService service = context.getBean("petStore", PetStoreService.class);

// use configured instance
List<String> userList = service.getUsernameList();
在Groovy配置中,使用看起来非常相似。它有一个不同的上下文实现类,该类支持groovy(但也理解XML bean定义)。下面的示例显示了Groovy配置
ApplicationContext context = new GenericGroovyApplicationContext("services.groovy", "daos.groovy");
最灵活的变体是结合reader委托使用的GenericApplicationContext,例如,使用XML文件的XmlBeanDefinitionReader,如下面的示例所示
GenericApplicationContext context = new GenericApplicationContext();
new XmlBeanDefinitionReader(context).loadBeanDefinitions("services.xml", "daos.xml");
context.refresh();
还可以为Groovy文件使用GroovyBeanDefinitionReader,如下面的示例所示
GenericApplicationContext context = new GenericApplicationContext();
new GroovyBeanDefinitionReader(context).loadBeanDefinitions("services.groovy", "daos.groovy");
context.refresh();
您可以在相同的ApplicationContext上混合和匹配这样的读取器委派,从不同的配置源读取bean定义.
然后可以使用getBean检索bean的实例。 ApplicationContext接口还有其他几种检索bean的方法,但是理想情况下,您的应用程序代码永远不要使用它们。 实际上,您的应用程序代码应该根本不调用getBean()方法,因此完全不依赖于Spring API。 例如,Spring与Web框架的集成为各种Web框架组件(例如控制器和JSF管理的Bean)提供了依赖项注入,使您可以通过元数据(例如自动装配注释)声明对特定Bean的依赖项。
# 1.3. Bean介绍
在容器本身内,bean定义表示为BeanDefinition对象,其中包含(除其他信息外)以下元数据:
包限定的类名:通常,定义了Bean的实际实现类。
Bean行为配置元素,用于声明Bean在容器中的行为(作用域,生命周期回调等)。
引用该bean完成其工作所需的其他bean。 这些引用也称为协作者或依赖项。
要在新创建的对象中设置的其他配置设置,例如,池的大小限制或在管理连接池的bean中要使用的连接数。
该元数据转换为一组组成每个bean定义的属性。下表描述了这些属性
| Property | Explained in… |
|---|---|
| Class | Instantiating Beans (opens new window) |
| Name | Naming Beans (opens new window) |
| Scope | Bean Scopes (opens new window) |
| Constructor arguments | Dependency Injection (opens new window) |
| Properties | Dependency Injection (opens new window) |
| Autowiring mode | Autowiring Collaborators (opens new window) |
| Lazy initialization mode | Lazy-initialized Beans (opens new window) |
| Initialization method | Initialization Callbacks (opens new window) |
| Destruction method | Destruction Callbacks (opens new window) |
除了包含有关如何创建特定bean的信息的bean定义之外,ApplicationContext实现还允许注册在容器外部(由用户)创建的现有对象。 这是通过通过getBeanFactory()方法访问ApplicationContext的BeanFactory来完成的,该方法返回BeanFactory DefaultListableBeanFactory实现。 DefaultListableBeanFactory通过registerSingleton(..)和registerBeanDefinition(..)方法支持此注册。 但是,典型的应用程序只能与通过常规bean定义元数据定义的bean一起使用。
Bean元数据和手动提供的单例实例需要尽早注册,以便容器在自动装配和其他自省步骤期间正确地判断它们。虽然在某种程度上支持覆盖现有元数据和现有的单例实例,但在运行时注册新bean(与对工厂的实时访问并发)不受官方支持,可能会导致并发访问异常、bean容器中的不一致状态,或者两者都有。
# 1.3.1. Beans命名
每个bean具有一个或多个标识符。 这些标识符在承载Bean的容器内必须唯一。 一个bean通常只有一个标识符。 但是,如果需要多个,则可以将多余的别名视为别名。
在基于XML的配置元数据中,可以使用id属性和/或name属性来指定Bean标识符。 id属性可让您精确指定一个id。 按照惯例,这些名称是字母数字(“ myBean”,“ someService”等),但它们也可以包含特殊字符。 如果要为bean引入其他别名,还可以在name属性中指定它们,并用逗号(,),分号(;)或空格分隔。 作为历史记录,在Spring 3.1之前的版本中,id属性定义为xsd:ID类型,该类型限制了可能的字符。 从3.1开始,它被定义为xsd:string类型。 请注意,bean ID唯一性仍由容器强制执行,尽管不再由XML解析器执行。
您不需要提供bean的名称或ID。 如果未明确提供名称或ID,则容器将为该bean生成一个唯一的名称。 但是,如果要按名称引用该bean,则通过使用ref元素或服务定位器样式查找,必须提供一个名称。 不提供名称的动机与使用内部bean和自动装配协作类有关。
约定是在命名bean时使用标准Java约定来命名实例字段名。也就是说,bean名称以小写字母开头,并从那里采用驼峰格式。这些名称的例子包括accountManager、accountService、userDao、loginController等等。一致地命名bean可以使配置更易于阅读和理解。另外,如果您使用Spring AOP,在将通知(
advice)应用到一组与名称相关的bean时,它会很有用。通过在类路径中进行组件扫描,Spring会按照前面描述的规则为未命名的组件生成Bean名称:本质上,采用简单的类名称并将其初始字符转换为小写。 但是,在特殊情况下,如果有多个字符并且第一个和第二个字符均为大写字母,则会保留原始大小写。 这些规则与
java.beans.Introspector.decapitalize(Spring使用的)定义的规则相同。
# Bean别名
在bean定义本身中,可以使用由id属性指定的最多一个名称和name属性中任意数量的其他名称的组合,为bean提供多个名称。 这些名称可以是同一个bean的等效别名,并且在某些情况下很有用,例如,通过使用特定于该组件本身的bean名称,让应用程序中的每个组件都引用一个公共依赖项。
但是,在实际定义bean的地方指定所有别名并不够。 有时需要为在别处定义的bean引入别名。 这在大型系统中通常是这种情况,在大型系统中,配置在每个子系统之间分配,每个子系统都有自己的对象定义集。 在基于XML的配置元数据中,可以使用<alias />元素来完成此操作。 以下示例显示了如何执行此操作:
<alias name="fromName" alias="toName"/>
例如,子系统A的配置元数据可以通过subsystemA-dataSource的名称引用数据源。 子系统B的配置元数据可以通过subsystemB-dataSource的名称引用数据源。 组成使用这两个子系统的主应用程序时,主应用程序通过myApp-dataSource的名称引用数据源。 要使所有三个名称都引用相同的对象,可以将以下别名定义添加到配置元数据中:
<alias name="myApp-dataSource" alias="subsystemA-dataSource"/>
<alias name="myApp-dataSource" alias="subsystemB-dataSource"/>
现在,每个组件和主应用程序都可以通过唯一的名称引用数据源,并且保证不会与任何其他定义(有效地创建一个名称空间)冲突,但它们引用的是同一个bean。
如果使用Javaconfiguration,则@Bean注解可用于提供别名。
# 1.3.2. 实例化Beans
bean定义本质上是创建一个或多个对象的方法。当被请求时,容器查看指定bean的方法,并使用该bean定义封装的配置元数据创建(或获取)实际对象。
如果使用基于XML的配置元数据,则在<bean />元素的class属性中指定要实例化的对象的类型(或类)。 这个类属性(在内部是BeanDefinition实例的Class属性)通常是必需的。 (可以通过以下两种方式之一使用Class属性:
通常,在容器本身通过反射性地调用其构造函数直接创建Bean的情况下,指定要构造的Bean类,这在某种程度上等同于使用new运算符的Java代码。
要指定包含用于创建对象的静态工厂方法的实际类,在不太常见的情况下,容器将在类上调用静态工厂方法以创建Bean。 从静态工厂方法的调用返回的对象类型可以是同一类,也可以是完全不同的另一类。
如果要为静态内部类配置Bean定义,则必须使用内部类的二进制名称。例如,如果您在com.example包中有一个名为SomeThing的类,并且此SomeThing类具有一个名为OtherThing的静态内部类,则bean定义上的class属性的值为com.example.SomeThing $ OtherThing。请注意,名称中使用$字符将内部类的类名与外部类名分开。
# 构造器实例化
当通过构造方法创建一个bean时,所有普通类都可以被Spring使用并兼容。 也就是说,正在开发的类不需要实现任何特定的接口或以特定的方式进行编码。 只需指定bean类就足够了。 但是,根据您用于该特定bean的IoC的类型,您可能需要一个默认(空)构造函数。
Spring IoC容器几乎可以管理您要管理的任何类。 它不仅限于管理真正的JavaBean。 大多数Spring用户更喜欢实际的JavaBean,它仅具有默认(无参数)构造函数,并具有根据容器中的属性构造的适当setter和getter。 您还可以在容器中具有更多非bean规范的类。 例如,如果您需要使用绝对不符合JavaBean规范的旧式连接池,则Spring也可以对其进行管理。
# 静态工厂实例化
定义使用静态工厂方法创建的bean时,请使用class属性指定包含静态工厂方法的类,并使用名为factory-method的属性指定工厂方法本身的名称。 您应该能够调用此方法(使用可选参数,如稍后所述)并返回一个活动对象,该对象随后将被视为已通过构造函数创建。 这种bean定义的一种用法是在旧版代码中调用静态工厂。
以下bean定义指定通过调用工厂方法来创建bean。 该定义不指定返回对象的类型(类),而仅指定包含工厂方法的类。 在此示例中,createInstance()方法必须是静态方法。 以下示例显示如何指定工厂方法:
<bean id="clientService"
    class="examples.ClientService"
    factory-method="createInstance"/>
以下示例显示了可与前面的bean定义一起使用的类:
public class ClientService {
    private static ClientService clientService = new ClientService();
    private ClientService() {}

    public static ClientService createInstance() {
        return clientService;
    }
}
# 实例工厂实例化
类似于通过静态工厂方法进行实例化,使用实例工厂方法进行实例化会从容器中调用现有bean的非静态方法来创建新bean。 要使用此机制,请将class属性保留为空,并在factory-bean属性中,在当前(或祖先)容器中指定包含要创建该对象的实例方法的bean的名称。 使用factory-method属性设置工厂方法本身的名称。 以下示例显示了如何配置此类Bean:
<!-- the factory bean, which contains a method called createInstance() -->
<bean id="serviceLocator" class="examples.DefaultServiceLocator">
    <!-- inject any dependencies required by this locator bean -->
</bean>

<!-- the bean to be created via the factory bean -->
<bean id="clientService"
    factory-bean="serviceLocator"
    factory-method="createClientServiceInstance"/>
public class DefaultServiceLocator {

    private static ClientService clientService = new ClientServiceImpl();

    public ClientService createClientServiceInstance() {
        return clientService;
    }
}
一个工厂类也可以包含一个以上的工厂方法,如以下示例所示:
<bean id="serviceLocator" class="examples.DefaultServiceLocator">
    <!-- inject any dependencies required by this locator bean -->
</bean>

<bean id="clientService"
    factory-bean="serviceLocator"
    factory-method="createClientServiceInstance"/>

<bean id="accountService"
    factory-bean="serviceLocator"
    factory-method="createAccountServiceInstance"/>
public class DefaultServiceLocator {

    private static ClientService clientService = new ClientServiceImpl();

    private static AccountService accountService = new AccountServiceImpl();

    public ClientService createClientServiceInstance() {
        return clientService;
    }

    public AccountService createAccountServiceInstance() {
        return accountService;
    }
}
这种方法表明,工厂Bean本身可以通过依赖项注入(DI)进行管理和配置。
在Spring文档中,“ factory bean”是指在Spring容器中配置并通过实例或静态工厂方法创建对象的bean。 相比之下,
FactoryBean(注意大小写)是指特定于Spring的FactoryBean实现类。
# 确定Bean的运行时类型
确定特定bean的运行时类型并非易事。 Bean元数据定义中的指定类只是初始类引用,可能与声明的工厂方法结合使用,或者是FactoryBean类,这可能导致Bean的运行时类型不同,或者在实例级工厂方法(通过指定的factory-bean名称解析)的情况下完全不进行设置 。 此外,AOP代理可以使用基于接口的代理包装bean实例,而目标Bean的实际类型(仅是其实现的接口)的暴露程度有限。
找出特定bean的实际运行时类型的推荐方法是对指定bean名称的BeanFactory.getType调用。 这考虑了上述所有情况,并返回了针对相同bean名称的BeanFactory.getBean调用将返回的对象的类型。
# 1.4. 依赖Dependencies
典型的企业应用程序不包含单个对象(或Spring术语中的bean)。即使是最简单的应用程序也有几个对象一起工作,以表示最终用户认为一致的应用程序。下一节将解释如何从定义大量独立的bean定义过渡到一个完全实现的应用程序,在该应用程序中,对象相互协作以实现目标。
# 1.4.1. 依赖注入
依赖注入(DI)是一个过程,在这个过程中,对象仅通过构造函数参数、工厂方法的参数,或者在对象实例被构造或从工厂方法返回后设置的属性来定义它们的依赖项(即与它们一起工作的其他对象)。 然后,容器在创建bean时注入那些依赖项。 从根本上讲,此过程是通过使用类的直接构造或服务定位器模式来控制bean自身依赖的实例或位置的bean创建的逆过程(因此称为Control Inversion-控制反转)
使用DI原则后,代码更加清晰,当提供对象的依赖关系时,解耦会更加有效。对象不查找它的依赖项,也不知道依赖项的位置或类。因此,您的类变得更容易测试,特别是当依赖关系在接口或抽象基类上时,这些依赖关系允许在单元测试中使用stub或mock 实现。
依赖注入有两种主要的变体:基于构造函数的依赖注入和基于setter的依赖注入。
# 构造器注入
基于构造函数的DI是通过容器调用具有多个参数的构造函数来完成的,每个参数表示一个依赖项。 调用带有特定参数的静态工厂方法来构造Bean几乎是等效的,并且本次讨论将构造函数和静态工厂方法的参数视为类似。 以下示例显示了只能通过构造函数注入进行依赖项注入的类:
public class SimpleMovieLister {

    // the SimpleMovieLister has a dependency on a MovieFinder
    private MovieFinder movieFinder;

    // a constructor so that the Spring container can inject a MovieFinder
    public SimpleMovieLister(MovieFinder movieFinder) {
        this.movieFinder = movieFinder;
    }
	/*这里的MovieFinder需由Ioc容器管理;若有多个构造器的话,需要注意是否正确使用,可参考
      https://blog.csdn.net/qq_41737716/article/details/85596817*/
    // business logic that actually uses the injected MovieFinder is omitted...
}
注意,该类没有什么特别的。 它是一个POJO,不依赖于特定于容器的接口,基类或注解。
构造器参数解析
构造函数参数解析匹配通过使用参数的类型进行。 如果Bean定义的构造函数参数中没有潜在的歧义,则在实例化Bean时,在Bean定义中定义构造函数参数的顺序就是将这些参数提供给适当的构造函数的顺序。 考虑以下类:
package x.y;

public class ThingOne {

    public ThingOne(ThingTwo thingTwo, ThingThree thingThree) {
        // ...
    }
}
假设ThingTwo和ThingThree类没有通过继承关联,则不存在潜在的歧义。 因此,以下配置可以正常运行,并且您无需在<constructor-arg />元素中显式指定构造函数参数索引或类型。
<beans>
    <bean id="beanOne" class="x.y.ThingOne">
        <constructor-arg ref="beanTwo"/>
        <constructor-arg ref="beanThree"/>
    </bean>

    <bean id="beanTwo" class="x.y.ThingTwo"/>

    <bean id="beanThree" class="x.y.ThingThree"/>
</beans>
当引用另一个bean时,类型是已知的,并且可以发生匹配(与前面的示例一样)。 当使用简单类型(例如<value> true </value>)时,Spring无法确定值的类型,因此在没有指示的情况下无法按类型进行匹配。 考虑以下类别:
package examples;

public class ExampleBean {

    // Number of years to calculate the Ultimate Answer
    private int years;

    // The Answer to Life, the Universe, and Everything
    private String ultimateAnswer;

    public ExampleBean(int years, String ultimateAnswer) {
        this.years = years;
        this.ultimateAnswer = ultimateAnswer;
    }
}
构造器参数类型匹配
在上述情况下,如果通过使用type属性显式指定构造函数参数的类型,则容器可以使用简单类型的类型匹配。 如下例所示:
<bean id="exampleBean" class="examples.ExampleBean">
    <constructor-arg type="int" value="7500000"/>
    <constructor-arg type="java.lang.String" value="42"/>
</bean>
构造器参数索引
您可以使用index属性来显式指定构造函数参数的索引,如以下示例所示:
<bean id="exampleBean" class="examples.ExampleBean">
    <constructor-arg index="0" value="7500000"/>
    <constructor-arg index="1" value="42"/>
</bean>
除了解决多个简单值的歧义之外,指定索引还可以解决构造函数有两个相同类型的参数的歧义。
索引从0开始。
构造器参数名
还可以使用构造函数参数名来消除值的歧义,如下面的示例所示
<bean id="exampleBean" class="examples.ExampleBean">
    <constructor-arg name="years" value="7500000"/>
    <constructor-arg name="ultimateAnswer" value="42"/>
</bean>
请记住,要使其能够开箱即用,您的代码必须在编译时启用debug标志,以便Spring可以从构造函数查找参数名。如果您不能或不希望用debug标志编译您的代码,您可以使用@ConstructorProperties JDK注解来显式地命名您的构造函数参数。示例类如下所示
package examples;

public class ExampleBean {

    // Fields omitted

    @ConstructorProperties({"years", "ultimateAnswer"})
    public ExampleBean(int years, String ultimateAnswer) {
        this.years = years;
        this.ultimateAnswer = ultimateAnswer;
    }
}
# setter注入
基于setter的DI是由容器在调用无参数构造函数或无参数静态工厂方法来实例化bean之后再调用bean上的setter方法来实现的。
下面的示例显示了一个只能通过使用纯setter注入来注入依赖项的类。这个类是传统的Java。它是一个不依赖于容器特定接口、基类或注解的POJO。
public class SimpleMovieLister {

    // the SimpleMovieLister has a dependency on the MovieFinder
    private MovieFinder movieFinder;

    // a setter method so that the Spring container can inject a MovieFinder
    public void setMovieFinder(MovieFinder movieFinder) {
        this.movieFinder = movieFinder;
    }

    // business logic that actually uses the injected MovieFinder is omitted...
}
ApplicationContext支持它管理的bean的基于构造函数和基于setter的DI。 在已经通过构造函数方法注入了某些依赖项之后,它还支持基于setter的DI。 您可以以BeanDefinition的形式配置依赖项,并与PropertyEditor实例结合使用,以将属性从一种格式转换为另一种格式。 但是,大多数Spring用户并不直接(即以编程方式)使用这些类,而是使用XML bean定义,带注解的组件(即以@ Component,@ Controller等进行注解的类)或@Bean方法来处理这些类。 基于Java的@Configuration类。 然后将它们在内部转换为BeanDefinition实例,并用于加载整个Spring IoC容器实例。
由于可以混合使用基于构造函数的DI和基于setter的DI,因此将构造函数用于强制性依赖项并将setter方法或配置方法用于可选的依赖项是一个很好的经验。 注意,在setter方法上使用@Required批注可以使该属性成为必需的依赖项。 但是,最好使用带有参数的程序验证的构造函数注入。
Spring团队通常提倡构造函数注入,因为它使您可以将应用程序组件实现为不可变对象,并确保所需的依赖项不为null。 此外,注入构造函数的组件始终以完全初始化的状态返回到客户端(调用)代码。 附带说明一下,构造器包含大量的参数是不好的代码,这表明该类可能承担了太多的职责,应进行重构以更好地解决关注点分离问题。
Setter注入主要应仅用于可以在类中分配合理的默认值的可选依赖项。 否则,必须在代码使用依赖项的任何地方执行非空检查。 setter注入的一个好处是,setter方法使该类的对象在以后可以重新配置或重新注入。 因此,通过JMX MBean进行管理是用于setter注入的典型用例。
使用对特定类最有意义的DI。 有时,在处理您没有源代码的第三方类时,将为您做出选择。 例如,如果第三方类未公开任何setter方法,则构造函数注入可能是DI的唯一可用形式。
# 依赖解析过程
容器按如下方式执行bean依赖项解析:
使用描述所有bean的配置元数据创建和初始化ApplicationContext。 可以通过XML,Java代码或注解指定配置元数据。
对于每个bean,它的依赖关系都以属性、构造函数参数或静态工厂方法的参数的形式表示(如果您使用该方法而不是普通的构造函数)。当实际创建bean时,将向bean提供这些依赖项。
每个属性或构造函数参数都是要设置的实参,或者是对容器中另一个bean的引用。
作为值的每个属性或构造函数参数都将从其指定的格式转换为该属性或构造函数参数的实际类型。默认情况下,Spring可以将以字符串格式提供的值转换为所有内置类型,比如int、long、string、boolean等等。
在创建容器时,Spring容器会验证每个bean的配置。 但是,在实际创建Bean之前,不会设置Bean属性本身。 创建容器时,将创建具有单例作用域并设置为预先实例化(默认)的Bean。 作用域在Bean作用域中定义。 否则,仅在请求时才创建Bean。 创建和分配bean的依赖关系及其依赖关系(依此类推)时,创建bean可能会导致创建一个bean图。 请注意,这些依赖项之间的解析不匹配可能会在后期出现,即在第一次创建受影响的bean时。
如果主要使用构造函数注入,则可能会创建无法解析的循环依赖方案。
例如:A类通过构造函数注入需要B类的实例,而B类通过构造函数注入需要A类的实例。 如果您为将类A和B相互注入而配置了bean,则Spring IoC容器会在运行时检测到此循环引用,并抛出
BeanCurrentlyInCreationException。一种可能的解决方案是编辑某些类的源代码,这些类的源代码由setter而不是构造函数来配置。 或者,避免构造函数注入,而仅使用setter注入。 换句话说,尽管不建议这样做,但是您可以使用setter注入配置循环依赖项。
与典型情况(没有循环依赖关系)不同,Bean A和Bean B之间的循环依赖关系迫使其中一个Bean在完全初始化之前被注入另一个Bean(经典的“鸡与蛋”场景)。
通常,您可以信任Spring做正确的事。 它在容器加载时检测配置问题,例如对不存在的Bean的引用和循环依赖项。 Spring设置属性并尽可能晚地解决依赖关系--在实际创建bean时。 这意味着,如果创建对象或其依赖项之一有问题,则正确加载了Spring的容器以后可以在您请求对象时抛出异常-例如,bean会因不存在或无效属性而抛出异常。这样可能会延迟某些配置问题的可见性,所以这就是为什么默认情况下ApplicationContext实现会预先实例化单例bean的原因。 在实际需要这些bean之前需要花一些前期时间和内存来创建它们,您会在创建ApplicationContext时发现配置问题,而不是稍后。 您仍然可以覆盖此默认行为,以便单例bean延迟初始化,而不是预先实例化。
如果不存在循环依赖关系,则在将一个或多个协作Bean注入到从属Bean中时,每个协作Bean在注入到从属Bean中之前都已完全配置。 这意味着,如果bean A依赖于bean B,则Spring IoC容器会在对bean A调用setter方法之前完全配置beanB。换句话说,被实例化的bean(如果它不是预先实例化的单例) ),它的依赖项被设置,并调用了相关的生命周期方法(例如已配置的init方法或InitializingBean回调方法)。
# 依赖注入实例
下面的示例为基于setter的DI使用基于xml的配置元数据。Spring XML配置文件的一小部分指定了一些bean定义,如下所示
<bean id="exampleBean" class="examples.ExampleBean">
    <!-- setter injection using the nested ref element -->
    <property name="beanOne">
        <ref bean="anotherExampleBean"/>
    </property>

    <!-- setter injection using the neater ref attribute -->
    <property name="beanTwo" ref="yetAnotherBean"/>
    <property name="integerProperty" value="1"/>
</bean>

<bean id="anotherExampleBean" class="examples.AnotherBean"/>
<bean id="yetAnotherBean" class="examples.YetAnotherBean"/>
public class ExampleBean {

    private AnotherBean beanOne;

    private YetAnotherBean beanTwo;

    private int i;

    public void setBeanOne(AnotherBean beanOne) {
        this.beanOne = beanOne;
    }

    public void setBeanTwo(YetAnotherBean beanTwo) {
        this.beanTwo = beanTwo;
    }

    public void setIntegerProperty(int i) {
        this.i = i;
    }
}
在前面的示例中,将setter声明为与XML文件中指定的属性匹配。下面的示例使用基于构造函数的DI
<bean id="exampleBean" class="examples.ExampleBean">
    <!-- constructor injection using the nested ref element -->
    <constructor-arg>
        <ref bean="anotherExampleBean"/>
    </constructor-arg>

    <!-- constructor injection using the neater ref attribute -->
    <constructor-arg ref="yetAnotherBean"/>

    <constructor-arg type="int" value="1"/>
</bean>

<bean id="anotherExampleBean" class="examples.AnotherBean"/>
<bean id="yetAnotherBean" class="examples.YetAnotherBean"/>
public class ExampleBean {

    private AnotherBean beanOne;

    private YetAnotherBean beanTwo;

    private int i;

    public ExampleBean(
        AnotherBean anotherBean, YetAnotherBean yetAnotherBean, int i) {
        this.beanOne = anotherBean;
        this.beanTwo = yetAnotherBean;
        this.i = i;
    }
}
bean定义中指定的构造函数参数用作ExampleBean构造函数的参数。
现在考虑该示例的一个变体,在该变体中,不是使用构造函数,而是告诉Spring调用静态工厂方法以返回对象的实例:
<bean id="exampleBean" class="examples.ExampleBean" factory-method="createInstance">
    <constructor-arg ref="anotherExampleBean"/>
    <constructor-arg ref="yetAnotherBean"/>
    <constructor-arg value="1"/>
</bean>

<bean id="anotherExampleBean" class="examples.AnotherBean"/>
<bean id="yetAnotherBean" class="examples.YetAnotherBean"/>
public class ExampleBean {

    // a private constructor
    private ExampleBean(...) {
        ...
    }

    // a static factory method; the arguments to this method can be
    // considered the dependencies of the bean that is returned,
    // regardless of how those arguments are actually used.
    public static ExampleBean createInstance (
        AnotherBean anotherBean, YetAnotherBean yetAnotherBean, int i) {

        ExampleBean eb = new ExampleBean (...);
        // some other operations...
        return eb;
    }
}
静态工厂方法的参数由<constructor-arg />元素提供,与实际使用构造函数的情况完全相同。 factory方法返回的类的类型不必与包含静态工厂方法的类的类型相同(尽管在此示例中是)。 实例(非静态)工厂方法可以以基本上相同的方式使用(除了使用factory-bean属性代替class属性之外),因此在此不讨论这些细节。
# 1.4.2. 依赖配置详解
如上一节所述,您可以将bean属性和构造器参数定义为对容器中其他bean(协作者)的引用或内联定义的值。 Spring的基于XML的配置元数据为达到此目的在其<property />和<constructor-arg />元素中支持子元素类型。
# 直接值(原语,Strings等)
<property />元素的value属性将属性或构造器参数指定为人类可读的字符串表示形式。 Spring的转换服务用于将这些值从字符串转换为属性或参数的实际类型。 以下示例显示了设置的各种值:
<bean id="myDataSource" class="org.apache.commons.dbcp.BasicDataSource" destroy-method="close">
    <!-- results in a setDriverClassName(String) call -->
    <property name="driverClassName" value="com.mysql.jdbc.Driver"/>
    <property name="url" value="jdbc:mysql://localhost:3306/mydb"/>
    <property name="username" value="root"/>
    <property name="password" value="misterkaoli"/>
</bean>
下面的示例使用p-namespace进行更简洁的XML配置
<beans xmlns="http://www.springframework.org/schema/beans"
    xmlns:xsi="http://www.w3.org/2001/XMLSchema-instance"
    xmlns:p="http://www.springframework.org/schema/p"
    xsi:schemaLocation="http://www.springframework.org/schema/beans
    https://www.springframework.org/schema/beans/spring-beans.xsd">

    <bean id="myDataSource" class="org.apache.commons.dbcp.BasicDataSource"
        destroy-method="close"
        p:driverClassName="com.mysql.jdbc.Driver"
        p:url="jdbc:mysql://localhost:3306/mydb"
        p:username="root"
        p:password="misterkaoli"/>

</beans>
前面的XML更简洁。 但是,除非在创建bean定义时使用支持自动属性补全的IDE(例如IntelliJ IDEA或Eclipse的Spring Tools),否则错误是在运行时而不是编码时发现的。 强烈建议您使用此类IDE帮助开发。
您还可以配置java.util.Properties实例,如下所示:
<bean id="mappings"
    class="org.springframework.context.support.PropertySourcesPlaceholderConfigurer">

    <!-- typed as a java.util.Properties -->
    <property name="properties">
        <value>
            jdbc.driver.className=com.mysql.jdbc.Driver
            jdbc.url=jdbc:mysql://localhost:3306/mydb
        </value>
    </property>
</bean>
Spring容器通过使用JavaBeans PropertyEditor机制将<value />元素内的文本转换为java.util.Properties实例。 这很方便,并且是Spring团队偏爱使用嵌套的<value />元素而不是value属性的几个地方之一。
idref元素
idref元素只是将容器中另一个bean的id(字符串值-不是引用)传递给<constructor-arg />或<property />元素的一种防错方法。 以下示例显示了如何使用它:
<bean id="theTargetBean" class="..."/>

<bean id="theClientBean" class="...">
    <property name="targetName">
        <idref bean="theTargetBean"/>
    </property>
</bean>
前面的bean定义代码片段(在运行时)与下面的代码片段完全等价
<bean id="theTargetBean" class="..." />

<bean id="client" class="...">
    <property name="targetName" value="theTargetBean"/>
</bean>
第一种形式优于第二种形式,因为使用idref标记可使容器在部署时验证所引用的名为bean的实际存在。 在第二个变体中,不对传递给客户端bean的targetName属性的值执行验证。 拼写错误仅在实际实例化客户端bean时才发现(最有可能导致致命的结果)。 如果客户端Bean是原型Bean,则可能在部署容器很久之后才发现此错误和所产生的异常。
这里传的都是字面量,而不是bean引用,idref与value的区别只是前者会做校验。
在4.0 Bean XSD中不再支持idref元素上的local属性,因为它不再提供常规Bean引用上的值(这里不好理解,之前local属性的作用是:只能指定与当前配置的对象在同一个配置文件的对象定义的名称,所以这里认为5.3.2把这个属性废弃就行了)。 升级到4.0模式时,将现有的idref local属性更改为idref bean。
<idref />元素带来价值的一个常见地方(至少在Spring 2.0之前的版本中)是在ProxyFactoryBean bean定义中配置AOP拦截器。 在指定拦截器名称时使用<idref />元素可防止您拼写错误的拦截器ID。
# 引用其他Bean
ref元素是<constructor-arg />或<property />定义元素内的最后一个元素。 在这里,您将Bean的指定属性的值设置为对容器管理的另一个Bean(协作者)的引用。 引用的bean是要设置其属性的bean的依赖,并且在设置属性之前根据需要对其进行初始化。 (如果协作者是单例bean,则它可能已经由容器初始化了。)所有引用最终都是对另一个对象的引用。 作用于和验证取决于您是通过bean还是parent指定另一个对象的ID或名称。
通过<ref />标记的bean属性指定目标bean是最通用的形式,并且允许创建对同一容器或父容器中任何bean的引用,而不管它是否在同一XML文件中。 bean属性的值可以与目标bean的id属性相同,也可以与目标bean的name属性中的值之一相同。 下面的示例演示如何使用ref元素:
<ref bean="someBean"/>
通过parent属性指定目标Bean将创建对当前容器的父容器中的Bean的引用。 parent属性的值可以与目标Bean的id属性或目标Bean的名称属性中的值之一相同。 目标Bean必须位于当前容器的父容器中。 在容器具有层次结构并且要包装一个与在父容器中已存在的bean具有相同名称的代理bean时,才应该使用parent属性。 以下清单显示了如何使用parent属性:
<!-- in the parent context -->
<bean id="accountService" class="com.something.SimpleAccountService">
    <!-- insert dependencies as required as here -->
</bean>
<!-- in the child (descendant) context -->
<bean id="accountService" <!-- bean name is the same as the parent bean -->
    class="org.springframework.aop.framework.ProxyFactoryBean">
    <property name="target">
        <ref parent="accountService"/> <!-- notice how we refer to the parent bean -->
    </property>
    <!-- insert other configuration and dependencies as required here -->
</bean>
ref元素的
local属性在4.0 Bean XSD中不再受支持,因为它不再提供常规Bean引用上的值。 升级到4.0模式时,将现有的ref local更改为ref bean。
# 内部Beans
<property />或<constructor-arg />元素内的<bean />元素定义了一个内部bean,如以下示例所示:
<bean id="outer" class="...">
    <!-- instead of using a reference to a target bean, simply define the target bean inline -->
    <property name="target">
        <bean class="com.example.Person"> <!-- this is the inner bean -->
            <property name="name" value="Fiona Apple"/>
            <property name="age" value="25"/>
        </bean>
    </property>
</bean>
内部bean定义不需要定义ID或名称。 如果指定,则容器不使用该值作为标识符。 容器在创建时也会忽略scope标志,因为内部Bean始终是匿名的,并且始终与外部Bean一起创建。 不能独立访问内部bean,也不能将它们注入到协作bean中(除了封装的bean)。
# 集合
<list />,<set />,<map />和<props />元素分别设置Java集合类型的List,Set,Map和Properties的属性和参数。 以下示例显示了如何使用它们:
<bean id="moreComplexObject" class="example.ComplexObject">
    <!-- results in a setAdminEmails(java.util.Properties) call -->
    <property name="adminEmails">
        <props>
            <prop key="administrator">administrator@example.org</prop>
            <prop key="support">support@example.org</prop>
            <prop key="development">development@example.org</prop>
        </props>
    </property>
    <!-- results in a setSomeList(java.util.List) call -->
    <property name="someList">
        <list>
            <value>a list element followed by a reference</value>
            <ref bean="myDataSource" />
        </list>
    </property>
    <!-- results in a setSomeMap(java.util.Map) call -->
    <property name="someMap">
        <map>
            <entry key="an entry" value="just some string"/>
            <entry key ="a ref" value-ref="myDataSource"/>
        </map>
    </property>
    <!-- results in a setSomeSet(java.util.Set) call -->
    <property name="someSet">
        <set>
            <value>just some string</value>
            <ref bean="myDataSource" />
        </set>
    </property>
</bean>
其中,map的key或者value,或set的value,可以是以下任一元素:
bean | ref | idref | list | set | map | props | value | null
集合合并
Spring容器还支持合并集合。 应用程序开发人员可以定义父<list />,<map />,<set />或<props />元素,并具有从父集合继承并覆盖值的子元素,,
下面的示例演示了集合合并:
<beans>
    <bean id="parent" abstract="true" class="example.ComplexObject">
        <property name="adminEmails">
            <props>
                <prop key="administrator">administrator@example.com</prop>
                <prop key="support">support@example.com</prop>
            </props>
        </property>
    </bean>
    <bean id="child" parent="parent">
        <property name="adminEmails">
            <!-- the merge is specified on the child collection definition -->
            <props merge="true">
                <prop key="sales">sales@example.com</prop>
                <prop key="support">support@example.co.uk</prop>
            </props>
        </property>
    </bean>
<beans>
注意子bean定义的adminEmails属性的<props />元素上使用merge = true属性。 当子bean由容器解析并实例化后,生成的实例具有adminEmails Properties集合,其中包含将子bean的adminEmails集合与父bean的adminEmails集合合并的结果。 以下清单显示了结果:
administrator=administrator@example.com
sales=sales@example.com
support=support@example.co.uk
子Properties集合的值集继承了父<props />的所有属性,子属性的support值覆盖了父集合中的值。
此合并行为类似地适用于<list />,<map />和<set />集合类型。 在<list />元素的特定情况下,将维护与List集合类型关联的语义(即,值的有序集合的概念)。 父级的值先于子级列表的所有值。 对于Map,Set和Properties集合类型,不存在排序。 因此,对于容器内部使用的关联Map,Set和Properties实现类型的集合,没有有效的排序语义。
集合合并的限制
您不能合并不同的集合类型(如Map和List)。如果您尝试这样做,则会抛出适当的异常。必须在下层的继承的子集合定义上指定merge属性。在父集合定义上指定merge属性是多余的,并且不会导致所需的合并。
强类型的集合
随着Java 5中泛型类型的引入,您可以使用强类型集合。 也就是说,可以声明一个Collection类型,使其只能包含(例如)String元素。 如果使用Spring将强类型的Collection依赖注入到Bean中,则可以利用Spring的类型转换支持,以便在将强类型的Collection实例的元素添加到Bean中之前,先将其转换为适当的类型。 以下Java类和bean定义显示了如何执行此操作:
public class SomeClass {

    private Map<String, Float> accounts;

    public void setAccounts(Map<String, Float> accounts) {
        this.accounts = accounts;
    }
}
<beans>
    <bean id="something" class="x.y.SomeClass">
        <property name="accounts">
            <map>
                <entry key="one" value="9.99"/>
                <entry key="two" value="2.75"/>
                <entry key="six" value="3.99"/>
            </map>
        </property>
    </bean>
</beans>
当准备注入something bean的accounts属性时,可以通过反射获得有关强类型Map <String,Float>的元素类型的泛型信息。 因此,Spring的类型转换基础架构将各种值元素识别为Float类型,并将字符串值(9.99、2.75和3.99)转换为实际的Float类型。
# Null和空String
Spring将属性之类的空参数视为空字符串。以下基于xml的配置元数据片段将email属性设置为空字符串值("")。
<bean class="ExampleBean">
    <property name="email" value=""/>
</bean>
等价于:
exampleBean.setEmail("");
<null />元素处理空值。 以下清单显示了一个示例:
<bean class="ExampleBean">
    <property name="email">
        <null/>
    </property>
</bean>
等价于:
exampleBean.setEmail(null);
# p-namespace
通过p-namespace,您可以使用bean元素的属性(而不是嵌套的<property />元素)来描述协作bean的属性值,或同时使用这两者。
Spring支持带有命名空间的可扩展配置格式,这些名称空间基于XML Schema定义。 本章讨论的bean配置格式在XML Schema文档中定义。 但是,p-namespace未在XSD文件中定义,仅存在于Spring Core中。
下面的示例显示了两个解析到相同结果的XML片段(第一个使用标准XML格式,第二个使用p-namespace):
<beans xmlns="http://www.springframework.org/schema/beans"
    xmlns:xsi="http://www.w3.org/2001/XMLSchema-instance"
    xmlns:p="http://www.springframework.org/schema/p"
    xsi:schemaLocation="http://www.springframework.org/schema/beans
        https://www.springframework.org/schema/beans/spring-beans.xsd">

    <bean name="classic" class="com.example.ExampleBean">
        <property name="email" value="someone@somewhere.com"/>
    </bean>

    <bean name="p-namespace" class="com.example.ExampleBean"
        p:email="someone@somewhere.com"/>
</beans>
该示例显示了bean定义中的p-namespace中的一个名为email的属性。这告诉Spring包含一个属性声明。如前所述,p-namespace没有schema 定义,因此可以将属性的名称设置为属性名。
下一个示例包括另外两个bean定义,它们都引用了另一个bean:
<beans xmlns="http://www.springframework.org/schema/beans"
    xmlns:xsi="http://www.w3.org/2001/XMLSchema-instance"
    xmlns:p="http://www.springframework.org/schema/p"
    xsi:schemaLocation="http://www.springframework.org/schema/beans
        https://www.springframework.org/schema/beans/spring-beans.xsd">

    <bean name="john-classic" class="com.example.Person">
        <property name="name" value="John Doe"/>
        <property name="spouse" ref="jane"/>
    </bean>

    <bean name="john-modern"
        class="com.example.Person"
        p:name="John Doe"
        p:spouse-ref="jane"/>

    <bean name="jane" class="com.example.Person">
        <property name="name" value="Jane Doe"/>
    </bean>
</beans>
此示例不仅包括使用p-namespace的属性值,而且还使用特殊格式来声明属性引用。 第一个bean定义使用<property name="spouse" ref="jane" />创建从bean john到bean jane的引用,而第二个bean定义使用p:spouse-ref="jane"属性做相同的事情。 在这种情况下,spouse是属性名称,而-ref部分表示这不是一个直接值,而是对另一个bean的引用。
p-namespace不像标准XML格式那么灵活。例如,声明属性引用的格式与以Ref结尾的属性发生冲突(我验证仍能正确解析),而标准XML格式没有。我们建议您谨慎地选择自己的方法,并将其告知团队成员,以避免生成同时使用这三种方法的XML文档。
# c-namespace
与p-namespace的XML快捷方式类似,Spring 3.1中引入的c-namespace允许内联属性来配置构造函数参数,而不是嵌套的constructor-arg元素。
下面的示例使用c:namespace来做和基于构造器的依赖注入相同的事情
<beans xmlns="http://www.springframework.org/schema/beans"
    xmlns:xsi="http://www.w3.org/2001/XMLSchema-instance"
    xmlns:c="http://www.springframework.org/schema/c"
    xsi:schemaLocation="http://www.springframework.org/schema/beans
        https://www.springframework.org/schema/beans/spring-beans.xsd">

    <bean id="beanTwo" class="x.y.ThingTwo"/>
    <bean id="beanThree" class="x.y.ThingThree"/>

    <!-- traditional declaration with optional argument names -->
    <bean id="beanOne" class="x.y.ThingOne">
        <constructor-arg name="thingTwo" ref="beanTwo"/>
        <constructor-arg name="thingThree" ref="beanThree"/>
        <constructor-arg name="email" value="something@somewhere.com"/>
    </bean>

    <!-- c-namespace declaration with argument names -->
    <bean id="beanOne" class="x.y.ThingOne" c:thingTwo-ref="beanTwo"
        c:thingThree-ref="beanThree" c:email="something@somewhere.com"/>

</beans>
c:命名空间使用与p: 相同的约定(bean引用的末尾是-ref),通过它们的名称设置构造器参数。类似地,它需要在XML文件中声明,即使它不是在XSD模式中定义的(它存在于Spring Core中)。
对于极少数情况下无法使用构造函数参数名称的情况(通常,如果字节码是在没有调试信息的情况下编译的),则可以使用参数索引,如下所示:
<!-- c-namespace index declaration -->
<bean id="beanOne" class="x.y.ThingOne" c:_0-ref="beanTwo" c:_1-ref="beanThree"
    c:_2="something@somewhere.com"/>
由于XML语法的原因,索引表示法需要有前导符号 "_",因为XML属性名不能以数字开头(尽管有些ide允许)。
<constructor-arg>元素也可以使用相应的索引表示法,但不常用,因为在那里声明的普通顺序通常就足够了。
# 复合属性名
在设置bean属性时,可以使用复合或嵌套属性名,只要路径的所有组件(最终属性名除外)都不是null的。考虑下面的bean定义
<bean id="something" class="things.ThingOne">
    <property name="fred.bob.sammy" value="123" />
</bean>
something bean有一个fred属性,它有一个bob属性,bob还有一个sammy属性,最后的sammy属性被设置为值123。为了正常解析,在构造bean之后,something的fred属性和fred的bob属性不能为空。否则,抛出NullPointerException。
<?xml version="1.0" encoding="UTF-8"?>
<beans xmlns="http://www.springframework.org/schema/beans"
       xmlns:xsi="http://www.w3.org/2001/XMLSchema-instance" xmlns:p="http://www.springframework.org/schema/p"
       xsi:schemaLocation="http://www.springframework.org/schema/beans http://www.springframework.org/schema/beans/spring-beans.xsd">
<bean id="student" class="pre.chl.spring.core.Student" p:ref-ref="courseRef">
    <!--如果把下面这行注释了就会抛异常NullValueInNestedPathException
	如果不注释,score最后的值也是99,可见p命名空间和原始标签混用可能会出现冲	突,应该只会选原始标签元素去解析-->
    <!--<property name="ref" ref="courseRef"/>-->
    <property name="ref.score" value="99"/>
</bean>
    <bean id="courseRef" class="pre.chl.spring.core.Course" p:score="100"/>
</beans>
# 1.4.3. depends-on
如果一个bean是另一个bean的依赖项,则通常意味着将一个bean设置为另一个bean的属性。 通常,您可以使用基于XML的配置元数据中的<ref />元素来完成此操作。 但是,有时bean之间的依赖不太直接。 一个例子是当要触发类中的静态初始化器的时候,例如数据库驱动程序注册。 depends-on可以显式地强制初始化一个或多个使用该元素引用的bean。 下面的示例使用depends-on属性来表示对单例bean的依赖关系:
<bean id="beanOne" class="ExampleBean" depends-on="manager"/>
<bean id="manager" class="ManagerBean" />
要表达对多个bean的依赖关系,请提供一个bean名称的列表作为depends-on属性的值(逗号,空格和分号都是合法 的分隔符):
<bean id="beanOne" class="ExampleBean" depends-on="manager,accountDao">
    <property name="manager" ref="manager" />
</bean>

<bean id="manager" class="ManagerBean" />
<bean id="accountDao" class="x.y.jdbc.JdbcAccountDao" />
depends-on既可以指定初始化时依赖项,在单例bean的情况下,也可以指定相应的销毁时依赖项。在销毁给定bean本身之前,首先销毁depends-on的bean。因此,depends-on还可以控制关闭顺序。
# 1.4.4. 懒加载Beans
默认情况下,作为初始化过程的一部分,ApplicationContext实现会尽早创建和配置所有单例bean。 通常,这种预初始化是可取的,因为与数小时甚至数天后相比,会立即发现配置或环境参数中的错误。 如果您不希望这样做,则可以通过将bean定义标记为延迟初始化来阻止单例bean的预实例化。 延迟初始化的bean告诉IoC容器在首次请求时(而不是在启动时)才创建一个bean实例。
在XML中,此行为由<bean />元素上的lazy-init属性控制,如以下示例所示:
<bean id="lazy" class="com.something.ExpensiveToCreateBean" lazy-init="true"/>
<bean name="not.lazy" class="com.something.AnotherBean"/>
ApplicationContext使用上述配置时,当ApplicationContext启动,lazy bean不会立即预实例化,not.lazy bean被尽早地预实例化。
但是,当延迟初始化的bean是未延迟初始化的单例bean的依赖项时,ApplicationContext会在启动时创建延迟初始化的bean,因为它必须满足单例的依赖关系。 延迟初始化的bean被注入到其他未延迟初始化的单例bean中。
您还可以使用<beans />元素上的default-lazy-init属性在容器级别控制延迟初始化,如以下示例所示:
<beans default-lazy-init="true">
    <!-- no beans will be pre-instantiated... -->
</beans>
# 1.4.5. 自动装配协作者
Spring容器可以自动装配协作bean之间的关系。您可以通过检查ApplicationContext的内容,让Spring为您的bean自动解析协作者(其他bean)。自动装配具有以下优点:
自动装配可以显著减少指定属性或构造器参数的需要。(本章其他地方讨论的其他机制,比如bean模板,在这方面也很有价值。)
随着对象的更新,自动装配可以更新配置。 例如,如果需要将依赖项添加到类中,则无需修改配置即可自动满足该依赖项。 因此,自动装配在开发过程中特别有用,而不必否定在代码库变得更稳定时切换到显式装配的选择。
使用基于XML的配置元数据时(请参阅“依赖注入”),可以使用<bean />元素的autowire属性为bean定义指定自动装配模式。 自动装配功能具有四种模式。 您可以为每个bean指定自动装配,并选择要自动装配的模式。 下表描述了四种自动装配模式:
| Mode | Explanation |
|---|---|
no | (默认)不自动装配。Bean引用必须由ref元素定义。对于较大的部署,不建议更改默认设置,因为显式地指定协作者可以提供更好的控制和透明度。在某种程度上,它记录了系统的结构。 |
byName | 按属性名称自动装配。 Spring查找与需要自动装配的属性同名的bean。 例如,如果一个bean定义被设置为按名称自动装配,并且包含一个master属性(即,它具有setMaster(..)方法),那么Spring将查找一个名为master的bean定义并使用它来设置该属性。 |
byType | 如果容器中恰好存在该属性类型的一个bean,则自动装配该属性。如果存在多个,将抛出一个致命异常,这表明您不能对该bean使用byType自动装配。如果没有匹配的bean,则什么也不会发生(属性没有设置)。 |
constructor | 与byType类似,但适用于构造函数参数。 如果容器中不存在构造函数参数类型的一个bean,则将引发致命错误。 |
使用byType或构造器自动装配模式,您可以装配数组和集合类。 在这种情况下,将提供容器中与预期类型匹配的所有自动装配候选,以满足依赖。 如果期望的key类型为String,则可以自动装配强类型Map实例。 自动装配的Map实例的值包括与期望类型匹配的所有bean实例,并且Map实例的key包含相应的bean名称。
# 自动装配的局限和缺点
当在项目中一致使用自动装配时,自动装配效果最佳。 如果不全部使用自动装配,则可能会使开发人员使用自动装配仅来装配一个或两个Bean定义而感到困惑。
考虑自动装配的局限性和缺点:
property和constructor-arg设置中的显式依赖总是覆盖自动装配。您不能自动装配简单的属性,如原语、Strings和Classes(以及这些简单属性的数组)。这种限制是由设计造成的。自动装配不如显示装配严格。尽管如此,正如前面的表中所指出的那样,在出现可能产生意外结果的歧义时,Spring会谨慎地避免猜测。spring管理的对象之间的关系不再显式地记录。
从Spring容器生成文档的工具可能无法使用装配信息。
容器内的多个bean定义可能与要自动装配的setter方法或构造器参数指定的类型匹配。 对于数组,集合或Map实例,这不一定是问题。 但是,对于需要单个值的依赖项,不会随便解决此歧义。 如果没有唯一的bean定义可用,则会引发异常。
在后一种情况下,您有几种选择:
使用显示装配而不是自动装配
通过将其bean的
autowire-candidate属性设置为false,避免自动装配bean,如下一节所述。通过将其
<bean />元素的primary属性设置为true,将定义的单个bean指定为主要候选对象。实现基于注解的配置提供的更细粒度的控制。
# 从自动装配中排除Bean
在每个bean的基础上,您可以从自动装配中排除一个bean。 使用Spring的XML格式,将<bean />元素的autowire-candidate属性设置为false。 容器使特定的bean对自动装配基础架构不可用(包括注解式的配置,例如@Autowired)。
autowire-candidate属性被设计为只影响基于类型的自动装配。它不影响通过名称进行的显式引用,即使指定的bean没有被标记为自动装配候选对象,也会解析该引用。因此,如果名称匹配,按名称自动装配仍然会注入一个bean。
您还可以基于与Bean名称的模式匹配来限制自动装配候选项。 顶级<beans />元素在其default-autowire-candidates属性中接受一个或多个模式。 例如,要将自动装配候选状态限制为名称以Repository结尾的任何bean,请提供* Repository值。 要提供多种模式,请在以逗号分隔的列表中定义它们。 Bean定义的autowire-candidate属性的显式值true或false始终优先。 对于此类bean,模式匹配规则不适用。
这些技术对于那些您不希望通过自动装配被注入到其他bean中的bean非常有用。这并不意味着不能使用自动装配来配置被排除的bean本身。相反,bean本身并不是自动装配其他bean的候选对象。
# 1.4.6. 方法注入
在大多数应用场景中,容器中的大多数bean是单例的。 当单例Bean需要与另一个单例Bean协作或非单例Bean需要与另一个非单例Bean协作时,通常可以通过将一个Bean定义为另一个Bean的属性来处理依赖。 当bean的生命周期不同时会出现问题。 假设单例bean A可能需要使用非单例(原型)bean B,也许是在A的每个方法调用时使用的。容器仅创建一次单例bean A,因此只有一次机会来设置属性。 每次需要一个bean B时,容器都无法为bean A提供一个新的bean B实例。
一个解决方案是放弃一些控制反转。您可以通过实现ApplicationContextAware接口使bean A感知到容器,并在bean A每次需要bean B实例时向容器发出getBean(“B”)调用来获得(通常是新的)。下面的示例演示了这种方法:
// a class that uses a stateful Command-style class to perform some processing
package fiona.apple;

// Spring-API imports
import org.springframework.beans.BeansException;
import org.springframework.context.ApplicationContext;
import org.springframework.context.ApplicationContextAware;

public class CommandManager implements ApplicationContextAware {

    private ApplicationContext applicationContext;

    public Object process(Map commandState) {
        // grab a new instance of the appropriate Command
        Command command = createCommand();
        // set the state on the (hopefully brand new) Command instance
        command.setState(commandState);
        return command.execute();
    }

    protected Command createCommand() {
        // notice the Spring API dependency!
        return this.applicationContext.getBean("command", Command.class);
    }

    public void setApplicationContext(
            ApplicationContext applicationContext) throws BeansException {
        this.applicationContext = applicationContext;
    }
}
前面的情况是不可取的,因为业务代码能够感知Spring框架并与之耦合。方法注入是Spring IoC容器的一个高级特性,它让您很好地处理这个用例。
您可以在这篇博客文章 (opens new window)中阅读更多关于方法注入的探讨。
# LookUp方法注入
Lookup 方法注入是容器重写容器管理的Bean上的方法并返回容器中另一个Bean的功能。 查找通常涉及原型bean,如上一节中所述。 Spring框架通过使用CGLIB库中的字节码生成功能来动态生成覆盖该方法的子类,从而实现此方法注入。
为了使此动态子类起作用,Spring Bean容器子类的类型也不能是final,而要覆盖的方法也不能是final。
对具有抽象方法的类进行单元测试需要您自己对该类进行子类化,并提供该抽象方法的stub实现。
组件扫描也需要具体的方法,这需要具体的类。
另一个关键限制是,查找方法不适用于工厂方法,尤其不适用于配置类中的@Bean方法,因为在这种情况下,容器不负责创建实例,因此无法创建运行时生成的 动态子类。
对于前面的代码片段中的CommandManager类,Spring容器动态地重写createCommand()方法。 如重做的示例所示,CommandManager类没有任何Spring依赖项:
package fiona.apple;

// no more Spring imports!

public abstract class CommandManager {

    public Object process(Object commandState) {
        // grab a new instance of the appropriate Command interface
        Command command = createCommand();
        // set the state on the (hopefully brand new) Command instance
        command.setState(commandState);
        return command.execute();
    }

    // okay... but where is the implementation of this method?
    protected abstract Command createCommand();
}
在包含要注入的方法的客户端类(在本例中为CommandManager)中,要注入的方法需要以下形式的签名:
<public|protected> [abstract] <return-type> theMethodName(no-arguments);
如果方法是抽象的,则动态生成的子类实现该方法。否则,动态生成的子类会覆盖在原始类中定义的具体方法。考虑以下示例:
<!-- a stateful bean deployed as a prototype (non-singleton) -->
<bean id="myCommand" class="fiona.apple.AsyncCommand" scope="prototype">
    <!-- inject dependencies here as required -->
</bean>

<!-- commandProcessor uses statefulCommandHelper -->
<bean id="commandManager" class="fiona.apple.CommandManager">
    <lookup-method name="createCommand" bean="myCommand"/>
</bean>
id为commandManager的bean在需要myCommand bean的新实例时调用自己的createCommand()方法。如果确实需要部署myCommand bean,那么必须小心地将其作为原型部署。如果是单例,则每次返回myCommand bean的相同实例。
另外,在基于注解的组件模式中,您可以通过@Lookup注解声明一个查找方法,如下面的示例所示:
public abstract class CommandManager {

    public Object process(Object commandState) {
        Command command = createCommand();
        command.setState(commandState);
        return command.execute();
    }

    @Lookup("myCommand")
    protected abstract Command createCommand();
}
或者,更常用的是,您可以依赖于根据查找方法声明的返回类型解析目标bean
public abstract class CommandManager {

    public Object process(Object commandState) {
        MyCommand command = createCommand();
        command.setState(commandState);
        return command.execute();
    }

    @Lookup
    protected abstract MyCommand createCommand();
}
请注意,通常应使用具体的stub实现声明此类带注解的查找方法,以使其与Spring的组件扫描规则(默认情况下抽象类会被忽略)兼容。 此限制不适用于显式注册或显式导入的Bean类。
访问作用域不同的目标bean的另一种方法是ObjectFactory / Provider注入点。
ServiceLocatorFactoryBean(在org.springframework.beans.factory.config包中)也很有用。
# 任意方法替换
与查找方法注入相比,方法注入的一种不太有用的形式是能够用另一种方法实现替换托管bean中的任意方法。 您可以放心地跳过本节的其余部分,直到您真正需要此功能为止。
借助基于XML的配置元数据,您可以使用replaced-method元素将现有的方法实现替换为另一个。 考虑以下类,该类具有一个我们要覆盖的名为computeValue的方法:
public class MyValueCalculator {

    public String computeValue(String input) {
        // some real code...
    }

    // some other methods...
}
一个实现org.springframework.beans.factory.support.MethodReplacer接口的类提供了新的方法定义,如以下示例所示:
/**
 * meant to be used to override the existing computeValue(String)
 * implementation in MyValueCalculator
 */
public class ReplacementComputeValue implements MethodReplacer {

    public Object reimplement(Object o, Method m, Object[] args) throws Throwable {
        // get the input value, work with it, and return a computed result
        String input = (String) args[0];
        ...
        return ...;
    }
}
用于部署原始类并指定方法重写的Bean定义类似于以下示例:
<bean id="myValueCalculator" class="x.y.z.MyValueCalculator">
    <!-- arbitrary method replacement -->
    <replaced-method name="computeValue" replacer="replacementComputeValue">
        <arg-type>String</arg-type>
    </replaced-method>
</bean>

<bean id="replacementComputeValue" class="a.b.c.ReplacementComputeValue"/>
您可以在<replaced-method />元素内使用一个或多个<arg-type />元素来指示被覆盖的方法的方法签名。 仅当方法重载且类中存在多个变体时,才需要对参数签名。 为了方便起见,参数的类型字符串可以是完全限定类型名称的子字符串。 例如,以下所有都匹配java.lang.String:
java.lang.String
String
Str
因为参数的数量通常足以区分每个可能的选择,所以通过让您仅键入与参数类型匹配的最短字符串,此快捷方式可以节省很多输入。
# 1.5. Bean作用域
创建一个bean定义时,将创建一个配置,该配置用于创建该bean定义所定义的类的实例。 bean定义是配置的思想很重要,因为它意味您可以从一个配置中创建一个类的许多对象实例。
您不仅可以控制要插入到从特定bean定义创建的对象中的各种依赖项和配置值,还可以控制从特定bean定义创建的对象的作用域。 这种方法功能强大且灵活,因为您可以选择通过配置创建的对象的作用域,而不必在Java类级别上bake(这里不知道如何翻译)对象的作用域。 可以将Bean定义为部署在多个作用域之一中。 Spring框架支持六个作用域,其中四个只有在使用Web感知的ApplicationContext时才可用。 您还可以创建自定义作用域。
| Scope | Description |
|---|---|
| singleton (opens new window) | (默认值)将每个Spring IoC容器的单个bean定义作用域限定为单个对象实例。 |
| prototype (opens new window) | 将单个bean定义的作用域限定为任意数量的对象实例。 |
| request (opens new window) | 将单个bean定义的作用域限定为单个HTTP请求的生命周期内。 也就是说,每个HTTP请求都有一个自己的bean实例,它是在单个bean定义的基础上创建的。 仅在web感知的Spring ApplicationContext上下文中有效。 |
| session (opens new window) | 将单个bean定义的作用域限定为HTTP session的生命周期内。 仅在web感知的Spring ApplicationContext上下文中有效。 |
| application (opens new window) | 将单个bean定义的作用域限定为ServletContext的生命周期内。 仅在web感知的Spring ApplicationContext上下文中有效。 |
| websocket (opens new window) | 将单个bean定义的作用域限定为WebSocket的生命周期内。 仅在web感知的Spring ApplicationContext上下文中有效。 |
从Spring 3.0开始,线程作用域可用,但默认情况下未注册。 有关更多信息,请参见SimpleThreadScope (opens new window)文档。 有关如何注册此或任何其他自定义作用域的说明,请参阅自定义作用域。
# 1.5.1. 单例作用域
一个单例bean只有一个共享实例被管理,所有对具有一个或多个与该bean定义匹配的ID的bean的请求都会导致Spring容器返回一个特定的bean实例。
换句话说,当您定义一个bean定义并将其定义为单例时,Spring IoC容器将为该bean定义所定义的对象创建一个实例。 该单个实例存储在此类单例bean的缓存中,并且对该命名bean的所有后续请求和引用都返回缓存的对象。 下图显示了单例作用域的工作方式:
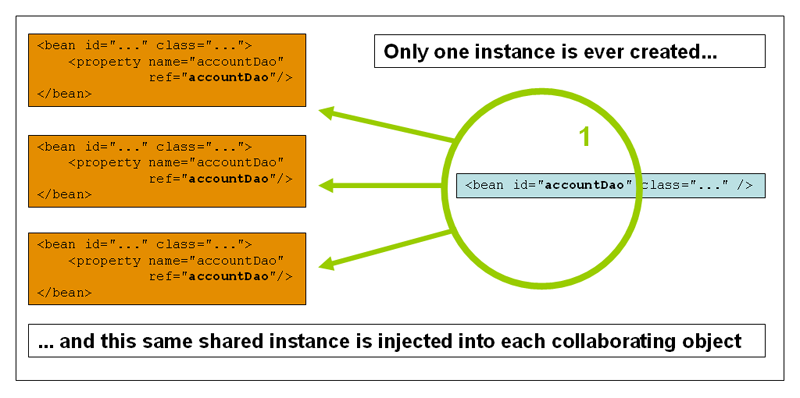
Spring的单例bean概念与《Gang of Four (GoF)》一书中定义的单例模式不同。 GoF中的单例对对象的作用域进行硬编码,以使每个ClassLoader只能创建一个特定类的一个实例。 最好将Spring单例作用域描述为每个容器和每个bean。 这意味着,如果您在单个Spring容器中为特定类定义一个bean,则Spring容器将创建该bean定义所定义的类的一个且只有一个实例。 单例作用域是Spring中的默认作用域。 要在XML中定义单例bean,可以如以下示例所示定义bean:
<bean id="accountService" class="com.something.DefaultAccountService"/>

<!-- the following is equivalent, though redundant (singleton scope is the default) -->
<bean id="accountService" class="com.something.DefaultAccountService" scope="singleton"/>
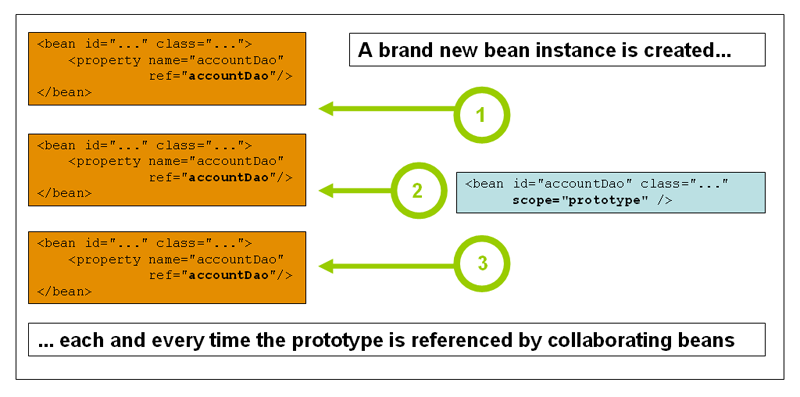
# 1.5.2. 原型作用域
每次请求特定bean时,非单例的原型作用域都会导致创建一个新的bean实例。 也就是说,该Bean被注入到另一个Bean中,或者您可以通过容器上的getBean()方法调用来请求它。 通常,应将原型作用域用于所有有状态的Bean,将单例作用域用于无状态的Bean。
下面的图表说明了Spring原型作用域
(数据访问对象(DAO)通常不被配置为原型,因为典型的DAO不持有任何会话状态。重用单例图的核心对我们来说更容易。)
下面的示例在XML中将bean定义原型:
<bean id="accountService" class="com.something.DefaultAccountService" scope="prototype"/>
与其他作用域相反,Spring不管理原型Bean的完整生命周期。 容器实例化,配置或组装原型对象,然后将其交给客户端,而无需保持对该原型实例的进一步记录。 因此,尽管无论在什么作用于下都会在所有对象上调用初始化生命周期回调方法,但对于原型,则不会调用已配置的销毁生命周期回调。 客户端代码必须清除原型作用域内的对象,并释放原型Bean拥有的昂贵资源。 为了使Spring容器释放原型作用下的bean所拥有的资源,请尝试使用自定义bean后置处理器,该处理器包含对需要清理的bean的引用。
在某些方面,Spring容器在原型作用域Bean方面的角色是Java new运算符的替代。 超过该点(也就是new之后)的所有生命周期管理必须由客户端处理。 (有关Spring容器中bean的生命周期的详细信息,请参阅生命周期回调。)
# 1.5.3. 包含原型bean引用的单例beans
当您使用对原型bean有依赖性的单例作用域Bean时,请注意,依赖关系在实例化时解析。 因此,如果将依赖的原型bean依赖项注入到单例bean中,则将实例化新的原型bean,然后将依赖项注入到单例bean中。 原型实例是曾经提供给单例bean的唯一实例。
但是,假设您希望单例作用域的bean在运行时重复获取原型作用域的bean的新实例。 您不能将原型作用域的bean依赖注入到您的单例bean中,因为当Spring容器实例化单例bean并解析并注入其依赖项时,该注入仅发生一次。 如果在运行时不止一次需要原型bean的新实例,请参见[方法注入](###1.4.6. 方法注入)。
# 1.5.4. Request, Session, Application, and WebSocket 作用域
只有当您使用web感知的Spring ApplicationContext实现(如XmlWebApplicationContext)时,request,session, application, 和websocket作用域才可用。如果在常规的Spring IoC容器(如ClassPathXmlApplicationContext)中使用这些作用域,则会抛出一个未知bean作用域的IllegalStateException。
# 初始Web配置
为了支持request,session,application,websocket这些基于web的bean作用域,需要在定义bean前做一些初始化配置(singleton,prototype标准作用域不是必须的)。
如和完成这些初始化步骤取决于你的Servlet环境。
如果您在 Spring Web MVC 中访问以上作用域 bean,实际上是在 Spring DispatcherServlet 处理的请求中,则不需要特殊设置。DispatcherServlet 已经暴露了所有相关的状态。
如果你用的是Servlet2.5的web容器,在Spring的DispatcherServlet外部处理请求(例如JSF或者Struts),你需要注册org.springframework.web.context.request.RequestContextListener (ServletRequestListener.Servlet 3.0+),也可以用WebApplicationInitializer接口以编程方式实现,或者对于更老的容器来说,添加以下声明在web.xml文件中
<web-app>
    ...
    <listener>
        <listener-class>
            org.springframework.web.context.request.RequestContextListener
        </listener-class>
    </listener>
    ...
</web-app>
或者可以用Spring的RequestContextFilter,这个过滤器映射取决于web应用的配置,所以必须合适得更改它,以下是一个web应用的部分过滤器配置:
<web-app>
    ...
    <filter>
        <filter-name>requestContextFilter</filter-name>
        <filter-class>org.springframework.web.filter.RequestContextFilter</filter-class>
    </filter>
    <filter-mapping>
        <filter-name>requestContextFilter</filter-name>
        <url-pattern>/*</url-pattern>
    </filter-mapping>
    ...
</web-app>
DispatcherServlet、RequestContextListener 和 RequestContextFilter 都做完全相同的事情,即将 HTTP 请求对象绑定到为该请求提供服务的线程。 这使得request和session作用域的 bean 在调用链的更下游可用。
# Reqeust作用域
以下面的xml形式的bean定义举例:
<bean id="loginAction" class="com.something.LoginAction" scope="request"/>
Spring 容器通过为每个 HTTP 请求使用 loginAction bean 定义来创建 LoginAction bean 的新实例。 也就是说, loginAction bean 的作用域是 HTTP 请求级别的。 您可以根据需要更改所创建实例的内部状态,因为从同一loginAction bean 定义创建的其他实例不会看到这些状态更改。 它们是针对单个请求的。 当请求完成处理时,该请求范围内的 bean 将被废弃。
当使用注解驱动的组件或者Java配置时,@ReqeustScope注解可用于指定一个组件为request作用域,如下示例:
@RequestScope
@Component
public class LoginAction {
    // ...
}
# Session作用域
以下面的xml形式的bean定义举例:
<bean id="userPreferences" class="com.something.UserPreferences" scope="session"/>
Spring 容器通过在单个 HTTP 会话的生命周期中使用 userPreferences bean 定义创建 UserPreferences bean 的新实例。 换句话说,userPreferences bean 作用域是 HTTP 会话级别。 与Reqeust作用域的 bean 一样,您可以根据需要更改所创建实例的内部状态,其他HTTP Session也在使用从相同 userPreferences bean 定义创建的实例不会看到这些状态更改 ,因为它们特定于单个 HTTP 会话。 当 HTTP 会话最终被丢弃时,作用域为该特定 HTTP 会话的 bean 也将被丢弃。
当使用注解驱动的组件或者Java配置时,@SessionScope注解可用于指定一个组件为session作用域,如下示例:
@SessionScope
@Component
public class UserPreferences {
    // ...
}
# Application作用域
以下面的xml形式的bean定义举例:
<bean id="appPreferences" class="com.something.AppPreferences" scope="application"/>
Spring 容器通过为整个 Web 应用程序使用以上定义一次来创建 AppPreferences bean 的新实例。 也就是说,appPreferences bean 的范围在 ServletContext 级别,并存储为常规 ServletContext 属性。 这有点类似于 Spring 单例 bean,但在两个重要方面有所不同:它是每个 ServletContext 的单例,而不是每个 Spring 'ApplicationContext'(在任何给定的 Web 应用程序中可能有多个),并且它实际上是公开的,因此 作为 ServletContext 属性可见。
当使用注解驱动的组件或者Java配置时,@ApplicationScope注解可用于指定一个组件为application作用域,如下示例:
@ApplicationScope
@Component
public class AppPreferences {
    // ...
}
# 依赖中的作用域bean
Spring IoC 容器不仅管理对象(bean)的实例化,还管理协作者(或依赖项)的连接。 如果您想将(例如)一个 HTTP 请求范围的 bean 注入到另一个生命周期更长的 bean 中,您可以选择注入一个 AOP 代理来代替该作用域的 bean。 也就是说,您需要注入一个代理对象,该对象公开与作用域对象相同的公共接口,但也可以从相关作用域(例如 HTTP 请求)中检索真实目标对象,并将方法调用委托给真实对象。
您还可以在作用域为单例的 bean 之间使用<aop:scoped-proxy/>,然后引用通过可序列化的中间代理,因此能够在反序列化时重新获取目标单例 bean。
当针对原型的 bean 声明<aop:scoped-proxy/> 时,共享代理上的每个方法调用都会导致创建一个新的目标实例,然后将调用转发到该实例。
此外,原型代理并不是以生命周期安全的方式从较短作用域访问 bean 的唯一方法。 您还可以将您的注入点(即构造函数或 setter 参数或自动装配字段)声明为 ObjectFactory<MyTargetBean>,从而允许每次需要时调用 getObject() 来按需检索当前实例 — 无需保留实例或单独存储。
作为扩展变体,您可以声明 ObjectProvider<MyTargetBean>,它提供了几个额外的访问变体,包括 getIfAvailable 和 getIfUnique。
此 JSR-330 变体称为 Provider,并与 Provider<MyTargetBean> 声明和每次检索尝试的相应 get() 调用一起使用。 有关 JSR-330 整体的更多详细信息,请参见此处 (opens new window)。
下例中的配置只有一行,但了解其背后的“why”以及“how”很重要:
<?xml version="1.0" encoding="UTF-8"?>
<beans xmlns="http://www.springframework.org/schema/beans"
    xmlns:xsi="http://www.w3.org/2001/XMLSchema-instance"
    xmlns:aop="http://www.springframework.org/schema/aop"
    xsi:schemaLocation="http://www.springframework.org/schema/beans
        https://www.springframework.org/schema/beans/spring-beans.xsd
        http://www.springframework.org/schema/aop
        https://www.springframework.org/schema/aop/spring-aop.xsd">

    <!-- an HTTP Session-scoped bean exposed as a proxy -->
    <bean id="userPreferences" class="com.something.UserPreferences" scope="session">
        <!-- instructs the container to proxy the surrounding bean -->
        <aop:scoped-proxy/>
    </bean>

    <!-- a singleton-scoped bean injected with a proxy to the above bean -->
    <bean id="userService" class="com.something.SimpleUserService">
        <!-- a reference to the proxied userPreferences bean -->
        <property name="userPreferences" ref="userPreferences"/>
    </bean>
</beans>
要创建这样的代理,要将 <aop:scoped-proxy/> 元素插入到作用域 bean 定义中(请参阅选择要创建的代理类型和基于XML配置模式)。 为什么在请求、会话和自定义范围级别范围内的 bean 定义需要<aop:scoped-proxy/> 元素? 考虑以下单例 bean 定义,并将其与您需要为上述范围定义的内容进行对比(请注意,以下 userPreferences bean 定义不完整):
<bean id="userPreferences" class="com.something.UserPreferences" scope="session"/>

<bean id="userManager" class="com.something.UserManager">
    <property name="userPreferences" ref="userPreferences"/>
</bean>
在前面的示例中,单例 bean (userManager) 被注入了对 HTTP 会话范围 bean (userPreferences) 的引用。 这里的重点是 userManager bean 是一个单例:它在每个容器中被实例化一次,并且它的依赖项(在这种情况下只有一个,userPreferences bean)也只注入一次。 这意味着 userManager bean 只对完全相同的 userPreferences 对象(即最初注入它的那个对象)进行操作。
这不是您将生命周期较短的作用域 bean 注入到生命周期较长的作用域 bean(例如,将 HTTP 会话作用域的 bean 作为依赖项注入到单例 bean 中)时想要的行为。 相反,您需要一个 userManager 对象,并且,对于 HTTP 会话的生命周期,您需要一个特定于 HTTP 会话的 userPreferences 对象。 因此,容器创建一个对象,该对象公开与 UserPreferences 类完全相同的公共接口(理想情况下是一个 UserPreferences 实例的对象),它可以从作用域机制(HTTP 请求、会话等)中获取真正的 UserPreferences 对象 。容器将这个代理对象注入到 userManager bean 中,它不知道这个 UserPreferences 引用是一个代理。 在这个例子中,当一个 UserManager 实例在依赖注入的 UserPreferences 对象上调用一个方法时,它实际上是在调用代理上的一个方法。 然后代理从(在这种情况下)HTTP 会话中获取真实的 UserPreferences 对象,并将方法调用委托给检索到的真实 UserPreferences 对象。
因此,在将request和session作用域的 bean 注入对象时,您需要以下(正确且完整的)配置,如以下示例所示:
<bean id="userPreferences" class="com.something.UserPreferences" scope="session">
    <aop:scoped-proxy/>
</bean>

<bean id="userManager" class="com.something.UserManager">
    <property name="userPreferences" ref="userPreferences"/>
</bean>
# 选择要创建的代理对象类型
默认情况下,当 Spring 容器为使用 <aop:scoped-proxy/> 元素标记的 bean 创建代理时,将创建基于 CGLIB 的类代理。
CGLIB 代理只拦截公共方法调用! 不要在这样的代理上调用非公共方法。 它们不会委托给实际作用域的目标对象。
或者,您可以配置 Spring 容器,通过为 <aop:scoped-proxy/> 元素的 proxy-target-class 属性的值指定 false 来为此类作用域 bean 创建标准的基于 JDK 接口的代理。 使用基于 JDK 接口的代理意味着您不需要应用程序类路径中的其他库来实现此类代理。 但是,这也意味着作用域 bean 的类必须至少实现一个接口,并且注入作用域 bean 的所有依赖都必须通过其接口之一引用 bean。 以下示例显示了基于接口的代理:
<!-- DefaultUserPreferences implements the UserPreferences interface -->
<bean id="userPreferences" class="com.stuff.DefaultUserPreferences" scope="session">
    <aop:scoped-proxy proxy-target-class="false"/>
</bean>

<bean id="userManager" class="com.stuff.UserManager">
    <property name="userPreferences" ref="userPreferences"/>
</bean>
有关选择基于类或基于接口的代理的更多详细信息,请参阅代理机制 (opens new window)。
# 1.5.5. 自定义作用域
bean 作用域机制是可扩展的。 您可以定义自己的作用域,甚至重新定义现有作用域,尽管后者被认为是不好的做法,并且您不能覆盖内置的单例和原型作用域。
# 创建自定义作用域
要将自定义作用域集成到 Spring 容器中,您需要实现 org.springframework.beans.factory.config.Scope接口,这在本节中进行了描述。 有关如何实现您自己的作用域,请参阅 Spring Framework 本身提供的 Scope 实现和 Scope (opens new window) javadoc,它更详细地解释了您需要实现的方法。
Scope 接口有四种方法可以从作用域中获取对象,从作用域中移除它们,以及让它们被销毁。
例如,会话作用域实现返回会话作用域 bean(如果它不存在,则该方法在将它绑定到会话以供将来引用后返回该 bean 的一个新实例)。 以下方法从作用域返回对象:
Object get(String name, ObjectFactory<?> objectFactory)
例如,会话作用域实现从会话中删除会话作用域的 bean。 应该返回一个对象,但如果没有找到具有指定名称的对象,您可以返回 null。 以下方法从作用域中删除对象:
Object remove(String name)
以下方法注册了一个回调,当它被销毁或作用域中的指定对象被销毁时,该作用域应该调用该回调:
void registerDestructionCallback(String name, Runnable destructionCallback)
有关销毁回调的更多信息,请参阅 javadoc (opens new window) 或 Spring scope实现。
以下方法获取作用域的会话标识符:
String getConversationId()
这个标识符对于每个作用域都是不同的。 对于会话作用域的实现,此标识符可以是session标识符。
# 使用自定义作用域
在您编写并测试一个或多个自定义 Scope 实现之后,您需要让 Spring 容器感知你的新作用域。 以下方法是向 Spring 容器注册新 Scope 的中心方法:
void registerScope(String scopeName, Scope scope);
此方法在 ````ConfigurableBeanFactory接口上声明,该接口可通过 Spring 附带的大多数具体ApplicationContext``` 实现的 BeanFactory 属性获得。
registerScope(..) 方法的第一个参数是与作用域关联的唯一名称。 Spring 容器本身中此类名称的示例是singleton和prototype。 registerScope(..) 方法的第二个参数是您希望注册和使用的自定义 Scope 实现的实际实例。
假设已编写了自定义实现,然后按照下一个示例进行注册。
下一个示例使用 SimpleThreadScope,它包含在 Spring 中,但默认情况下未注册。对于您自己的自定义 Scope 实现,使用方法是相同的。
Scope threadScope = new SimpleThreadScope();
beanFactory.registerScope("thread", threadScope);
然后,您可以创建符合自定义 Scope 规则的 bean 定义,如下所示:
<bean id="..." class="..." scope="thread">
使用自定义 Scope 实现,您不仅限于以编程方式注册。您还可以使用 CustomScopeConfigurer 类以声明方式进行 Scope 注册,如以下示例所示:
<?xml version="1.0" encoding="UTF-8"?>
<beans xmlns="http://www.springframework.org/schema/beans"
    xmlns:xsi="http://www.w3.org/2001/XMLSchema-instance"
    xmlns:aop="http://www.springframework.org/schema/aop"
    xsi:schemaLocation="http://www.springframework.org/schema/beans
        https://www.springframework.org/schema/beans/spring-beans.xsd
        http://www.springframework.org/schema/aop
        https://www.springframework.org/schema/aop/spring-aop.xsd">

    <bean class="org.springframework.beans.factory.config.CustomScopeConfigurer">
        <property name="scopes">
            <map>
                <entry key="thread">
                    <bean class="org.springframework.context.support.SimpleThreadScope"/>
                </entry>
            </map>
        </property>
    </bean>

    <bean id="thing2" class="x.y.Thing2" scope="thread">
        <property name="name" value="Rick"/>
        <aop:scoped-proxy/>
    </bean>

    <bean id="thing1" class="x.y.Thing1">
        <property name="thing2" ref="thing2"/>
    </bean>

</beans>
当您将 <aop:scoped-proxy/> 放在 FactoryBean 实现中时,作用域的是工厂 bean 本身,而不是从 getObject() 返回的对象。
# 1.6. 自定义bean性质
Spring Framework提供了许多接口,可以用于自定义Bean的性质。本节将其分组如下:
- Lifecycle Callbacks
- ApplicationContextAware & BeanNameAware
- 其他Aware接口
# 1.6.1. Lifecycle 回调
要与容器管理的bean生命周期交互,你可以实现InitializingBean和DisposableBean接口,容器会在前者下调用afterPropertiesSet(),在后者调用destroy()方法,让bean在初始化和销毁的时候执行某些操作。
💡 JSR-250 @PostConstruct和@Predestroy注解通常被认为是在现代Spring应用中接收生命周期回调的最佳实践。使用这些注解意味着您的bean不耦合到Spring特定的接口。
如果您不想使用JSR-250注解,又需要解耦,请考虑使用
init-method和destroy-method的 bean定义元数据。
在内部,Spring框架使用BeanPostProcessor实现来处理它可以找到的任何回调接口并调用适当的方法。如果您需要自定义功能或其他生命周期行为,Spring则不会默认提供,您可以自己实现BeanPostProcessor。有关更多信息,请参阅容器扩展点 (opens new window)。
除了初始化和销毁回调之外,Spring托管对象还可以实现Lifecycle接口,以便这些对象可以参与到容器启动和关闭过程,作为容器自己的生命周期的驱动。
# Initialization初始化回调
org.springframework.Beans.Factory.InitializationBean接口允许bean在容器中设置完bean上的所有必需属性后执行初始化工作。InitializingBean接口定义了一个方法:
void afterPropertiesSet() throws Exception;
我们建议您不要使用InitializingBean接口,因为它不必要地将代码耦合到Spring。或者,我们建议使用@PostConstruct注解或指定POJO初始化方法。在基于XML的配置元数据的情况下,您可以使用init-method属性指定具有void No-Argument签名的方法的名称。使用Java配置,您可以使用@Bean的initmethod属性。请参阅接收生命周期回调 (opens new window)。考虑以下示例:
<bean id="exampleInitBean" class="examples.ExampleBean" init-method="init"/>
public class ExampleBean {

    public void init() {
        // do some initialization work
    }
}
此示例与以下示例几乎完全相同:
<bean id="exampleInitBean" class="examples.AnotherExampleBean"/>
public class AnotherExampleBean implements InitializingBean {

    @Override
    public void afterPropertiesSet() {
        // do some initialization work
    }
}
但是,第一个示例代码没有与Spring耦合。
# Destruction销毁回调
实现org.springframework.beans.factory.disposablebean接口允许bean当包含它的容器被销毁时会收到回调。DisposableBean接口定义了一个方法:
void destroy() throws Exception;
**我们建议您不要使用DisposableBean接口,因为它不必要地将代码耦合到Spring。或者,我们建议使用@PreDestroy注解或指定bean定义支持的泛型方法。在基于XML的配置元数据的情况下,您可以在
<bean id="exampleInitBean" class="examples.ExampleBean" destroy-method="cleanup"/>
public class ExampleBean {

    public void cleanup() {
        // do some destruction work (like releasing pooled connections)
    }
}
此示例与以下示例几乎完全相同:
<bean id="exampleInitBean" class="examples.AnotherExampleBean"/>
public class AnotherExampleBean implements DisposableBean {

    @Override
    public void destroy() {
        // do some destruction work (like releasing pooled connections)
    }
}
但是,第一个示例代码没有与Spring耦合。
💡 您可以分配<bean>元素的destroy-method属性一个特殊(推断)值,该值指示Spring在特定bean类上自动检测pulic
close或者shutdown。(任何实现java.lang.autoclosable或java.io.closable的类都会匹配。)您还可以在<bean>元素的default-destroy-method属性上设置此特殊(推断的)值以应用此行为到一组bean上(请参阅默认初始化和销毁方法)。请注意,这是Java配置的默认行为。
# 默认初始化和销毁方法
当不通过实现Spring特定的InitializingBean和DisposableBean定义的接口来完成初始化和销毁方法回调时,通常会使用像init(),initialize(),dispose()等名称编写方法。理想情况下,这些生命周期回调方法的名称在项目中应该标准化,以便所有开发人员使用相同的方法名称并确保一致性。
您可以配置Spring容器在每个bean上查找指定命名的初始化和销毁回调方法。这意味着您作为应用程序开发人员,不用为每个bean配置init-methoad="init"的属性,就可以编写名为init()的初始化回调方法。Spring IoC容器在创建bean时调用该方法(并根据先前描述的标准生命周期回调约定)。此功能还确保了初始化和销毁方法回调的命名一致约定。
假设您的初始化回调方法名为init(),您的销毁回调方法名为destroy()。然后,您的类类似以下示例:
public class DefaultBlogService implements BlogService {

    private BlogDao blogDao;

    public void setBlogDao(BlogDao blogDao) {
        this.blogDao = blogDao;
    }

    // this is (unsurprisingly) the initialization callback method
    public void init() {
        if (this.blogDao == null) {
            throw new IllegalStateException("The [blogDao] property must be set.");
        }
    }
}
然后,您可以在类似于以下内容的bean定义中使用该类:
<beans default-init-method="init">

    <bean id="blogService" class="com.something.DefaultBlogService">
        <property name="blogDao" ref="blogDao" />
    </bean>

</beans>
顶级default-init-method属性的存在会导致Spring IoC容器识别Bean类中称为init的方法作为初始化方法回调。创建并组装Bean时,如果Bean类具有这样的方法,则会在适当的时间调用它。
您可以类似地通过在顶级efault-destroy-method属性来配置默认销毁回调。
当现有bean类已经有与约定回调方法有差异的方法时,可以通过使用init-method和destroy-method属性指定方法名称来覆盖默认值。
Spring 容器保证在向bean注入所有依赖项之后立即调用配置的初始化回调方法。因此,在原始bean上才会调用初始化回调,这意味着AOP拦截器等尚未应用于bean。首先完全创建目标bean,然后应用具有其拦截链的AOP代理。如果目标bean和代理单独定义,则您的代码甚至可以绕过代理直接与原始目标bean交互。因此,将拦截器应用于init方法是矛盾的,因为这样做会将目标bean的生命周期耦合到其代理或拦截器,并在代码与原始目标bean直接交互时留下奇怪的语义。
# 组合生命周期机制
截至Spring 2.5,您有三种方式控制bean的声明周期,你可以组合这些机制来控制bean的声明周期:
InitializingBean和DisposableBean回调接口- 自定义
init()和destroy方法 @PostContruct和@PreDestroy注解
如果为bean配置了多个生命周期机制,并且每个机制配置了不同名称的方法,则每个配置的方法按照列出的顺序运行。但是,如果配置了相同名称的方法 - 例如,初始化方法
init()- 对于这些生命周期机制中的多个,该方法只会运行一次。
为同一bean配置的多个生命周期机制,r若具有不同的初始化方法,按照如下所示顺序执行:
@PostConstruct注释的方法InitializingBean回调接口中的afterPropertiesSet()方法- 自定义的
init()方法
销毁方法以相同的顺序调用:
@PreDestroy注释的方法DisposableBean回调接口中的destroy()方法- 自定义的
destroy()方法
# 启动和停止回调
Lifecycle接口为对象定义了任何具有其自身生命周期要求的基本方法(例如启动和停止某些后台进程):
public interface Lifecycle {

    void start();

    void stop();

    boolean isRunning();
}
任何Spring管理的对象都可以实现生命周期接口。然后,当ApplicationContext本身接收开始和停止信号(例如,在运行时进行停止/重启)时,它将这些调用级联到该上下文中定义的所有生命周期实现。它通过将其委派给LifecycleProcessor来实现这一点,如下所示所示:
public interface LifecycleProcessor extends Lifecycle {

    void onRefresh();

    void onClose();
}
请注意,LifecyCleProcessor本身是Lifecycle接口的扩展。它还添加了另外两个方法,将在应用上下文刷新和关闭时调用。
💡请注意,常规
org.springframework.context.Lifecycle接口是一个简单的约定,用于显式启动和停止通知,并不意味着上下文刷新时自动启动。对特定bean的自动启动(包括启动阶段)进行细粒度控制,请考虑实现org.springframework.context.SmartLifecycle。此外,请注意,销毁前不保证发起停止通知。一般在停止时,所有
Lifecycle实现类首先在常规销毁回调传播之前接收停止通知。但是,在上下文热刷新或停止刷新尝试期间,只调用销毁方法。
启动和关闭调用的顺序很重要。如果在任何两个对象之间存在依赖关系,则需要依赖的将于其依赖项启动后启动,并且在其依赖项停止前停止。但是有时,直接依赖是未知的。您可能只知道某种类型的对象应该在另一个类型的对象之前启动。在这些情况下,SmartLifecycle接口定义了另一个选项,即在其父接口Phased定义的getPhase()方法。以下是该接口的定义:
public interface Phased {

    int getPhase();
}
以下是SmartLifecycle接口的定义:
public interface SmartLifecycle extends Lifecycle, Phased {

    boolean isAutoStartup();

    void stop(Runnable callback);
}
启动时,顺位最低的对象首先启动。停止时,顺序相反。因此,一个实现SmartLifecycle且其getphase()方法返回Integer.MIN_VALUE的对象将是第一个启动和最后停止。也就是说,返回Integer.MAX_VALUE的值的将最后启动并首先停止(可能是因为它取决于要运行的其他进程)。很重要的是要知道不实现SmartLifecycle的任何普通Lifecycle实例的默认顺位值是0。因此,任何负的顺位值表示对象应该在这些标准组件之前启动(并在其之后停止)。反之亦然。
SmartLifecycle定义的stop方法接受一个线程回调。在该实现的关闭进程完成后,任何实现必须调用回调线程的run()方法。这使得在必要时启用异步关闭,因为LifecycleProcessor接口的默认实现DefaultLifeCycleProcessor,在每个阶段内的对象组等待定义的超时时间后调用该回调。默认的超时时间为30秒。您可以通过在上下文中定义名为lifecycleProcessor的bean来覆盖默认生命周期处理器实例。如果您只想修改超时时间,以下定义就足够了:
<bean id="lifecycleProcessor" class="org.springframework.context.support.DefaultLifecycleProcessor">
    <!-- timeout value in milliseconds -->
    <property name="timeoutPerShutdownPhase" value="10000"/>
</bean>
如前所述,LifecyCleProcessor接口也定义了刷新和关闭上下文的回调方法。后者驱动了停止过程,仿佛stop()被显示调用一样,但它发生在上下文关闭的过程中。另一方面,“refresh”回调可以启用SmartLifecycle bean的另一个功能。刷新上下文(在实例化并初始化所有对象后)时,调用该回调。此时,默认生命周期处理器检查每个SmartLifecycle对象的isAutostArtup()方法返回的布尔值。如果为true,则在刷新时启动该对象,而不是等待上下文或其自己的start()方法被显式调用(与上下文刷新不同,标准上下文实现不会自动启动)。phase值和依赖关系确定如前所述的启动顺序。
# 在非web应用中优雅地关闭Spring Ioc容器
本节仅适用于非Web应用程序。Spring的基于Web的ApplicationContext实现已有相关代码,能在Web应用程序关闭时优雅地关闭Spring IoC容器。
如果在非Web应用程序环境中使用Spring的IoC容器(例如,在富客户端桌面环境中),请使用JVM注册关闭hook。这样做确保了一个优雅的停止,并在单例bean上调用相关的销毁方法,以便释放所有资源。您必须正确配置和实现这些销毁回调。
要注册关闭hook,请调用在ConfigurableApplicationContext接口上声明的registerShutdownHook()方法,如以下示例显示:
import org.springframework.context.ConfigurableApplicationContext;
import org.springframework.context.support.ClassPathXmlApplicationContext;

public final class Boot {

    public static void main(final String[] args) throws Exception {
        ConfigurableApplicationContext ctx = new ClassPathXmlApplicationContext("beans.xml");

        // add a shutdown hook for the above context...
        ctx.registerShutdownHook();

        // app runs here...

        // main method exits, hook is called prior to the app shutting down...
    }
}
# 1.6.2. ApplicationContextAware和BeanNameAware
当ApplicationContext创建实现org.springframework.context.applicationContextaware接口的对象实例时,将提供该ApplicationContext的引用。以下列表显示了ApplicationContextaware接口的定义:
public interface ApplicationContextAware {

    void setApplicationContext(ApplicationContext applicationContext) throws BeansException;
}
因此,bean可以通过编程方式操作创建它们的ApplicationContext,通过ApplicationContext接口或通过将引用转换为该接口的已知子类(例如公开其他功能的ConfigurableApplicationContext)。一个作用就是检索其他bean。有时这种能力很有用。但是,一般而言,您应该避免使用它,因为它将代码与Spring耦合,并且不遵循控制反转的风格(依赖作为bean的属性提供)。ApplicationContext的其他方法提供对文件资源的访问,发布应用程序事件和访问MessagesSource。这些附加功能在ApplicationContext的附加功能 (opens new window)中描述。
自动注入是获得对ApplicationContext的引用的另一种选择。传统的构造函数注入和按类型注入模式(如1.4.5所述)可以分别为构造函数参数或Setter方法参数分别提供ApplicationContext的依赖。更灵活的方式,包括自动注入字段和多个参数方法的能力,请使用基于注解的自动注入功能。如果您在需要的地方使用了@Autowired注解,期望类型的ApplicationContext将自动注入到字段,构造函数或方法参数中。有关更多信息,请参阅使用@Autowired (opens new window)。
当ApplicationContext创建一个实现org.springFramework.Beans.Factory.BeannameAware接口的类时,该类会获得跟它自身定义相关的名称。以下列表显示了Beannameaware接口的定义:
public interface BeanNameAware {

    void setBeanName(String name) throws BeansException;
}
该方法回调将会在普通bean属性设值后,初始化回调之前(如InitializingBean、afterPropertiesSet、自定义初始化方法)调用。
# 1.6.3. 其他Aware接口
除了ApplicationContextaware和Beannameaware之外,Spring还提供了更多的Aware回调接口,让bean向容器指明它们需要依赖某个明确的基础架构。作为一般规则,名称表示依赖类型。如下表格4(未翻译)总结了最重要的Aware接口:
| Name | Injected Dependency | Explained in… |
|---|---|---|
ApplicationContextAware | Declaring ApplicationContext. | ApplicationContextAware and BeanNameAware (opens new window) |
ApplicationEventPublisherAware | Event publisher of the enclosing ApplicationContext. | Additional Capabilities of the ApplicationContext (opens new window) |
BeanClassLoaderAware | Class loader used to load the bean classes. | Instantiating Beans (opens new window) |
BeanFactoryAware | Declaring BeanFactory. | ApplicationContextAware and BeanNameAware (opens new window) |
BeanNameAware | Name of the declaring bean. | ApplicationContextAware and BeanNameAware (opens new window) |
LoadTimeWeaverAware | Defined weaver for processing class definition at load time. | Load-time Weaving with AspectJ in the Spring Framework (opens new window) |
MessageSourceAware | Configured strategy for resolving messages (with support for parametrization and internationalization). | Additional Capabilities of the ApplicationContext (opens new window) |
NotificationPublisherAware | Spring JMX notification publisher. | Notifications (opens new window) |
ResourceLoaderAware | Configured loader for low-level access to resources. | Resources (opens new window) |
ServletConfigAware | Current ServletConfig the container runs in. Valid only in a web-aware Spring ApplicationContext. | Spring MVC (opens new window) |
ServletContextAware | Current ServletContext the container runs in. Valid only in a web-aware Spring ApplicationContext. | Spring MVC (opens new window) |
请注意,使用这些接口你的代码将与Spring API耦合,并且不遵循控制反转的风格。因此,我们推荐它们在需要对容器进行编程访问的基础架构bean中使用。
# 1.7. Bean定义继承
Bean定义可以包含大量的配置信息,包括构造函数参数,属性值和特定于容器的信息,例如初始化方法,静态工厂方法名称等。子bean定义从父定义继承配置数据。子定义可以根据需要覆盖某些值或添加其他值。使用父、子bean定义可以减少配置。实际上,这是模板模式的一种形式。
如果您以编程方式使用ApplicationContext接口,则子Bean定义由ChildBeanDefinition类表示。大多数用户不会在这种级别使用它们。相反,他们在诸如ClassPathxMlApplicationContext等类中声明地配置bean定义。使用基于XML的配置元数据时,可以使用parent属性指定子bean定义,指定父bean作为此属性的值。以下示例显示了如何做:
<bean id="inheritedTestBean" abstract="true"
        class="org.springframework.beans.TestBean">
    <property name="name" value="parent"/>
    <property name="age" value="1"/>
</bean>

<bean id="inheritsWithDifferentClass"
        class="org.springframework.beans.DerivedTestBean"
        parent="inheritedTestBean" init-method="initialize">  1️⃣
    <property name="name" value="override"/>
    <!-- the age property value of 1 will be inherited from parent -->
</bean>
如果没有指定,则子bean使用父bean的定义,但也可以覆盖它。在后一种情况下,子bean必须与父bean兼容(即它必须接受父属性值)。
子bean定义继承作用域,构造函数参数值,属性值和从父类覆盖的方法,并可选择添加新值。您指定的任何作用域,初始化方法,销毁方法或静态工厂方法设置将会覆盖父类中对应设置。
剩余的设置始终从子定义中引用:依赖,自动装配模式,依赖关系检查,单例和懒加载。
前面的示例通过使用abstract属性将父bean定义显式标记为抽象类。如果父定义未指定类,则父bean定义abstract属性是必须的,如以下示例显示:
<bean id="inheritedTestBeanWithoutClass" abstract="true">
    <property name="name" value="parent"/>
    <property name="age" value="1"/>
</bean>

<bean id="inheritsWithClass" class="org.springframework.beans.DerivedTestBean"
        parent="inheritedTestBeanWithoutClass" init-method="initialize">
    <property name="name" value="override"/>
    <!-- age will inherit the value of 1 from the parent bean definition-->
</bean>
父bean无法自动化,因为它是不完整的,并且也明确标记为抽象。当定义是抽象的时候,它仅用为纯模板bean定义,它用作子定义的父定义。尝试自己使用这样一个抽象父bean,通过将其作为另一个bean的ref属性,否则使用父bean id显示执行getBean()调用将返回错误。同样,容器的内部预留preInstantiateSingletons()方法忽略了被定义为抽象的bean定义。
ℹ️ApplicationContext默认预先实例化所有单例bean。因此,如果您有打算仅用作为模板的(父)bean定义,并且此定义定义了类,则必须确保将
abstract属性设置为true,否则应用上下文将(尝试)预实例化抽象类。
# 1.8. 容器扩展点
通常,应用程序开发者不需要子类化ApplicationContext实现类。相反,Spring IoC容器可以通过特殊的集成接口实现扩展。接下来的几节将介绍这些集成接口。
# 1.8.1. 用BeanPostProcessor自定义Beans
BeanPostProcessor接口定义了可以实现的回调方法,以提供自己的(或覆盖容器的默认)实例化逻辑,依赖解析逻辑等。如果要在Spring容器完成实例化,配置和初始化Bean后实现某些自定义逻辑,可以插入一个或多个自定义BeanPostProcessor实现。
您可以配置多个BeanPostProcessor实例,您可以通过设置order属性来控制这些BeanPostProcessor实例运行的顺序。只有当BeanPostProcessor实现Ordered接口时,才能设置此属性。如果您编写自己的BeanPostProcessor,则应考虑实现Ordered接口。有关详细信息,请参阅BeanPostProcessor (opens new window)和Ordered (opens new window)的Javadoc。另请参阅关于BeanPostProcessor实例的程序化注册的说明 (opens new window)。
ℹ️BeanPostProcessor实例在Bean(或Object)实例上运行。也就是说,Spring IoC容器实例化了一个bean实例,然后Beanbostprocessor实例执行它们的回调方法。
BeanPostProcessor实例作用域是容器。仅当您使用容器层次结构时才起作用。如果在一个容器中定义BeanPostProcessor,则它仅在该容器中处理bean。换句话说,即使两个容器都是相同层次结构的一部分,在一个容器中定义的bean也不会被另一个容器中定义的BeanPostProcessor处理。
该org.springframework.beans.factory.config.BeanPostProcessor接口包括正好两个回调方法。当此类被容器注册为后置处理器时,对于每个容器创建的bean实例,后处理器在容器初始化方法(例如InitializationBean.afterPropertiesset()或任何声明的init方法)被调用前,并在任何bean初始化回调之后调用。后处理器可以对bean实例执行任何操作,包括完全忽略回调。bean后置处理器通常检查回调接口,或者它可能会将bean包装为代理。一些Spring AOP基础架构类就是bean后处理器的实现,以提供代理包装逻辑。
ApplicationContext将自动检测在配置元数据中定义的实现BeanPostProcessor接口的任何Bean。ApplicationContext将这些bean注册为后处理器,以便稍后可以在bean创建前被调用。Bean后处理器能以与任何其他bean相同的方式部署在容器中。
注意,在配置类上使用@Bean工厂方法声明BeanPostProcessor时,工厂方法的返回类型应该是实现类本身或至少是org.springframework.beans.factory.config.beanpostProcessor接口,以清楚地表示该bean的后处理器性质。否则,ApplicationContext无法在完全创建它之前通过类型自动探测到它。由于需要提前实例化BeanPostProcessor以便在上下文中初始化其他Bean时应用处理器,因此该早期类型检测至关重要。
ℹ️以编程方式注册BeanPostProcessor实例
虽然BeanPostProcessor注册的推荐方法是通过ApplicationContext自动检测(如前所述),但您可以使用ConfigurableBeanFactory的
addBeanPostProcessor方法进行编程方式注册。当您需要评估条件逻辑或甚至用于在层次结构中的上下文中复制bean后处理器时,这可能很有用。但请注意,Ordered接口对编程添加的BeanPostProcessor实例无效。在这里,执行顺序就是注册顺序。还要注意,无论任何指定的顺序如何,编程方式注册的BeanPostProcessor实例都会在通过自动检测注册的那些处理器之前之前执行。
ℹ️BeanPostProcessor实例和AOP自动代理
实现BeanPostProcessor接口的类是特殊的,容器会特殊处理。所有BeanPostProcessor实例和它们直接引用的Bean,在启动时都会作为ApplicationContext的特殊启动阶段的一部分。接下来,所有BeanPostProcessor实例都以指定的顺序注册,并应用于容器中的所有其他bean。由于AOP自动代理实现为BeanPostProcessor本身,因此BeanPostProcessor实例和它们直接引用的Bean都没有资格自动代理,因此,它们没有切面。
如果您使用autowiring或@Resource(可能autowiring失败)将beans装配到BeanPostProcessor中,则在搜索类型匹配的依赖候选时,Spring可能会得到错误的Bean,因此使其无法被自动代理或被其他后处理器处理。例如,如果您有被@Resource注解标注的依赖项,如字段或setter方法名与已声明名称的bean不直接对应且没有使用name属性的话,Spring搜索其他bean以按类型匹配它们。
以下示例显示如何在ApplicationContext中编写,注册和使用BeanPostProcessor实例
# 例:Hell World, BeanPostProcessor -style
第一个例子说明了基本用法。该示例显示了自定义BeanPostProcessor实现,该实现调用每个bean的toString()方法,它由容器创建并将生成的字符串打印到系统控制台。
package scripting;

import org.springframework.beans.factory.config.BeanPostProcessor;

public class InstantiationTracingBeanPostProcessor implements BeanPostProcessor {

    // simply return the instantiated bean as-is
    public Object postProcessBeforeInitialization(Object bean, String beanName) {
        return bean; // we could potentially return any object reference here...
    }

    public Object postProcessAfterInitialization(Object bean, String beanName) {
        System.out.println("Bean '" + beanName + "' created : " + bean.toString());
        return bean;
    }
}
以下beans元素使用InstantialTracingBeanPostProcessor:
<?xml version="1.0" encoding="UTF-8"?>
<beans xmlns="http://www.springframework.org/schema/beans"
    xmlns:xsi="http://www.w3.org/2001/XMLSchema-instance"
    xmlns:lang="http://www.springframework.org/schema/lang"
    xsi:schemaLocation="http://www.springframework.org/schema/beans
        https://www.springframework.org/schema/beans/spring-beans.xsd
        http://www.springframework.org/schema/lang
        https://www.springframework.org/schema/lang/spring-lang.xsd">

    <lang:groovy id="messenger"
            script-source="classpath:org/springframework/scripting/groovy/Messenger.groovy">
        <lang:property name="message" value="Fiona Apple Is Just So Dreamy."/>
    </lang:groovy>

    <!--
    when the above bean (messenger) is instantiated, this custom
    BeanPostProcessor implementation will output the fact to the system console
    -->
    <bean class="scripting.InstantiationTracingBeanPostProcessor"/>

</beans>
请注意InstantialTracingBeanPostProcessor是如何被定义的。它甚至没有名字,而且因为它是一个bean,它可以像任何其他bean一样依赖注入。(前面的配置还定义了由Groovy脚本备份的bean。Spring动态语言支持在此章节 (opens new window)中详述。)
以下Java应用程序运行前面的代码和配置:
import org.springframework.context.ApplicationContext;
import org.springframework.context.support.ClassPathXmlApplicationContext;
import org.springframework.scripting.Messenger;

public final class Boot {

    public static void main(final String[] args) throws Exception {
        ApplicationContext ctx = new ClassPathXmlApplicationContext("scripting/beans.xml");
        Messenger messenger = ctx.getBean("messenger", Messenger.class);
        System.out.println(messenger);
    }

}
前面应用程序的输出类似于以下内容:
Bean 'messenger' created : org.springframework.scripting.groovy.GroovyMessenger@272961
org.springframework.scripting.groovy.GroovyMessenger@272961
# 例:RequiredAnnotationBeanPostProcessor
使用回调接口或注解连接自定义BeanPostProcessor实现是扩展Spring IoC容器的常见方法。一个例子是Spring的ResertandannotationBeanPostProcessor - 一个Spring实现的BeanPostProcessor,它确保用(任意)注解标记的bean上的依赖注入属性实际上(被配置为)有值。
# 1.8.2. 使用BeanFactoryPostProcessor自定义配置元数据
我们查看的下一个扩展点是org.springframework.beans.factory.config.BeanfactoryPostProcessor。此接口的语义类似于BeanPostProcessor的语义,其中一个主要区别:BeanFactoryPostProcessor在操作的是Bean配置元数据。也就是说,Spring IoC容器允许BeanFactoryPostPostProcessor读取配置元数据,并且在容器实例化BeanFactoryPostProcessor实例之外的任何Bean之前可能会更改它。
您可以配置多个BeanFactoryPostProcessor实例,您可以通过设置order属性来控制这些BeanFactoryPostProcessor实例运行的顺序。只有当BeanFactoryPostProcessor实现Ordered接口时,才能设置此属性。如果您编写自己的BeanFactoryPostProcessor,则应考虑实现Ordered接口。有关详细信息,请参阅BeanFactoryPostProcessor (opens new window)和Ordered (opens new window)的Javadoc。
ℹ️如果要更改实际Bean实例(即,从配置元数据创建的对象),则需要使用BeanPostProcessor)。虽然技术上可以在BeanFactoryPostProcessor中使用bean实例(例如,通过使用BeanFactory.getBean()),但这样做会导致更早的bean实例化,违反标准容器生命周期。这可能导致负副作用,例如绕过Bean后处理。
BeanFactoryPostProcessor实例作用域是容器。仅当您使用容器层次结构时才起作用。如果在一个容器中定义BeanFactoryPostProcessor,则它仅在该容器中处理bean元数据。换句话说,即使两个容器都是相同层次结构的一部分,在一个容器中bean的元数据也不会被另一个容器中定义的BeanFactoryPostProcessor处理。
将自动运行在ApplicationContext中声明的Bean工厂后处理器,以便将更改应用于定义容器的配置元数据。Spring包括许多预定义的Bean工厂后处理器,例如PropertyOverrideConfigurer和PropertySourcesPlaceholderConfigurer。您还可以使用自定义BeanFactoryPostProcessor - 例如,注册自定义属性编辑器。
ApplicationContext会自动检测部署在它中的任何实现了BeanFactoryPostPostPostPostor接口的Bean。它在适当的时间使用这些作为bean工厂后处理器的bean。您可以按照任何其他bean的方式部署这些后处理器bean。
ℹ️与BeanPostProcessor一样,您通常不希望配置BeanFactoryPostProcessors为延迟初始化。如果没有其他bean引用Bean(Factory)PostProcessor,则根本不会立即实例化。因此,将其标记为延时初始化将被忽略,并且即使在
元素声明上将 default-lazy-init属性设置为true,Bean(Factory)PostProcessor也会立即实例化。
# 例:类名称替换PropertySourcesPlaceholderConfigurer
您可以通过PropertySourcesPlaceholderConfigurer使用标准Java Properties格式在单独文件中从Bean定义中外部化属性值。这样做使得部署应用程序的人能够自定义特定于环境的属性,例如数据库URL和密码,而无需担心修改容器的主要XML定义文件带来的复杂性或风险。
考虑以下基于XML的配置元数据片段,其中定义了具有占位符值的数据源:
<bean class="org.springframework.context.support.PropertySourcesPlaceholderConfigurer">
    <property name="locations" value="classpath:com/something/jdbc.properties"/>
</bean>

<bean id="dataSource" destroy-method="close"
        class="org.apache.commons.dbcp.BasicDataSource">
    <property name="driverClassName" value="${jdbc.driverClassName}"/>
    <property name="url" value="${jdbc.url}"/>
    <property name="username" value="${jdbc.username}"/>
    <property name="password" value="${jdbc.password}"/>
</bean>
该示例显示了从外部属性文件配置的属性。在运行时,PropertySourcePlaceHolterConfigurer应用于替换数据源的某些属性的元数据。要替换的值被指定为$ {property-name}的占位符形式,它遵循Ant和log4j和JSP EL 风格。
实际值来自标准Java Properties格式的另一个文件:
jdbc.driverClassName=org.hsqldb.jdbcDriver
jdbc.url=jdbc:hsqldb:hsql://production:9002
jdbc.username=sa
jdbc.password=root
因此,$ {jdbc.username}字符串在运行时替换为'sa',属性文件中其他占位符值也一样按键值匹配替换。PropertySourcesPlaceholderConfigurer检查在Bean定义的大多数属性中的占位符。此外,您可以自定义占位符前缀和后缀。
使用Spring 2.5中引入的上下文命名空间,您可以使用专用配置元素配置属性占位符。您可以在location属性中提供一个或多个位置作为逗号分隔的列表,如以下示例显示:
<context:property-placeholder location="classpath:com/something/jdbc.properties"/>
该PropertySourcesPlaceholderConfigurer不仅会在你指定的Properties文件中查找。默认情况下,如果不能在指定的属性文件中找到属性,它会针对Spring Environment属性配置和普通的Java System属性配置进行查找。
💡您可以使用PropertySourcePlaceHolderConfigurer来替换类名,当您必须在运行时选择特定实现类时有用。以下示例显示了如何执行此操作:
<bean class="org.springframework.beans.factory.config.PropertySourcesPlaceholderConfigurer">
    <property name="locations">
        <value>classpath:com/something/strategy.properties</value>
    </property>
    <property name="properties">
        <value>custom.strategy.class=com.something.DefaultStrategy</value>
    </property>
</bean>

<bean id="serviceStrategy" class="${custom.strategy.class}"/>
如果在运行时无法在运行时解析到有效类别,则在将要创建时(对于非懒加载bean,ApplicationContext的preInstantiateSingletons()阶段),Bean解析失败。
# 例:PropertyOverrideConfigurer
PropertyOverrideConfigurer,另一个bean factory后处理器,类似于PropertySourcePlaceHolderConfigurer,但与后者不同,原始定义可以具有默认值或根本没有值作为bean的属性。如果覆盖的Properties文件没有某些bean属性的条目,则使用默认上下文定义。
请注意,bean定义无法感知被覆盖,因此覆盖的配置应用于XML定义文件不会显而易见。如果有多个PropertyOverrideConfigurer实例定义相同的bean属性的不同值,由于覆盖机制只会使用最后一个。
属性文件配置行采用以下格式:
beanName.property=value
以下列表显示了格式的示例:
dataSource.driverClassName=com.mysql.jdbc.Driver
dataSource.url=jdbc:mysql:mydb
此示例文件可以与包含一个名为dataSource的bean的容器定义一起使用,其中包含driver和url属性。
还支持复合属性名称,只要除了被覆盖的最终属性之外的路径上的的每个组件都是非空的(可能由构造函数初始化)。在以下示例中,tom bean的fred属性的bob属性的sammy属性设置为常量123:
tom.fred.bob.sammy=123
ℹ️指定的覆盖值始终是字面量。它们不会翻译成bean引用。此约定还适用于XML Bean定义中的原始值指定为bean引用时。
在Spring 2.5中引入的上下文命名空间,可以使用专用配置元素配置属性覆盖,如以下示例显示:
<context:property-override location="classpath:override.properties"/>
# 1.8.3. 使用FactoryBean自定义实例化逻辑
本身是工厂的对象可以实现org.springframework.beans.factory.FactoryBean接口。
FactoryBean接口是Spring IoC容器的实例化逻辑的可插拔点。如果您有复杂的初始化代码,则在Java中可以比冗长的(可能)XML更好地表达,您可以创建自己的FactoryBean,在该类中写入复杂的初始化逻辑,然后将您的自定义FactoryBean插入容器中。
FactoryBean接口提供三个方法:
Object getObject():返回此工厂创建的对象的实例。实例可能会被共享,具体取决于此出厂是否返回单例或原型。boolean isSingleton():如果FactoryBean返回单例bean此方法返回true否则返回false。Class getObjectType():返回getObject()方法返回的对象类型,如果类型不能提前推断则返回null。
FactoryBean思想和接口用于Spring框架内的许多地方。spring内部就有FactoryBean接口的50多个实现。
当您需要询问实际FactoryBean实例而不是它生成的bean时,请在调用ApplicationContext的getBean()方法时使用and符号(&)前缀。对于给定的FactoryBean,调用容器上的getBean("myBean")返回FactoryBean产生的bean,而调用getBean("&myBean")返回FactoryBean实例本身。
# 1.9. 基于注解的容器配置
基于注解的配置是否比基于XML的配置更好?
基于注解的配置引出了此问题。长话短说是“得看情况”。也就是说,每种方法都有其利弊。而且通常由开发人员决定哪种策略更适合他们。由于它们的定义方式,注解在他们的声明中提供了上下文,所以配置更短更简练。但是,XML配置的优势是不侵入源代码或不需要重新编译它们。一些开发人员喜欢注解的方式,而其他开发人员则认为被注解的类不再是POJO,而且这会使得配置变得分散,更难控制。
无论哪种选择,Spring都可以兼容这两种风格,甚至将它们混合在一起。值得注意的是,通过其JavaConfig (opens new window)选项,Spring让注解以非侵入性方式使用,而无需接触目标组件源代码,并且在工具方面,所有配置样式都支持Eclipse的Spring Tools (opens new window)支持。
基于注解的配置提供了XML配置的替代方法,它依赖于要装配的组件而不是用尖括号声明的字节码元数据。开发者通过在相关类,方法或字段声明上使用注解,将配置移动到组件类自身中而不是使用XML。如示例RequiredAnnotationBeanPostProcessor (opens new window),使用BeanPostProcessor与注解结合是扩展Spring IoC容器的常见方法。例如,Spring 2.0引入了@Required注解,使得强制依赖属性成为可能。Spring 2.5使得可以遵循相同的一般方法来驱动Spring的依赖注入。本质上,@Autowired注释提供了相同的能力,如Autowiring (opens new window)所述,但具有更细粒度的控制和更广泛的适用性。Spring 2.5还增加了对JSR-250注解的支持,例如@PostConstruct和@PreDestroy。Spring 3.0添加了包含在javax.inject中的支持JSR-330(Java依赖注入)的注解,例如@Inject和@Named。有关这些注解的详细信息可以在相关章节 (opens new window)中找到。
ℹ️基于注解的注入在XML注入之前进行。因此,基于XML的配置覆盖了通过两种方法属性的装配。
当然,您可以将它们注册为单独的bean定义,但也可以通过在基于XML的Spring配置中包含以下标签来隐式注册(注意包含context命名空间):
<?xml version="1.0" encoding="UTF-8"?>
<beans xmlns="http://www.springframework.org/schema/beans"
    xmlns:xsi="http://www.w3.org/2001/XMLSchema-instance"
    xmlns:context="http://www.springframework.org/schema/context"
    xsi:schemaLocation="http://www.springframework.org/schema/beans
        https://www.springframework.org/schema/beans/spring-beans.xsd
        http://www.springframework.org/schema/context
        https://www.springframework.org/schema/context/spring-context.xsd">

    <context:annotation-config/>

</beans>
(隐式注册的后处理器包括AutowiredAnnotationBeanPostProcessor (opens new window), CommonAnnotationBeanPostProcessor (opens new window), PersistenceAnnotationBeanPostProcessor (opens new window),RequiredAnnotationBeanPostProcessor (opens new window), CommonAnnotationBeanPostProcessor (opens new window), PersistenceAnnotationBeanPostProcessor (opens new window), RequiredAnnotationBeanPostProcessor (opens new window).)
ℹ️<context:annotation-config />仅查找在定义它的同一应用程序上下文中的注解。这意味着,如果将<context:annotation-config />放在DispatcherServlet的WebApplicationContext中,则只会扫描Controller中的@Autowired 注解的bean。有关更多信息,请参阅DispatcherServlet (opens new window)。
# 1.9.1. @Required
@Required注解适用于bean属性setter方法,如下例所示:
public class SimpleMovieLister {

    private MovieFinder movieFinder;

    @Required
    public void setMovieFinder(MovieFinder movieFinder) {
        this.movieFinder = movieFinder;
    }

    // ...
}
此注解表示必须通过Bean定义中的显式属性值或通过自动装配在配置bean时填充bean的属性。如果尚未填充受注解影响的bean属性,则该容器会抛出异常。这允许更早的失败,避免了后续的NullPointerException等。我们仍然建议您将断言放入Bean类本身(例如,init方法)。这样做即使在容器外部使用类时,也可以拿到所需的引用和值。
ℹ️@Required在Spring Framework 5.1中正式过时,支持使用构造函数注入所需的设置(或InitializingBean.afterPropertiesSet()的自定义实现以及Bean属性的setter实现)。
# 1.9.2. 使用@Autowired
ℹ️JSR 330的@Inject注解可以用于代替本节中包含的示例中的Spring @Autowired注释。有关详细信息,请参阅此处 (opens new window)。
你可以应用@Autowired注解于构造器,就像下面这样:
public class MovieRecommender {

    private final CustomerPreferenceDao customerPreferenceDao;

    @Autowired
    public MovieRecommender(CustomerPreferenceDao customerPreferenceDao) {
        this.customerPreferenceDao = customerPreferenceDao;
    }

    // ...
}
ℹ️截至Spring Framework 4.3,如果目标bean仅定义一个构造函数,则不再需要在此构造函数上用@Autowired注解。但是,如果有多个构造函数并且没有主/默认构造函数,则至少有一个构造函数必须用@Autowired注解,以指示容器使用哪一个构造器。
你也可以像下面这样应用@Autowired注解于传统setter方法:
public class SimpleMovieLister {

    private MovieFinder movieFinder;

    @Autowired
    public void setMovieFinder(MovieFinder movieFinder) {
        this.movieFinder = movieFinder;
    }

    // ...
}
你还可以像下面这样应用@Autowired注解于任意名称和多参数的方法:
public class MovieRecommender {

    private MovieCatalog movieCatalog;

    private CustomerPreferenceDao customerPreferenceDao;

    @Autowired
    public void prepare(MovieCatalog movieCatalog,
            CustomerPreferenceDao customerPreferenceDao) {
        this.movieCatalog = movieCatalog;
        this.customerPreferenceDao = customerPreferenceDao;
    }

    // ...
}
你也可以将@Autowired应用于字段,甚至将其与构造函数混合,如以下示例所示:
public class MovieRecommender {

    private final CustomerPreferenceDao customerPreferenceDao;

    @Autowired
    private MovieCatalog movieCatalog;

    @Autowired
    public MovieRecommender(CustomerPreferenceDao customerPreferenceDao) {
        this.customerPreferenceDao = customerPreferenceDao;
    }

    // ...
}
💡确保您的目标组件(例如,MovieCatalog或CustomerPreferenceDao)和用@ Autowired注解的注入点的类型声明一致。否则,运行时可能因类型不匹配而注入失败。
对于通过类路径扫描找到的XML定义的bean或组件类,容器通常预先知道确切的类型。但是,对于@Bean工厂方法,您需要确保声明的返回类型是足够明确的。对于实现多个接口或可能由其实现类型引用的组件,考虑在工厂方法上声明最具体的返回类型(至少跟注入点需要的类型一样)。
您还可以将@Autowired注解添加到期望得到该类型数组的字段或方法上,让Spring从ApplicationContext返回所有这种类型的bean,如下所示:
public class MovieRecommender {

    @Autowired
    private MovieCatalog[] movieCatalogs;

    // ...
}
类型集合也是一样:
public class MovieRecommender {

    private Set<MovieCatalog> movieCatalogs;

    @Autowired
    public void setMovieCatalogs(Set<MovieCatalog> movieCatalogs) {
        this.movieCatalogs = movieCatalogs;
    }

    // ...
}
💡如果您希望以特定顺序排序数组或列表中的元素,您的目标bean可以实现
org.springframework.core.Ordered接口或使用@Order或标准@Priority注解。否则,它们的顺序跟容器中定义的目标bean的注册顺序一样。您可以针对单个bean定义(如果有多个使用相同的bean类的定义)在目标类级别和@Bean方法中声明@Order注解。@Order值可能会影响注入点的优先级,但请注意它们不会影响单例的启动顺序,这是由依赖关系和@DependsOn声明决定的问题。
请注意,标准
javax.annotation.Priority注解在@Bean级别不可用,因为它无法在方法中声明。它的语义跟通过@Order值与每种类型的单个bean上的@Primary组合类似。
只要预期的key类型为String,即使是Map实例也可以自动注入。映射值包含预期类型的所有bean,键包含相应的bean名称,如以下示例所示:
public class MovieRecommender {

    private Map<String, MovieCatalog> movieCatalogs;

    @Autowired
    public void setMovieCatalogs(Map<String, MovieCatalog> movieCatalogs) {
        this.movieCatalogs = movieCatalogs;
    }

    // ...
}
默认情况下,当没有匹配的候选bean可用于给定注入点时,自动注入失败。在声明的数组,集合或映射的情况下,预期至少有一个匹配的元素。
默认行为是将带注解的方法和字段视为必须的依赖项。您可以通过以下示例中演示更改此行为,使框架能够让其变为非必须的来跳过一个不满足依赖的注入点(即,通过将@Autowired中的required属性设置为false):
public class SimpleMovieLister {

    private MovieFinder movieFinder;

    @Autowired(required = false)
    public void setMovieFinder(MovieFinder movieFinder) {
        this.movieFinder = movieFinder;
    }

    // ...
}
如果它的依赖项(或在多个参数的情况下)不可用,则不会调用此非必需的方法。在这种情况下,非必须的字段不会填充,会用其默认值代替。
被注入的构造器和工厂方法参数是一个特殊情况,因为@Autowired中required属性由于Spring的构造函数解析算法可能潜在地处理多个构造函数,因此具有稍微不同的含义。默认情况下构造器和工厂方法参数是必须的,但在单个构造函数场景中有一些特殊规则,例如多元素注入点(数组,集合,映射),如果没有可匹配的bean,则解析为空实例。这允许常见的实现模式,其中所有依赖关系都可以在唯一的多参数构造函数中声明 - 例如,在没有@Autowired注解的情况下被声明为单个公共构造函数。
ℹ️给定bean只有一个构造函数可以被required=true的@Autowired声明,表明这个构造器是其作为Spring bean要注入的构造器。因此,如果其required属性为默认值true,则只有单个构造函数可以用@Autowired注解声明。如果多个构造函数声明了这个注解,则它们都必须将required设置为false,以便被视为用于自动装配的候选者(类似于XML中的autowire=constructor)。Spring容器将选择能最大满足依赖的构造器。如果候选者没有一个满足的,则将使用主/默认构造函数(如果存在)。同样,如果类声明多个构造函数,但都没有声明@Autowired注解,则将使用主/默认构造函数(如果存在)。如果类仅声明单个构造函数,即使没有注解,也将始终使用它。请注意,注解声明的构造函数修饰符不必为public。
在setter方法上建议使用@Autowired的required属性而不是已弃用的@Required注解。将required属性设置为false表示自动注入目标不是必须的,如果它无法自动注入则将忽略该属性。另一方面,@Required强制属性设置,无论用容器支持的什么手段,如果没有定义任何值,则会抛出相应的异常。
或者,您可以通过Java 8的java.util.options表示特定依赖的非必要性质,如以下示例所示:
public class SimpleMovieLister {

    @Autowired
    public void setMovieFinder(Optional<MovieFinder> movieFinder) {
        ...
    }
}
截至Spring Framework 5.0,您也可以使用@Nullable注释(任何包中的任何类型 - 例如,JSR-305中的javax.annotation.Nullable)或只是利用Kotlin内置的空安全支持:
public class SimpleMovieLister {

    @Autowired
    public void setMovieFinder(@Nullable MovieFinder movieFinder) {
        ...
    }
}
您还可以使用@Autowired用于众所周知的可解析依赖性的接口:BeanFactory,ApplicationContext,Environment,ResourceLoader,ApplicationEventPublisher和MessageSource。这些接口及其扩展接口(例如ConfigurableApplicationContext或ResourcePatternResolver)会自动解析,无需特殊设置。以下示例注入ApplicationContext对象:
public class MovieRecommender {

    @Autowired
    private ApplicationContext context;

    public MovieRecommender() {
    }

    // ...
}
ℹ️@Autowired,@Inject,@Value和@Resource注解由Spring BeanPostProcessor实现处理。这意味着您无法在您自己的BeanPostProcessor或BeanFactoryPostProcessor类型中应用这些注解(如果有)。这些类型必须通过使用XML或Spring @Bean方法显式注入。
# 1.9.3. 使用@Primary调整基于注解的自动注入
因为按类型的自动注入可能有多个候选者,所以通常需要更精细地控制选择过程。实现这一目标的一种方法是Spring的@Primary注解。@Primary表示当单值依赖有多个候选者时,应给出注入bean的首选项。如果候选者中存在一个主bean,则它将成为自动注入的值。
就像以下配置,将FirstMovieCatalog定义为MovieCatalog类型的主bean:
@Configuration
public class MovieConfiguration {

    @Bean
    @Primary
    public MovieCatalog firstMovieCatalog() { ... }

    @Bean
    public MovieCatalog secondMovieCatalog() { ... }

    // ...
}
使用前面的配置,下面的MovieRecommender将注入firstMovieCatalog:
public class MovieRecommender {

    @Autowired
    private MovieCatalog movieCatalog;

    // ...
}
相应的bean定义如下:
<?xml version="1.0" encoding="UTF-8"?>
<beans xmlns="http://www.springframework.org/schema/beans"
    xmlns:xsi="http://www.w3.org/2001/XMLSchema-instance"
    xmlns:context="http://www.springframework.org/schema/context"
    xsi:schemaLocation="http://www.springframework.org/schema/beans
        https://www.springframework.org/schema/beans/spring-beans.xsd
        http://www.springframework.org/schema/context
        https://www.springframework.org/schema/context/spring-context.xsd">

    <context:annotation-config/>

    <bean class="example.SimpleMovieCatalog" primary="true">
        <!-- inject any dependencies required by this bean -->
    </bean>

    <bean class="example.SimpleMovieCatalog">
        <!-- inject any dependencies required by this bean -->
    </bean>

    <bean id="movieRecommender" class="example.MovieRecommender"/>

</beans>
# 1.9.4. 使用@Qualifiers调整基于注解的自动注入
当按类型注入的方式可以确定一个主候选者时,使用@Primary是很有效的方式。当你需要控制更多选择过程时,可以使用@Qualifier注解。你可以将限定符与特定参数相关联,缩小类型匹配的集合,以便为每个参数选择特定bean。在最简单的情况下,这可以是普通的描述性值,如下例所示:
public class MovieRecommender {

    @Autowired
    @Qualifier("main")
    private MovieCatalog movieCatalog;

    // ...
}
你也单独地在构造函数参数或方法参数上指定@Qualifier注解,如下图所示:
public class MovieRecommender {

    private MovieCatalog movieCatalog;

    private CustomerPreferenceDao customerPreferenceDao;

    @Autowired
    public void prepare(@Qualifier("main") MovieCatalog movieCatalog,
            CustomerPreferenceDao customerPreferenceDao) {
        this.movieCatalog = movieCatalog;
        this.customerPreferenceDao = customerPreferenceDao;
    }

    // ...
}
以下示例显示了相应的bean定义:
<?xml version="1.0" encoding="UTF-8"?>
<beans xmlns="http://www.springframework.org/schema/beans"
    xmlns:xsi="http://www.w3.org/2001/XMLSchema-instance"
    xmlns:context="http://www.springframework.org/schema/context"
    xsi:schemaLocation="http://www.springframework.org/schema/beans
        https://www.springframework.org/schema/beans/spring-beans.xsd
        http://www.springframework.org/schema/context
        https://www.springframework.org/schema/context/spring-context.xsd">

    <context:annotation-config/>

    <bean class="example.SimpleMovieCatalog">
        <qualifier value="main"/>

        <!-- inject any dependencies required by this bean -->
    </bean>

    <bean class="example.SimpleMovieCatalog">
        <qualifier value="action"/>

        <!-- inject any dependencies required by this bean -->
    </bean>

    <bean id="movieRecommender" class="example.MovieRecommender"/>

</beans>
对于匹配方式,bean名称是默认的限定符值。因此,你可以定义一个id为main的bean代替嵌套的限定元素。然而,虽然您可以使用此约定按名称引用特定bean,但@Autowired根本上是可选语义限定符的按类型注入。这意味着限定符的值,甚至是bean的name,始终在类型匹配中缩小语义。它们没有语义表达对唯一bean id的引用。好的限定符值是main、EMEA或persistent,表达与bean id无关的特定组件的特征。
限定符也适用于集合,如Set\<MovieCatalog\>,在这种情况下,根据声明的限定符,所有匹配的bean都被注入集合。这意味着限定符不必是独一无二的。相反,它们是筛选的条件。例如,你可以定义具有相同限定符值“action”的多个<MovieCatalog>bean,所有这些bean都将注入到用@Qualifier("action")标注中的Set\<MovieCatalog\>中。
💡让限定符值在类型匹配的候选内选择针对目标bean名称,在注入点处不需要@Qqualifier注解。如果没有其他指示符(例如qualifier 或primary ),则对于非唯一依赖情况,Spring将注入点名称(即字段名称或参数名称)与目标bean名称匹配并选择同样的候选人,如果有的话。
也就是说,如果你打算使用按名称注入的注解,不建议使用@Autowired,而使用JSR-250规范的@Resource注解,它在语义上的定义就是标识一个特定名称的组件,且声明的类型与匹配过程无关。@Autowired却有不同的语义:选择类型匹配的候选bean后,仅在这些候选者中考虑指定的字符串限定符(例如,将“account”限定符与标有相同限定符标签标记的bean匹配)。
对于定义为集合,Map或者数组类型的bean,@Resource能通过唯一名称引用特定的集合或数组bean。也就是说截止4.3,集合,你可以通过Spring的@Autowired类型匹配算法匹配Map和数组类型,只要在@Bean返回类型签名或集合继承层次结构中保留了元素类型信息(PS:这里翻译可能有误)。在这种情况下,你可以使用限定符来选择相同类型的集合,如前一段所述。
截至4.3,@Autowired也考虑自我注入(即,回到当前注入的bean的引用)。注意自注入是一个回调。对其他组件的常规依赖总是优先的。从这种意义上讲,自我引用不参加常规候选选择,因此不是最主要的。相反,它们总是低优先级最低的。在实践中,你应该仅使用自我引用作为最后的措施(例如,要通过Bean的事务代理调用相同实例的其他方法)。考虑在这种情况下将受影响的方法进行分解给单独的委派bean。或者,您可以使用@Resource,其可以通过其唯一名称获取代理返回当前bean。(PS:不太理解这一段的意思,可能翻译有误)
ℹ️尝试在同一配置类上注入来自@Bean方法的结果,也是有效的自引用参考场景。解析实际需要的方法签名中的此类引用(而不是配置类中的自动注入字段),或者将受影响的@Bean方法声明为静态的,从包含的配置类实例和其生命周期解耦它们。否则,此类bean仅在回调阶段中考虑在其他配置类上选择其中匹配的bean为主候选对象(如果可用)(PS:不太理解这一段的意思,可能翻译有误)。
@Autowired适用于字段,构造函数和多参数方法,允许通过参数级别的限定符注解缩小选择范围。相比之下,@Resource仅支持具有单个参数的字段和bean属性setter方法。因此,如果注入目标是构造函数或多参数方法,则应使用限定符。
您可以创建自己的自定义限定符注解。为此,定义注解并在定义中提供@Qualifier注解,如以下示例显示:
@Target({ElementType.FIELD, ElementType.PARAMETER})
@Retention(RetentionPolicy.RUNTIME)
@Qualifier
public @interface Genre {

    String value();
}
然后,您可以在自动注入字段和参数上提供自定义限定符,如以下示例显示:
public class MovieRecommender {

    @Autowired
    @Genre("Action")
    private MovieCatalog actionCatalog;

    private MovieCatalog comedyCatalog;

    @Autowired
    public void setComedyCatalog(@Genre("Comedy") MovieCatalog comedyCatalog) {
        this.comedyCatalog = comedyCatalog;
    }

    // ...
}
接下来,您可以提供候选bean定义的信息。您可以将<qualifier/>标记添加为<bean />标记的子元素,然后指定要匹配自定义限定符注释的类型和值。该类型与注解的完全限定类名匹配。或者,如果没有相互冲突的名称的风险,则可以使用短类名称。以下示例演示了两种方法:
<?xml version="1.0" encoding="UTF-8"?>
<beans xmlns="http://www.springframework.org/schema/beans"
    xmlns:xsi="http://www.w3.org/2001/XMLSchema-instance"
    xmlns:context="http://www.springframework.org/schema/context"
    xsi:schemaLocation="http://www.springframework.org/schema/beans
        https://www.springframework.org/schema/beans/spring-beans.xsd
        http://www.springframework.org/schema/context
        https://www.springframework.org/schema/context/spring-context.xsd">

    <context:annotation-config/>

    <bean class="example.SimpleMovieCatalog">
        <qualifier type="Genre" value="Action"/>
        <!-- inject any dependencies required by this bean -->
    </bean>

    <bean class="example.SimpleMovieCatalog">
        <qualifier type="example.Genre" value="Comedy"/>
        <!-- inject any dependencies required by this bean -->
    </bean>

    <bean id="movieRecommender" class="example.MovieRecommender"/>

</beans>
在ClassPath扫描和托管组件 (opens new window)中,您可以看到基于注解的替代方案。具体请参阅使用注解提供限定符元数据 (opens new window)。
在某些情况下,使用没有值的注解可能就足够了。当注解服务更通用的目的时,这可以是有用的,并且可以跨多种不同类型的依赖性应用。例如,您可以提供可以在没有可用的Internet连接时搜索的脱机目录。首先,定义简单的注释,如以下示例所示:
@Target({ElementType.FIELD, ElementType.PARAMETER})
@Retention(RetentionPolicy.RUNTIME)
@Qualifier
public @interface Offline {

}
然后将注解添加到字段或属性上,如下例所示
public class MovieRecommender {

    @Autowired
    @Offline
    private MovieCatalog offlineCatalog;

    // ...
}
现在Bean定义只需要一个限定符类型,如下例所示
<bean class="example.SimpleMovieCatalog">
    <qualifier type="Offline"/>
    <!-- inject any dependencies required by this bean -->
</bean>
您还可以定义接受命名属性的自定义限定符注解替代简单的值属性。如果在字段或参数上指定了多个属性值,则bean定义必须与所有此类属性值匹配才被视为自动注入的候选者。例如,参考以下注解定义:
@Target({ElementType.FIELD, ElementType.PARAMETER})
@Retention(RetentionPolicy.RUNTIME)
@Qualifier
public @interface MovieQualifier {

    String genre();

    Format format();
}
在这种情况下,Format是一个枚举,如下所示:
public enum Format {
    VHS, DVD, BLURAY
}
要自动注入的字段是用自定义限定符注注解标注的,并且包括两个属性的值:genre和format,如下例所示:
public class MovieRecommender {

    @Autowired
    @MovieQualifier(format=Format.VHS, genre="Action")
    private MovieCatalog actionVhsCatalog;

    @Autowired
    @MovieQualifier(format=Format.VHS, genre="Comedy")
    private MovieCatalog comedyVhsCatalog;

    @Autowired
    @MovieQualifier(format=Format.DVD, genre="Action")
    private MovieCatalog actionDvdCatalog;

    @Autowired
    @MovieQualifier(format=Format.BLURAY, genre="Comedy")
    private MovieCatalog comedyBluRayCatalog;

    // ...
}
最后,Bean定义应包含匹配的限定符值。此示例还演示了您可以使用bean meta属性而不是<qualifier/>元素。如果可用,则<qualifier/>元素及其属性优先,但自动控制机制如果在以下示例中没有存在此类限定符,则返回到<meta />标记中提供的值:
<?xml version="1.0" encoding="UTF-8"?>
<beans xmlns="http://www.springframework.org/schema/beans"
    xmlns:xsi="http://www.w3.org/2001/XMLSchema-instance"
    xmlns:context="http://www.springframework.org/schema/context"
    xsi:schemaLocation="http://www.springframework.org/schema/beans
        https://www.springframework.org/schema/beans/spring-beans.xsd
        http://www.springframework.org/schema/context
        https://www.springframework.org/schema/context/spring-context.xsd">

    <context:annotation-config/>

    <bean class="example.SimpleMovieCatalog">
        <qualifier type="MovieQualifier">
            <attribute key="format" value="VHS"/>
            <attribute key="genre" value="Action"/>
        </qualifier>
        <!-- inject any dependencies required by this bean -->
    </bean>

    <bean class="example.SimpleMovieCatalog">
        <qualifier type="MovieQualifier">
            <attribute key="format" value="VHS"/>
            <attribute key="genre" value="Comedy"/>
        </qualifier>
        <!-- inject any dependencies required by this bean -->
    </bean>

    <bean class="example.SimpleMovieCatalog">
        <meta key="format" value="DVD"/>
        <meta key="genre" value="Action"/>
        <!-- inject any dependencies required by this bean -->
    </bean>

    <bean class="example.SimpleMovieCatalog">
        <meta key="format" value="BLURAY"/>
        <meta key="genre" value="Comedy"/>
        <!-- inject any dependencies required by this bean -->
    </bean>

</beans>
# 1.9.5. 使用泛型作为自动装配限定符
除了@Qualifier注解外,还可以使用Java泛型作为隐式的限定形式。例如,假设您有以下配置:
@Configuration
public class MyConfiguration {

    @Bean
    public StringStore stringStore() {
        return new StringStore();
    }

    @Bean
    public IntegerStore integerStore() {
        return new IntegerStore();
    }
}
假设前面的bean实现了泛型接口,(即Store<String>和Store<Integer>),当泛型用作限定符时你可以使用@Autowire自动注入Store接口,如以下示例:
@Autowired
private Store<String> s1; // <String> qualifier, injects the stringStore bean

@Autowired
private Store<Integer> s2; // <Integer> qualifier, injects the integerStore bean
泛型限定符也适用于自动注入lists,Map和数组。如以下示例:
// Inject all Store beans as long as they have an <Integer> generic
// Store<String> beans will not appear in this list
@Autowired
private List<Store<Integer>> s;
# 1.9.6. 使用CustomAutowireConfigurer
CustomAutowirecConfigurer是一个BeanFactoryPostProcessor,它允许您注册自己的自定义限定符注解类型,即使它们没有使用Spring的@Qualifier注解。参考以下示例:
<bean id="customAutowireConfigurer"
        class="org.springframework.beans.factory.annotation.CustomAutowireConfigurer">
    <property name="customQualifierTypes">
        <set>
            <value>example.CustomQualifier</value>
        </set>
    </property>
</bean>
AutowireCandidateResolver通过以下方式确定Autowire候选者:
每个Bean定义的autowire-candidate值
在<bean />元素上可用的任何default-autowire-candidates
@Qualifier注解和使用CustomAutowireConfigurer注册的任何自定义注解
当多个bean限定为autowire候选者时,确定“primary”的原则如下:如果候选者中的一个bean定义primary属性为true,则被选中。
# 1.9.7. 使用@Resource注入
Spring还支持使用JSR-250 @Resource注解(javax.annotation.resource)在字段或bean属性setter方法上注入。这是Java EE中的常见模式:例如,在JSF管理Bean和JAX-WS端点中。Spring支持Spring管理对象的此模式。
@Resource有一个name属性。默认情况下,Spring将该值解释为要注入的bean名称。换句话说,它遵循名称语义,如下例所示:
public class SimpleMovieLister {

    private MovieFinder movieFinder;

    @Resource(name="myMovieFinder")
    public void setMovieFinder(MovieFinder movieFinder) {
        this.movieFinder = movieFinder;
    }
}
如果未明确指定名称,则默认名称派生自字段名称或Setter方法。如果是一个字段,它是字段名称。如果是setter方法,则它是bean属性名称。以下示例将用名为movieFinder的bean注入其setter方法:
public class SimpleMovieLister {

    private MovieFinder movieFinder;

    @Resource
    public void setMovieFinder(MovieFinder movieFinder) {
        this.movieFinder = movieFinder;
    }
}
ℹ️该注解提供的名称被CommonAnnotationBeanPostProcessor所知的ApplicationContext解析为Bean名称。如果您明确配置Spring的
SimpleJndiBeanFactory(opens new window) ,则可以通过JNDI解析名称。但是,我们建议您依靠默认行为,并使用Spring的JNDI查找功能来保留间接级别。
在@Resource没有显式指定名称情况下,类似于@Autowired,@Resource按主类型匹配而不是特定的bean名称,并解析可解析依赖项:BeanFactory,ApplicationContext,ResourceLoader,ApplicationEventPublisher和MessageSource接口
因此,在以下示例中,customerPreferenceDao字段首先查找名为“customerPreferenceDao”的bean,找不到时再去按CustomerPreferenceDao的主要类型匹配:
public class MovieRecommender {

    @Resource
    private CustomerPreferenceDao customerPreferenceDao;

    @Resource
    //基于已知的可解析依赖项类型(ApplicationContext)注入上下文字段:
    private ApplicationContext context;

    public MovieRecommender() {
    }

    // ...
}
# 1.9.8. 使用@Value
@Value通常用于注入外部属性:
@Component
public class MovieRecommender {

    private final String catalog;

    public MovieRecommender(@Value("${catalog.name}") String catalog) {
        this.catalog = catalog;
    }
}
@Configuration
@PropertySource("classpath:application.properties")
public class AppConfig { }
application.properties文件定义如下:
catalog.name=MovieCatalog
在这种情况下,catalog参数和字段将等于MovieCatalog。
默认的内嵌值解析器由Spring提供。它将尝试解析属性值,如果无法解析,则属性名称(例如$ {catalog.name})将被作为注入值。如果要保持对不存在的值的控制,则应声明名为PropertySourcesPlaceholderConfigurer的Bean,如以下示例:
@Configuration
public class AppConfig {

     @Bean
     public static PropertySourcesPlaceholderConfigurer propertyPlaceholderConfigurer() {
           return new PropertySourcesPlaceholderConfigurer();
     }
}
ℹ️使用javaconfig配置PropertySourcesPlaceholderConfigurer时,@Bean方法必须是静态的。
使用上述配置确保如果无法解决任何$ {}占位符,则会确保Spring初始化失败。也可以使用setPlaceholderPrefix,setPlaceholderSuffix或setValueSeparator等方法来定制占位符。
ℹ️Spring Boot默认配置了PropertySourcesPlaceholderConfigurer,它将从application.properties和application.yml文件中获取属性。
Spring提供的内置转换器支持允许自动处理简单类型转换(例如Integer或int)。无需额外操作,可以自动将多个逗号分隔值自动转换为字符串数组。如以下示例:
@Component
public class MovieRecommender {

    private final String catalog;

    public MovieRecommender(@Value("${catalog.name:defaultCatalog}") String catalog) {
        this.catalog = catalog;
    }
}
Spring的 BeanPostProcessor使用ConversionService来处理将@Value中的字符串值转换为目标类型的过程。如果要为自己的自定义类型提供转换支持,则可以提供自己的ConversionService Bean实例,如以下示例:
@Configuration
public class AppConfig {

    @Bean
    public ConversionService conversionService() {
        DefaultFormattingConversionService conversionService = new DefaultFormattingConversionService();
        conversionService.addConverter(new MyCustomConverter());
        return conversionService;
    }
}
当@Value包含SpEL表达式时,值会动态计算,如以下示例:
@Component
public class MovieRecommender {

    private final String catalog;

    public MovieRecommender(@Value("#{systemProperties['user.catalog'] + 'Catalog' }") String catalog) {
        this.catalog = catalog;
    }
}
SpEL还可以使用更复杂的数据结构:
@Component
public class MovieRecommender {

    private final Map<String, Integer> countOfMoviesPerCatalog;

    public MovieRecommender(
            @Value("#{{'Thriller': 100, 'Comedy': 300}}") Map<String, Integer> countOfMoviesPerCatalog) {
        this.countOfMoviesPerCatalog = countOfMoviesPerCatalog;
    }
}
# 1.9.9. 使用@PostConstruct和@PreDestroy
CommonAnnotationBeanPostProcessor不仅识别@Resource注解,还识别JSR-250生命周期注解:javax.annotation.PostConstruct和javax.annotation.PreDestroy。在Spring 2.5中引入,对这些注解的支持提供了初始化回调和销毁回调中描述的生命周期回调机制的替代方案。如果CommonAnnotationBeanPostProcessor在Spring ApplicationContext中注册,被这些注解标注的方法会在Spring对应的生命周期接口或声明的回调方法中调用。在以下示例中,缓存在初始化后预先存储并在销毁时清除:
public class CachingMovieLister {

    @PostConstruct
    public void populateMovieCache() {
        // populates the movie cache upon initialization...
    }

    @PreDestroy
    public void clearMovieCache() {
        // clears the movie cache upon destruction...
    }
}
有关组合各种生命周期机制的影响的详细信息,请参阅组合生命周期机制 (opens new window)。
ℹ️与@Resource一样,@PostConstruct和@PreDestroy注解是来自JDK 6到8的标准Java库的一部分。但是,整个javax.annotation包与JDK 9中的核心Java模块分开,最终在JDK 11中删除。如果需要,javax.annotation-api现在需要通过Maven获得,只需将其添加到应用程序的类路径。
# 1.10. ClassPath扫描和可管理组件
本章中大多数示例使用XML指定在Spring容器中生成每个BeanDefinition的配置元数据。上一节(基于注解的容器配置)演示了如何通过注解提供大量配置元数据。然而,即使在这些示例中,也要在XML文件中明确定义“基本”Bean定义,而注解仅驱动依赖注入。本节介绍通过扫描类路径隐式探测候选组件。候选组件是与过滤条件匹配的类,并具有对容器注册的相应bean定义。这能替代使用XML执行bean注册。相反,您可以使用注解(例如,@Component),AspectJ类型表达式或您自己的自定义筛选条件,以选择那些类具有在容器中注册的bean定义。
ℹ️从Spring 3.0开始,Spring JavaConfig 项目提供的许多功能都是spring core的一部分。这允许您使用Java而不是使用传统的XML文件来定义Bean。查看@Configuration,@Bean,@Import和@DependsOn注解,了解如何使用这些新功能。
# 1.10.1. @Component和其他原型注解
@Repository注解表示符合存储库角色或原型的类(也称为数据访问对象或DAO)。该标记的用途是异常的自动翻译,如Exception Translation (opens new window)中所述。
Spring提供了其他原型注解:@Component,@Service和@Controller。@Component是任何Spring托管组件的通用原型。@Repository,@Service和@Controller是@Component专门用于更具体场景的用例(分别在持久层,服务和演示层中)。因此,您可以使用@Component标注你的组件类,但是,通过使用@Repository,@Service或@Controller标注它们,你的类更适合通过工具处理或与切面相关联。例如,这些原型注解为切点提供了目标。@Repository,@Service和@Controller还可以在Spring框架的未来版本中携带额外的语义。因此,如果你在服务层使用@Component或@Service之间选择,则@Service显然是更好的选择。同样,如前所述,@Repository已被支持为持久层中的自动异常转换的标记。
# 1.10.2 使用元注解和组合注解
Spring提供的许多注解可以用作代码中的元注解。元注解是可以应用于另一个注解的注解。例如,前面提到的@Service注解是使用元注解@Component标注的,如以下示例:
@Target(ElementType.TYPE)
@Retention(RetentionPolicy.RUNTIME)
@Documented
@Component //组件导致@Service以与@Component相同的方式处理。
public @interface Service {

    // ...
}
您还可以组合元注解以创建组合注解。例如,Spring MVC的@RestController注解由@Controller和@ResponseBody组成。
此外,组合注解允许重定义元注解的属性。当您只想暴露元注解的属性的子集时,这可能特别有用。例如,Spring的@SessionScope注解硬件码scope为session,但仍允许自定义proxyMode。以下显示了SessionsCope注解的定义:
@Target({ElementType.TYPE, ElementType.METHOD})
@Retention(RetentionPolicy.RUNTIME)
@Documented
@Scope(WebApplicationContext.SCOPE_SESSION)
public @interface SessionScope {

    /**
     * Alias for {@link Scope#proxyMode}.
     * <p>Defaults to {@link ScopedProxyMode#TARGET_CLASS}.
     */
    @AliasFor(annotation = Scope.class)
    ScopedProxyMode proxyMode() default ScopedProxyMode.TARGET_CLASS;

}
然后,你可以使用@SessionScope而不声明proxyode,如下所示:
@Service
@SessionScope
public class SessionScopedService {
    // ...
}
你也可以覆盖proxyMode的值,如以下示例:
@Service
@SessionScope(proxyMode = ScopedProxyMode.INTERFACES)
public class SessionScopedUserService implements UserService {
    // ...
}
有关详细信息,请参阅 Spring Annotation Programming Model (opens new window)Wiki页面。
# 1.10.3. 自动探测类和注册Bean定义
Spring可以自动检测原型类并使用ApplicationContext注册相应的BeanDefinition实例。例如,以下两个类会被自动检测:
@Service
public class SimpleMovieLister {

    private MovieFinder movieFinder;

    public SimpleMovieLister(MovieFinder movieFinder) {
        this.movieFinder = movieFinder;
    }
}
@Repository
public class JpaMovieFinder implements MovieFinder {
    // implementation elided for clarity
}
要自动检测这些类并注册相应的bean,您需要将@ComponentScan添加到@Configuration标注的类上,其中basePackages属性是以上两个类的父包。(或者,您可以指定包含每个类的父包的以逗号、分号或空格分隔的列表。)
@Configuration
@ComponentScan(basePackages = "org.example")
public class AppConfig  {
    // ...
}
ℹ️简洁点,前面的示例可以使用注解的value属性(即,@ComponenScan(“org.example”))。
对应的XML配置如下:
<?xml version="1.0" encoding="UTF-8"?>
<beans xmlns="http://www.springframework.org/schema/beans"
    xmlns:xsi="http://www.w3.org/2001/XMLSchema-instance"
    xmlns:context="http://www.springframework.org/schema/context"
    xsi:schemaLocation="http://www.springframework.org/schema/beans
        https://www.springframework.org/schema/beans/spring-beans.xsd
        http://www.springframework.org/schema/context
        https://www.springframework.org/schema/context/spring-context.xsd">

    <context:component-scan base-package="org.example"/>

</beans>
💡<context:component-scan>隐式启用了<context:annotation-config>的功能。使用<context:component-scan>时,通常不需要包含<context:annotation-config>元素。
ℹ️类路径包的扫描需要类路径中存在相应的目录。当使用Ant构建JAR时,请确保不会激活JAR任务的仅限文件开关。此外,由于某些环境中的安全策略可能不会暴露类路径目录--例如,在JDK 1.7.0_45和更高的独立应用程序(需要在manifests 中设置‘Trusted-Library’--参考https://stackoverflow.com/questions/19394570/java-jre-7u45-breaks-classloader-getresources)
此外,使用component-scan时,AutowiredAnnotationBeanPostProcessor和CommonAnnotationBeanPostProcessor都被隐式包含。这意味着两个组件被自动检测并连接在一起 - 并不需要在XML中提供Bean配置元数据。
ℹ️您可以通过设置annotation-config为false来禁用AutowiredAnnotationBeanPostProcessor和CommonAnnotationBeanPostProcessor的注册。
# 1.10.4. 使用过滤器自定义扫描
默认情况下,使用@Component,@ Repository,@Service,@Controller,@Configuration或继承了@Component的自定义注解的类才被自动检测。但是,您可以通过应用自定义过滤器来修改和扩展此行为。将它们添加为@Componentscan的includeFilters或者excludeFilters属性(或作为<context:component-scan>的子元素<context:include-filter />和<context:exclude-filter />)。每个过滤元素都需要type和expression属性。下表介绍了过滤选项:
| 过滤类型 | 示例表达式 | 描述 |
|---|---|---|
| annotation (默认) | org.example.SomeAnnotation | 在目标组件中的类层级上存在或作为元数据的注解 |
| assignable | org.example.SomeClass | 目标组件扩展或实现的类(或接口) |
| aspectj | org.example..*Service+ | 匹配目标组件的AspectJ 类型表达式 |
| regex | org.example.Default.* | 匹配目标组件类名的正则表达式 |
| custom | org.example.MyTypeFilter | 自定义实现org.springframework.core.type.TypeFilter接口。 |
以下示例显示了忽略所有@Repository注释的配置,并使用“stub”仓储:
@Configuration
@ComponentScan(basePackages = "org.example",
        includeFilters = @Filter(type = FilterType.REGEX, pattern = ".*Stub.*Repository"),
        excludeFilters = @Filter(Repository.class))
public class AppConfig {
    ...
}
等价XML配置如下:
<beans>
    <context:component-scan base-package="org.example">
        <context:include-filter type="regex"
                expression=".*Stub.*Repository"/>
        <context:exclude-filter type="annotation"
                expression="org.springframework.stereotype.Repository"/>
    </context:component-scan>
</beans>
ℹ️您还可以通过在注解上设置
useDefaultFilters=false或在<component-scan />中配置use-default-filters="false"来禁用默认过滤器。这有效地禁用自动检测带有@Component,@Repository,@Service,@Controller,@RestController,@Configuration或被@Component标注的注解。
# 1.10.5. 在组件内定义Bean元数据
Spring组件还可以将Bean定义元数据放到容器。可以在@Configuration标注的类中使用@Bean来定义bean原数量,以下示例显示了如何执行此操作:
@Component
public class FactoryMethodComponent {

    @Bean
    @Qualifier("public")
    public TestBean publicInstance() {
        return new TestBean("publicInstance");
    }

    public void doWork() {
        // Component method implementation omitted
    }
}
该类是一个Spring组件,它在其doWork()方法中具有特定于应用程序的代码。但是,它还有一个包含bean定义的工厂方法publicInstance()。@Bean注解标识此工厂方法和其他bean定义属性,例如通过@Qualifier指定限定值。可以指定的其他方法级注解是@Scope,@Lazy和自定义限定符注解。
💡除了为组件初始化的作用外,还可以在标有@Autowired或@Inject的注入点上使用@Lazy注注解。在这种情况下,它会注入一个懒加载的代理类。
如前所述,支持自动注入的字段和方法,并为@Bean方法的自动装配提供了额外的支持。以下示例显示了如何执行此操作:
@Component
public class FactoryMethodComponent {

    private static int i;

    @Bean
    @Qualifier("public")
    public TestBean publicInstance() {
        return new TestBean("publicInstance");
    }

    // use of a custom qualifier and autowiring of method parameters
    @Bean
    protected TestBean protectedInstance(
            @Qualifier("public") TestBean spouse,
            @Value("#{privateInstance.age}") String country) {
        TestBean tb = new TestBean("protectedInstance", 1);
        tb.setSpouse(spouse);
        tb.setCountry(country);
        return tb;
    }

    @Bean
    private TestBean privateInstance() {
        return new TestBean("privateInstance", i++);
    }

    @Bean
    @RequestScope
    public TestBean requestScopedInstance() {
        return new TestBean("requestScopedInstance", 3);
    }
}
该示例自动将名为privateInstance的bean的age属性值注入到方法的country字符串参数。Spring表达式语言元素通过符号#{<表达式>}定义属性的值。对于@Value注解,在解析表达式文本时,请预先配置表达式解析器以查找Bean名称。
从Spring Framework 4.3起,可以声明类型注入点(或其更具体的子类:DependencyDescriptor)的工厂方法参数,以访问触发当前bean创建的请求注入点。请注意,这仅适用于Bean实例的实际创建,而不是注入现有实例。因此,此功能对原型范围的bean最有意义。对于其他作用域,工厂方法只能看到触发在给定范围内创建新Bean实例的注入点(例如,触发懒惰单例Bean创建的依赖项)。您可以在这种情况下使用提供的注入点元数据与语义关注。以下示例显示了如何使用注入点:
@Component
public class FactoryMethodComponent {

    @Bean @Scope("prototype")
    public TestBean prototypeInstance(InjectionPoint injectionPoint) {
        return new TestBean("prototypeInstance for " + injectionPoint.getMember());
    }
}
常规Spring组件中的@Bean方法与@Configuration标注的类中的处理有所不同。不同之处在于@Component标注的类不会使用CGLIB增强以拦截方法和字段的调用。CGLIB代理是@Configuration类中的@Bean方法中的调用方法或字段的方法创建对协作对象的bean元数据引用。此类方法不会用正常的Java语义调用,即使通过对@Bean方法的程序调用引用其他bean,而是通过容器调用,以便提供Spring bean的通常的生命周期管理和代理。相比之下,在纯@Component类中调用@Bean方法中的方法或字段具有标准的Java语义,没有特殊的CGLIB处理或应用其他约束。
💡可以将@Bean方法声明为静态,允许调用它们,而无需将其包含配置类作为实例。在定义后处理器bean(例如BeanFactoryPostProcessor或BeanPostProcessor)时,这会特别有意义,因为此类Bean早期在容器生命周期中初始化,并且应避免在该点处触发配置的其他部分。
调用静态@Bean方法永远不会被容器拦截,甚至在@Configuration类中(如本节前面所述),由于技术限制:CGLIB子类仅可以覆盖非静态方法。因此,对另一个@Bean方法的直接调用具有标准的Java语义,从而从工厂方法本身直接返回独立的实例。
@Bean方法的Java语言可见性对Spring的容器中产生的bean定义没有直接影响。可以自由声明工厂方法,非@Configuration配置类中也行,其他任何地方的静态方法也行。但是,@Configuration类中的常规@Bean方法需要可覆盖 - 也就是说,它们不得被声明为private或final。
@Bean方法也可在给定组件或配置类的基类上,以及在组件或配置类实现的接口中声明的Java 8默认方法被找到。这使得可以做很复杂的配置,并且自Spring 4.2起通过Java 8默认方法来实现多继承。
最后,单个类可能有同一bean的@Bean方法,作为多个工厂方法的配置,具体取决于运行时的可用依赖项。这与选择“贪婪”构造函数或工厂方法的其他配置方案中的算法相同:在构造时挑选具有最大数量的满足依赖性的变体,类似于容器如何在多个@Autowired构造函数之间选择。
# 1.10.6. 命名自动探测组件
当组件作为扫描过程的一部分被自动检测到时,其Bean名称由该扫描过程已知的BeanNameGenerator策略生成。默认情况下,包含value属性的任何Spring原型注解(@Component,@Repository,@Service和@Controller)将该名称提供给相应的bean定义。
如果这样的注解value没有设值或任何其他检测到的组件(例如自定义过滤器发现的组件),则默认bean名称生成器返回首字母小写的非限定类名。例如,如果检测到以下组件类,则该名称将是myMovieLister和movieFinderImpl:
@Service("myMovieLister")
public class SimpleMovieLister {
    // ...
}
@Repository
public class MovieFinderImpl implements MovieFinder {
    // ...
}
如果您不想依赖默认的bean命名策略,您可以提供自定义bean命名策略。首先,实现BeanNameGenerator接口,并确保包含默认的无参构造函数。然后,在配置扫描器时提供全限定类名,如以下示例。
💡如果由于具有相同的非限定类名(即具有相同名称的类但所在包不同)而遇到命名冲突,则可能需要配置默认为完全限定的类名的BeanNameGenerator。Spring Framework 5.2.3起,FullyQualifiedAnnotationBeanNameGenerator位于org.springframework.context.annotation中。
@Configuration
@ComponentScan(basePackages = "org.example", nameGenerator = MyNameGenerator.class)
public class AppConfig {
    // ...
}
<beans>
    <context:component-scan base-package="org.example"
        name-generator="org.example.MyNameGenerator" />
</beans>
作为一般规则,每当其他组件明确引用它时,请考虑使用注解指定名称。另一方面,只要容器负责注入,自动生成的名称就足够了。
# 1.10.7. 提供自动探测组件的作用域
与spring管理的组件一样,自动探测组件的默认和最常见的作用域是单例。但是,有时需要一个可以由@Scope注解指定的不同作用域。你可以在注解中提供作用域的名称,如以下示例显示:
@Scope("prototype")
@Repository
public class MovieFinderImpl implements MovieFinder {
    // ...
}
ℹ️@Scope注解仅在具体Bean类(被注解的组件)或工厂方法(用于@Bean方法)上。与XML Bean定义相比,没有Bean定义继承的概念,并且类级别的继承层次结构与元数据目的无关。
为了提供自定义作用域解决策略而不是依赖基于注解的方法,可以实现
ScopeMetadataResolver(opens new window)接口。请务必包含默认的无参构造函数。然后,您可以在配置扫描器时提供完全限定的类名,如以下示例:
@Configuration
@ComponentScan(basePackages = "org.example", scopeResolver = MyScopeResolver.class)
public class AppConfig {
    // ...
}
<beans>
    <context:component-scan base-package="org.example" scoped-proxy="interfaces"/>
</beans>
# 1.10.8. 用注解提供限定符元数据
@Qualifier在前面章节已经讨论。该部分中的示例演示了使用@Qualifier注解和自定义限定符注解,以便在您解析自动注入候选时提供细粒度控制。因为这些示例基于XML Bean定义,所以通过使用XML中的Bean元素的限定符或元子元素,在候选bean定义上提供限定符元数据。依赖于类路径扫描进行自动检测组件时,可以在候选类上提供具有类型级注解的限定符元数据。以下三个例子演示了这种技术:
@Component
@Qualifier("Action")
public class ActionMovieCatalog implements MovieCatalog {
    // ...
}
@Component
@Genre("Action")
public class ActionMovieCatalog implements MovieCatalog {
    // ...
}
@Component
@Offline
public class CachingMovieCatalog implements MovieCatalog {
    // ...
}
ℹ️与大多数基于注解的替代方案一样,记住注解元数据绑定到类定义本身,而XML的使用允许多个相同类型的Bean提供其限定符元数据的变体,因为元数据是为每个实例提供而不是每个类。
# 1.10.9. 生成候选组件的索引
虽然类路径扫描非常快,但可以通过在编译时间创建候选者的静态列表来提高大型应用程序的启动性能。在此模式下,组件扫描目标的所有模块都必须使用此机制。
ℹ️现有的@ComponentScan或<context:component-scan>指令必须保留,以请求上下文扫描正确软件包中的候选者。当ApplicationContext检测到这样的索引时,它会自动使用它而不是扫描类路径。
要生成索引,请为每个包含组件扫描指令的组件的模块添加一个额外依赖项。以下示例显示了如何使用maven执行此操作:
<dependencies>
    <dependency>
        <groupId>org.springframework</groupId>
        <artifactId>spring-context-indexer</artifactId>
        <version>5.3.2</version>
        <optional>true</optional>
    </dependency>
</dependencies>
使用Gradle 4.5及更早版本,应在compileOnly配置中声明依赖项,如以下示例所示:
dependencies {
    compileOnly "org.springframework:spring-context-indexer:5.3.2"
}
使用Gradle 4.6及更高版本,应在annotationProcessor配置中声明依赖项,如以下示例所示:
dependencies {
    annotationProcessor "org.springframework:spring-context-indexer:{spring-version}"
}
该过程在JAR文件中生成META-INF/spring.components文件。
ℹ️在IDE中使用此模式时,spring-context-indexer必须注册为注解处理器,以确保更新候选组件时索引是最新的。
💡在类路径上找到META-INF/spring.components时,索引将自动启用。如果索引部分可用于某些库(或用例),但无法为整个应用程序构建,您可以通过将spring.index.ignore设置为true,作为系统属性或在类路径根目录中的spring.properties文件中,以常规类路径配置(好像根本没有索引)。
# 1.11. 使用JSR330标准注解
从Spring 3.0开始,Spring为JSR-330标准注解提供支持(依赖注入)。这些注解以与Spring注解相同的方式扫描。要使用它们,您需要在类路径中拥有相关的JAR。
ℹ️如果使用maven,则标准Maven存储库(https://repo1.maven.org/maven2/javax/inject/javax.inject/1/)中提供了javax.inject。您可以将以下依赖添加到您的文件pom.xml:
<dependency>
    <groupId>javax.inject</groupId>
    <artifactId>javax.inject</artifactId>
    <version>1</version>
</dependency>
# 1.11.1. 使用@Inject和@Named依赖注入
相对于@Autowired,你可以使用@javax.inject.Inject,如下所示:
import javax.inject.Inject;

public class SimpleMovieLister {

    private MovieFinder movieFinder;

    @Inject
    public void setMovieFinder(MovieFinder movieFinder) {
        this.movieFinder = movieFinder;
    }

    public void listMovies() {
        this.movieFinder.findMovies(...);
        // ...
    }
}
与@Autowired一样,可以在字段级别,方法级别和构造函数-参数级别使用@Inject。此外,您可以将注入点声明为Provider,允许通过调用Provider.get()按需接受更短作用域或延迟访问其他bean。以下示例提供了前一个示例的变体:
import javax.inject.Inject;
import javax.inject.Provider;

public class SimpleMovieLister {

    private Provider<MovieFinder> movieFinder;

    @Inject
    public void setMovieFinder(Provider<MovieFinder> movieFinder) {
        this.movieFinder = movieFinder;
    }

    public void listMovies() {
        this.movieFinder.get().findMovies(...);
        // ...
    }
}
如果注入依赖项时想使用限定符名称,则应使用@Named,如以下示例所示:
import javax.inject.Inject;
import javax.inject.Named;

public class SimpleMovieLister {

    private MovieFinder movieFinder;

    @Inject
    public void setMovieFinder(@Named("main") MovieFinder movieFinder) {
        this.movieFinder = movieFinder;
    }

    // ...
}
与@Autowired一样,@Inject也可以与java.util.Optional或@Nullable一起使用。此处甚至更适用,因为@Inject没有必需的属性。
public class SimpleMovieLister {

    @Inject
    public void setMovieFinder(Optional<MovieFinder> movieFinder) {
        // ...
    }
}
public class SimpleMovieLister {

    @Inject
    public void setMovieFinder(@Nullable MovieFinder movieFinder) {
        // ...
    }
}
# 1.11.2. @Named和@ManagedBean:标准等同于@Component
相对于@Component,可以使用@ javax.inject.Named或javax.annotation.ManagedBean,如以下示例显示:
import javax.inject.Inject;
import javax.inject.Named;

@Named("movieListener")  // @ManagedBean("movieListener") could be used as well
public class SimpleMovieLister {

    private MovieFinder movieFinder;

    @Inject
    public void setMovieFinder(MovieFinder movieFinder) {
        this.movieFinder = movieFinder;
    }

    // ...
}
使用@Component而不为组件指定名称非常常见。@Named可以以类似的方式使用,如以下示例所示:
import javax.inject.Inject;
import javax.inject.Named;

@Named
public class SimpleMovieLister {

    private MovieFinder movieFinder;

    @Inject
    public void setMovieFinder(MovieFinder movieFinder) {
        this.movieFinder = movieFinder;
    }

    // ...
}
使用@Named或@ManagedBean时,可以以完全相同的方式使用组件扫描,就像使用Spring注解一样,如以下示例所示:
@Configuration
@ComponentScan(basePackages = "org.example")
public class AppConfig  {
    // ...
}
ℹ️与@Component相比,JSR-330 @Named和JSR-250 ManagedBean注解不可组合。应该使用Spring的原型模型来构建自定义组件注解。
# 1.11.3. JSR-330标准注解的限制
当你使用标准注解时,你应该知道不可用的一些重要功能,如下表显示:
| Spring | javax.inject.* | javax.inject 限制/注释 |
|---|---|---|
| @Autowired | @Inject | @Inject的属性可以为空. 可以使用Java 8的Optional. |
| @Component | @Named / @ManagedBean | JSR-330 未提供可组合的模式, 只有一种识别命名组件的方法. |
| @Scope("singleton") | @Singleton | JSR-330默认作用域就像Spring的prototype. 但是,为了保持与Spring的普遍默认值一致,默认情况下,Spring容器中声明的JSR-330 bean是单例的。为了使用单例以外的作用域, 你应该使用Spring的 @Scope annotation. javax.inject也提供了 @Scope (opens new window) 注解. 但是, 它仅用于创建你自己的注解 |
| @Qualifier | @Qualifier / @Named | javax.inject.Qualifier 只是建立自定义限定符的元注解。具体字符串限定符(如Spring的@Qualifier)可以通过javax.inject.named关联。 |
| @Value | - | - |
| @Required | - | - |
| @Lazy | - | - |
| ObjectFactory | Provider | javax.inject.Provider 是Spring的ObjectFactory的直接替代方案,仅有一个简短的get() 方法。它也可以与Spring的@Autowired或非注解的构造函数和setter方法组合使用。 |
# 1.12. 基于Java的容器配置
本节介绍如何在Java代码中使用注解来配置Spring容器。它包括以下主题:
- 基本概念:@Bean和@Configuration
- 使用AnnotationConfigApplicationContext实例化Spring容器
- 使用@Bean注解
- 使用@Configuration注解
- 编排基于Java的配置
- Bean定义配置文件
- PropertySource抽象
- 使用@PropertySource
- 语句中的占位符解决方案
# 1.12.1. 基本概念:@Bean和@Configuration
Spring的新java配置支持@Configuration注解的类和@Bean注解的方法。
@Bean注解用于指示方法实例化,配置并初始化由Spring IoC容器管理的新对象。对于熟悉Spring的<bean /> XML配置的人来说,@Bean注解扮演与<bean />元素相同的角色。你可以把@Bean注解的方法和Spring @Component搭配使用。但是,它们通常与@Configuration注解的类一起使用。
使用@Configuration注解类表示其主要目的是作为Bean定义的来源。此外,@Configuration类允许通过调用同一类中的其他@Bean方法来相互依赖。最简单的@Configuration类如下:
@Configuration
public class AppConfig {

    @Bean
    public MyService myService() {
        return new MyServiceImpl();
    }
}
前面的AppConfig类等同于以下spring <bean /> xml:
<beans>
    <bean id="myService" class="com.acme.services.MyServiceImpl"/>
</beans>
完整@configuration vs“lite”@Bean模式?
当@Bean方法在未使用@Configuration的类中声明时,它们被称为在“lite”模式下处理。在@Component中声明的Bean方法甚至在普通的old class中被认为是“lite”,具有不同目的,@Bean方法在那里有额外好处。例如,服务组件可以通过每个适用的组件类上的附加@Bean方法将管理视图暴露于容器。在这种情况下,@Bean方法是通用工厂方法机制。
与full @Configuration不同,lite @Bean方法无法声明相互依赖。相反,它们在其包含组件的内部状态上运行,并且可选地在他们可能声明的参数上运行。因此,这种@Bean方法不应调用其他@Bean方法。个此类方法实际上只是特定Bean引用的工厂方法,而没有任何特殊的运行时语义。这里的正面的副作用是在运行时没有施加Cglib子类化,因此在类设计方面没有限制(即,包含类可能是final的等等)。
在一般场景中,要在@Configuration类中声明@Bean方法,确保始终使用“full”模式,因此将跨方法引用重定向到容器的生命周期管理。这可以防止通过常规Java调用意外调用相同的@Bean方法,这有助于减少在“lite”模式下操作时可能产生难以追踪的微妙bug。
@Bean和@Configuration注释在以下章节中深入讨论。然而,我们首先涵盖了通过基于Java的配置创建Spring容器的各种方式。
# 1.12.2 使用AnnotationConfigApplicationContext实例化Spring容器
以下部分介绍在Spring 3.0中引入的AnnotationConfigApplicationContext。这种多功能ApplicationContext实现不仅能够接受@Configuration类作为输入,而且可以使用JSR-330元数据注解的类和纯@Component类。
当@Configuration类作为输入提供,@Configuration类本身作为bean定义被注册,并且类中的所有@Bean方法也作为bean定义被注册。
当提供@Component和JSR-330类时,它们作为Bean定义被注册,并且假设在必要时在这些类中使用诸如@Autowired或@Inject等DI元数据。
简单构造
在实例化ClassPathXmlApplicationContext时使用Spring XML文件作为输入,你可以在实例化AnnotationConfigApplicationContext时使用@Configuration类作为输入。这允许完全无XML使用spring容器,如以下示例显示:
public static void main(String[] args) {
    ApplicationContext ctx = new AnnotationConfigApplicationContext(AppConfig.class);
    MyService myService = ctx.getBean(MyService.class);
    myService.doStuff();
}
如前所述,AnnotationConfigApplicationContext不限于仅使用@Configuration类工作。任何@Component或JSR-330注解类都可以作为构造函数输入,如以下示例所示:
public static void main(String[] args) {
    ApplicationContext ctx = new AnnotationConfigApplicationContext(MyServiceImpl.class, Dependency1.class, Dependency2.class);
    MyService myService = ctx.getBean(MyService.class);
    myService.doStuff();
}
前面的示例假定MyServiceImpl,Dependency1和Dependency2使用Spring依赖注入注解,例如@Autowired。
通过使用register(Class<?>…)以编程方式构建容器
您可以使用无惨构造函数实例化AnnotationConfigApplicationContext,然后使用register()方法配置它。当以编程方式构建AnnotationConfigApplicationContext,这种方法特别有用。以下示例显示了如何执行此操作:
public static void main(String[] args) {
    AnnotationConfigApplicationContext ctx = new AnnotationConfigApplicationContext();
    ctx.register(AppConfig.class, OtherConfig.class);
    ctx.register(AdditionalConfig.class);
    ctx.refresh();
    MyService myService = ctx.getBean(MyService.class);
    myService.doStuff();
}
使用scan(String…)启用组件扫描
要启用组件扫描,您可以按如下方式注释您的@configuration类:
@Configuration
@ComponentScan(basePackages = "com.acme")
public class AppConfig  {
    ...
}
💡对spring熟悉的用户可能知道Spring的context中的XML声明等效应:命名空间,如下示例所示:
<beans>
    <context:component-scan base-package="com.acme"/>
</beans>
在前面的示例中,扫描com.acme包以查找任何@Component注解的类,并且这些类被注册为容器中的Spring Bean。AnnotationConfigApplicationContext暴露scan(String…)方法以允许相同的组件扫描功能,如以下示例所示:
public static void main(String[] args) {
    AnnotationConfigApplicationContext ctx = new AnnotationConfigApplicationContext();
    ctx.scan("com.acme");
    ctx.refresh();
    MyService myService = ctx.getBean(MyService.class);
}
ℹ️请记住,@Configuration被@Component元注解,因此它们是组件扫描的候选者。在前面的示例中,假设AppConfig在com.acme包中声明(或下面的任何包)中声明,在调用scan()期间被拾取。在调用refresh()时,将处理其所有@Bean方法并将其注册为容器中的Bean。
使用AnnotationConfigWebApplicationContext支持Web应用程序
AnnotationConfigApplicationContext的变体WebApplicationContext对于AnnotationConfigWebApplicationContext可用。你可以在配置Spring ContextLoaderListener Servlet侦听器,Spring MVC DispatcherServlet等时使用此实现。以下Web.xml片段配置典型的Spring MVC Web应用程序(请注意使用contextClass上context-param和init-param的使用):
<web-app>
    <!-- Configure ContextLoaderListener to use AnnotationConfigWebApplicationContext
        instead of the default XmlWebApplicationContext -->
    <context-param>
        <param-name>contextClass</param-name>
        <param-value>
            org.springframework.web.context.support.AnnotationConfigWebApplicationContext
        </param-value>
    </context-param>

    <!-- Configuration locations must consist of one or more comma- or space-delimited
        fully-qualified @Configuration classes. Fully-qualified packages may also be
        specified for component-scanning -->
    <context-param>
        <param-name>contextConfigLocation</param-name>
        <param-value>com.acme.AppConfig</param-value>
    </context-param>

    <!-- Bootstrap the root application context as usual using ContextLoaderListener -->
    <listener>
        <listener-class>org.springframework.web.context.ContextLoaderListener</listener-class>
    </listener>

    <!-- Declare a Spring MVC DispatcherServlet as usual -->
    <servlet>
        <servlet-name>dispatcher</servlet-name>
        <servlet-class>org.springframework.web.servlet.DispatcherServlet</servlet-class>
        <!-- Configure DispatcherServlet to use AnnotationConfigWebApplicationContext
            instead of the default XmlWebApplicationContext -->
        <init-param>
            <param-name>contextClass</param-name>
            <param-value>
                org.springframework.web.context.support.AnnotationConfigWebApplicationContext
            </param-value>
        </init-param>
        <!-- Again, config locations must consist of one or more comma- or space-delimited
            and fully-qualified @Configuration classes -->
        <init-param>
            <param-name>contextConfigLocation</param-name>
            <param-value>com.acme.web.MvcConfig</param-value>
        </init-param>
    </servlet>

    <!-- map all requests for /app/* to the dispatcher servlet -->
    <servlet-mapping>
        <servlet-name>dispatcher</servlet-name>
        <url-pattern>/app/*</url-pattern>
    </servlet-mapping>
</web-app>
# 1.12.3. 使用@Bean
@Bean是一种方法级注解和XML <bean />元素的功能类似。注解支持<bean />提供的一些属性,例如:* init-method * destroy-method * autowiring * 。
你可以在 @Configuration注解的类中或 @Component注解的类中使用@Bean注释。
声明bean
要声明bean,您可以通过@Bean注解一种方法。你可以使用此方法在指定为方法返回值的类型的ApplicationContext中注册Bean定义。默认情况下,Bean名称与方法名称相同。以下示例显示了@Bean方法声明:
@Configuration
public class AppConfig {

    @Bean
    public TransferServiceImpl transferService() {
        return new TransferServiceImpl();
    }
}
前面的配置完全等同于以下Spring XML:
<beans>
    <bean id="transferService" class="com.acme.TransferServiceImpl"/>
</beans>
这两种声明都使一个名为transferService的bean在ApplicationContext中可用,绑定到类型TransferServiceImpl的对象实例,如下文本所示:
transferService -> com.acme.TransferServiceImpl
您还可以使用接口(或基类)返回类型声明@Bean方法,如下示例显示:
@Configuration
public class AppConfig {

    @Bean
    public TransferService transferService() {
        return new TransferServiceImpl();
    }
}
但是,这限制了对指定接口类型(TransferService)的预先类型预测的可见性。然后,只有一次容器已知的全型(TransferServiceImpl),受影响的单例bean已经实例化了。非延迟单例bean据其声明顺序实例化,因此,您可能会看到其他类型的匹配结果,具体取决于另一个组件试图通过非声明类型匹配(例如@Autowired TransferServiceImpl,仅在transferService已被实例化后解析)。
💡如果您通过声明的service接口始终指代您的类型,@Bean返回类型则可以安全地加入该设计决策。但是,对于实现多个接口或可能引用其实现类型的组件,声明可能的最特定的返回类型(至少按照指向您的bean的注入点所需的特定程度尽可能更具体)是更安全的。
Bean依赖
@Bean注解方法可以具有描述构建该bean所需的依赖项的任意数量的参数。例如,如果我们的TransferService需要AccountRepository,我们可以使用方法参数实现该依赖引入,如以下示例所示:
@Configuration
public class AppConfig {

    @Bean
    public TransferService transferService(AccountRepository accountRepository) {
        return new TransferServiceImpl(accountRepository);
    }
}
这种解决机制与基于构造函数的依赖注入几乎相同。
接收生命周期回调
使用@Bean注解定义的任何类都支持常规生命周期回调,并且可以使用JSR-250的@PostConstruct和@PreDestroy注解。有关更多详细信息,请参见JSR-250注解 (opens new window)。
常规的spring生命周期回调也得到了充分的支持。如果Bean实现InitializingBean,DisposableBean或Lifecycle,则容器将调用它们的各自方法。
还支持标准的*Aware接口(例如 BeanFactoryAware (opens new window), BeanNameAware (opens new window), MessageSourceAware (opens new window), ApplicationContextAware (opens new window)等)。
@Bean支持指定任意初始化和销毁回调方法,就像Spring XML的init-method和bean元素上的destroy-method一样,如下示例显示:
public class BeanOne {

    public void init() {
        // initialization logic
    }
}

public class BeanTwo {

    public void cleanup() {
        // destruction logic
    }
}

@Configuration
public class AppConfig {

    @Bean(initMethod = "init")
    public BeanOne beanOne() {
        return new BeanOne();
    }

    @Bean(destroyMethod = "cleanup")
    public BeanTwo beanTwo() {
        return new BeanTwo();
    }
}
ℹ️默认情况下,使用Java配置的bean有销毁回调的public的close或shutdown方法。如果您有public的close或shutdown方法,并且当容器关闭时不希望将其调用,则可以将@Bean(destroyMethod=“”)添加到您的bean定义中以禁用默认(推断)模式。
默认情况下,您可能需要对使用JNDI获取的资源来执行此操作,因为其生命周期在应用程序之外进行了管理。特别是,请确保始终为数据源执行此操作,因为已知在Java EE应用程序服务器上存在问题。
以下示例显示了如何防止调用数据源的自动销毁回调:
@Bean(destroyMethod="")
public DataSource dataSource() throws NamingException {
    return (DataSource) jndiTemplate.lookup("MyDS");
}
另外,使用@Bean,通常使用程序化JNDI 查找,或spring的JndiTemplate或JndiLocatorDelegate helpers或直接使用jndi的InitialContext,而不是JndiObjectFactoryBeanvariant变体(这将强迫您将返回类型声明为FactoryBean类型而不是实际的目标类型,使其更难用于其他@Bean方法中的交叉引用调用)。
在上面的BeanOne示例中,直接在构造过程中调用init()方法同样有效,如以下示例所示:
@Configuration
public class AppConfig {

    @Bean
    public BeanOne beanOne() {
        BeanOne beanOne = new BeanOne();
        beanOne.init();
        return beanOne;
    }

    // ...
}
💡当您直接使用Java,您可以使用对象做任何喜欢的事情,并且不必总是依靠容器生命周期。
定义bean作用域
Spring包括@Scope注解,以便您可以指定Bean的作用域。
您可以指定使用@Bean定义的bean应该具有特定的作用域。您可以使用Bean Scopes (opens new window)部分中指定的任何标准作用域。
默认作用域是Singleton,但是您可以用@Scope覆盖它,如以下示例所示:
@Configuration
public class MyConfiguration {

    @Bean
    @Scope("prototype")
    public Encryptor encryptor() {
        // ...
    }
}
Spring提供了一种方便的方式,可以通过 scoped proxies (opens new window)解决作用域依赖。使用XML配置时创建这样的代理的最简单方法是<aop:scoped-proxy/>元素。@Scope提供了proxyMode属性支持。默认值是不代理(ScopedProxyMode.NO),但是您可以指定ScopedProxyMode.TARGET_CLASS或ScopedProxyMode.INTERFACES。
如果您使用Java将作用域代理示例移植到我们的@Bean中,则类似于以下:
// an HTTP Session-scoped bean exposed as a proxy
@Bean
@SessionScope
public UserPreferences userPreferences() {
    return new UserPreferences();
}

@Bean
public Service userService() {
    UserService service = new SimpleUserService();
    // a reference to the proxied userPreferences bean
    service.setUserPreferences(userPreferences());
    return service;
}
自定义bean名
默认情况下,配置类使用@Bean方法的名称作为所得bean的名称。但是,可以用名称属性覆盖此功能,如下示例显示:
@Configuration
public class AppConfig {

    @Bean(name = "myThing")
    public Thing thing() {
        return new Thing();
    }
}
bean别名
有时希望给出一个bean多个名称,也称为bean别名。@Bean的name属性接受字符串数组。以下示例显示了如何为bean设置许多别名:
@Configuration
public class AppConfig {

    @Bean({"dataSource", "subsystemA-dataSource", "subsystemB-dataSource"})
    public DataSource dataSource() {
        // instantiate, configure and return DataSource bean...
    }
}
bean描述
有时,提供更详细的bean的文本描述是有用的。当bean被暴露(也许是通过JMX)以进行监视时,这可能特别有用。
要将描述添加到@Bean中,您可以使用@Description (opens new window),如下示例显示:
@Configuration
public class AppConfig {

    @Bean
    @Description("Provides a basic example of a bean")
    public Thing thing() {
        return new Thing();
    }
}
# 1.12.4. 使用@Configuration
@Configuration是一个类级注解,指示对象是bean定义的源。@Configuration类通过公共@Bean方法声明bean。@Configuration类上@Bean方法的调用也可以用于定义bean相互依赖。请参阅基本概念:[@bean和@configuration有关基础介绍](Basic Concepts: @Bean and @Configuration (opens new window))。
注入相互bean依赖
当bean彼此依赖时,表达依赖性就像让一个bean方法调用另一个一样简单,如以下示例所示:
@Configuration
public class AppConfig {
@Bean
public BeanOne beanOne() {
return new BeanOne(beanTwo());
}
@Bean
public BeanTwo beanTwo() {
return new BeanTwo();
}
}
在前面的示例中,beanOne通过构造器注入对beanTwo的引用。
ℹ️bean相互依赖的方法仅在@Configuration类中中声明@Bean时才适用。您无法使用纯@Component声明Bean相互依赖。
查找方法注入
如前所述,查找方法注入是您应该很少使用的高级功能。在单例Bean具有对原型bean的依赖的情况下是有用的。使用Java进行此类配置提供了一种自然的手段来实现此模式。以下示例显示了如何使用查找方法注入:
public abstract class CommandManager {
public Object process(Object commandState) {
// grab a new instance of the appropriate Command interface
Command command = createCommand();
// set the state on the (hopefully brand new) Command instance
command.setState(commandState);
return command.execute();
}
// okay... but where is the implementation of this method?
protected abstract Command createCommand();
}
通过使用Java配置,您可以创建一个CommandManager的子类,其中抽象createCommand()方法被覆盖以查找新(prototype)command 对象的方式。以下示例显示了如何执行此操作:
@Bean
@Scope("prototype")
public AsyncCommand asyncCommand() {
AsyncCommand command = new AsyncCommand();
// inject dependencies here as required
return command;
}
@Bean
public CommandManager commandManager() {
// return new anonymous implementation of CommandManager with createCommand()
// overridden to return a new prototype Command object
return new CommandManager() {
protected Command createCommand() {
return asyncCommand();
}
}
}
有关基于Java的配置如何在内部工作的更多信息
考虑以下示例,该示例展示了被调用两次的@Bean方法:
@Configuration
public class AppConfig {
@Bean
public ClientService clientService1() {
ClientServiceImpl clientService = new ClientServiceImpl();
clientService.setClientDao(clientDao());
return clientService;
}
@Bean
public ClientService clientService2() {
ClientServiceImpl clientService = new ClientServiceImpl();
clientService.setClientDao(clientDao());
return clientService;
}
@Bean
public ClientDao clientDao() {
return new ClientDaoImpl();
}
}
clientDao()已在clientService1()中和clientService2()中各调用一次。由于此方法创建了一个新的ClientDaoImpl实例并返回它,因此您通常会期望有两个实例(每个服务一个)。这绝对是有问题的:在Spring中,默认情况下,实例化的bean是单例的。这是魔法进入的地方:所有@Configuration类启动时都在CGLIB作用下子类化。在子类中,子方法在它调用父方法并创建新实例之前首先检查容器是否存在任何缓存(范围)bean。
ℹ️根据bean的作用域,这种行为可能不同。我们在这里谈论的是单例。
ℹ️从Spring 3.2开始,不再需要在您的类路径中添加CGLIB,因为CGLIB类已在org.springframework.cglib下重新打包,并直接包含在Spring-Core Jar中。
💡由于CGLIB在启动时动态添加功能,因此有一些限制。特别是,配置类不能是final。但是,从4.3起,配置类上允许任何构造函数,包括使用@Autowired或单个非默认构造函数声明以默认注入。
如果您希望避免使用任何CGLIB施加的限制,请考虑在非@Configuration类上声明@Bean方法(例如,在@Component类上)。然后不会拦截@Bean方法之间的交叉方法调用,因此您必须仅依赖于构造函数或方法级别的依赖项注入。
# 1.12.5. 编排基于Java的配置
Spring的基于Java的配置功能使您可以组合注解,从而降低配置的复杂性。
使用@Import
就像在Spring XML文件中使用<import/>元素以帮助模块化配置一样,@Import允许从另一个配置类加载@Bean定义,如以下示例所示:
@Configuration
public class ConfigA {
@Bean
public A a() {
return new A();
}
}
@Configuration
@Import(ConfigA.class)
public class ConfigB {
@Bean
public B b() {
return new B();
}
}
现在,在实例化上下文时仅需要明确提供ConfigB,如以下示例所示:
public static void main(String[] args) {
ApplicationContext ctx = new AnnotationConfigApplicationContext(ConfigB.class);
// now both beans A and B will be available...
A a = ctx.getBean(A.class);
B b = ctx.getBean(B.class);
}
这种方法简化了容器的实例化,因为只需要处理一个类,而不是要求您记住在构造过程中潜在的@Configuration类。
💡从spring4.2开始,@Import还支持对常规组件类的引用,类似于AnnotationConfigApplicationContext.register方法。如果您想避免使用一些配置类作为入口点来明确定义所有组件,这将特别有用。
注入对导入@Bean定义的依赖
上一个示例有效,但很简单。在大多数实际情况下,beans在配置类中彼此之间相互依赖。当使用XML时,这不是问题,因为不涉及编译器,您可以声明ref="someBean",并信任Spring在容器初始化期间将其解析。当使用@Configuration类时,Java编译器在配置模型上放置约束,因为对其他bean的引用必须是有效的Java语法。
幸运的是,解决此问题很简单。正如我们已经讨论的那样,@Bean方法可以具有描述bean依赖性的任意数量的参数。考虑以下现实世界的场景,其中几个@Configuration类,每个类都依赖于其他的bean:
@Configuration
public class ServiceConfig {
@Bean
public TransferService transferService(AccountRepository accountRepository) {
return new TransferServiceImpl(accountRepository);
}
}
@Configuration
public class RepositoryConfig {
@Bean
public AccountRepository accountRepository(DataSource dataSource) {
return new JdbcAccountRepository(dataSource);
}
}
@Configuration
@Import({ServiceConfig.class, RepositoryConfig.class})
public class SystemTestConfig {
@Bean
public DataSource dataSource() {
// return new DataSource
}
}
public static void main(String[] args) {
ApplicationContext ctx = new AnnotationConfigApplicationContext(SystemTestConfig.class);
// everything wires up across configuration classes...
TransferService transferService = ctx.getBean(TransferService.class);
transferService.transfer(100.00, "A123", "C456");
}
还有另一种方法可以实现相同的结果。请记住,@Configuration类最终只是容器中的另一个bean:这意味着他们可以利用@Autowired和@Value注入以及与其他任何bean相同的其他功能。
❗️确保您以这种方式注入的依赖性仅是最简单的。@Configuration类在上下文初始化期间很早处理,并强迫以这种方式注入依赖性可能会导致意外的早期初始化。如前所述,只要有可能,请采取于基于参数的注射。
另外,请特别谨慎使用@Bean的BeanPostProcessor和BeanFactoryPostProcessor定义。这些通常应被声明为静态@Bean方法,而不触发包含它的配置类的实例化。否则,@Autowired和@Value可能无法在配置类本身上使用,因为可以比
AutowiredAnnotationBeanPostProcessor(opens new window)更早地将其创建为bean实例。
下面的示例显示了如何将一个bean自动注入到另一个bean:
@Configuration
public class ServiceConfig {
@Autowired
private AccountRepository accountRepository;
@Bean
public TransferService transferService() {
return new TransferServiceImpl(accountRepository);
}
}
@Configuration
public class RepositoryConfig {
private final DataSource dataSource;
public RepositoryConfig(DataSource dataSource) {
this.dataSource = dataSource;
}
@Bean
public AccountRepository accountRepository() {
return new JdbcAccountRepository(dataSource);
}
}
@Configuration
@Import({ServiceConfig.class, RepositoryConfig.class})
public class SystemTestConfig {
@Bean
public DataSource dataSource() {
// return new DataSource
}
}
public static void main(String[] args) {
ApplicationContext ctx = new AnnotationConfigApplicationContext(SystemTestConfig.class);
// everything wires up across configuration classes...
TransferService transferService = ctx.getBean(TransferService.class);
transferService.transfer(100.00, "A123", "C456");
}
💡@Configuration类中的构造注入仅在spring 4.3开始支持。还要注意,如果目标bean仅定义一个构造函数,则无需指定@Autowired。
全限定的导入bean更易导航
在前面的情况下,使用@Autowired效果很好,并提供了所需的模块化,但是确切确定注入的bean的位置仍然有些模棱两可。例如,作为一名开发人员看ServiceConfig,您如何确切知道@Autowired AccountRepository bean声明在哪里?它在代码中没有明确,这可能还能正确工作。请记住, Spring Tools for Eclipse (opens new window)提供了可以呈现bean是如何注入的图形化的工具。这可能是您所需要的。此外,您的Java IDE可以轻松找到AccountRepository类型的所有声明和使用,并迅速向您展示返回该类型的@Bean方法的位置。
如果这种歧义不可接受,并且您希望从一个@Configuration类中直接导航到另一个,请考虑自动注入配置类本身。如以下示例显示:
@Configuration
public class ServiceConfig {
@Autowired
private RepositoryConfig repositoryConfig;
@Bean
public TransferService transferService() {
// navigate 'through' the config class to the @Bean method!
return new TransferServiceImpl(repositoryConfig.accountRepository());
}
}
在前面的情况下,AccountRepository定义是完全明确的。但是,ServiceConfig现在与RepositoryConfig耦合。这需要权衡。通过使用基于接口或基于抽象类的@Configuration类,可以在某种程度上减轻这种紧密的耦合。考虑以下示例:
@Configuration
public class ServiceConfig {
@Autowired
private RepositoryConfig repositoryConfig;
@Bean
public TransferService transferService() {
return new TransferServiceImpl(repositoryConfig.accountRepository());
}
}
@Configuration
public interface RepositoryConfig {
@Bean
AccountRepository accountRepository();
}
@Configuration
public class DefaultRepositoryConfig implements RepositoryConfig {
@Bean
public AccountRepository accountRepository() {
return new JdbcAccountRepository(...);
}
}
@Configuration
@Import({ServiceConfig.class, DefaultRepositoryConfig.class}) // import the concrete config!
public class SystemTestConfig {
@Bean
public DataSource dataSource() {
// return DataSource
}
}
public static void main(String[] args) {
ApplicationContext ctx = new AnnotationConfigApplicationContext(SystemTestConfig.class);
TransferService transferService = ctx.getBean(TransferService.class);
transferService.transfer(100.00, "A123", "C456");
}
现在,ServiceConfig与具体的DefaultRepositoryConfig低耦合,并且内置的IDE工具仍然有用:您可以轻松获得RepositoryConfig实现的类型层次结构。通过这种方式,导航@Configuration类及其依赖项与基于接口的代码的通常过程没有什么不同。
💡如果您想影响某些bean的创建顺序,请考虑将其中的一些声明为@Lazy(用于首次访问而不是在启动时创建)或@DependsOn确定的bean(确保在此之前创建特定的其他bean)。
有条件地包括@Configuration类或@Bean方法
根据某些专用系统状态,有条件地启用或禁用完整的@Configuration类,甚至单独的@Bean方法通常是有用的。一个常见的例子是,只有在Spring环境中启用了特定配置文件时,使用@Profile激活bean(有关详细信息,请参见 Bean Definition Profiles (opens new window))。
@Profile实际上是通过使用更灵活的注解@Conditional来实现的。@Conditional表明在@Bean注册之前,特定的org.springframework.context.annotation.Condition实现应该被考虑。
Condition接口的实现提供了返回true或false的matches(...)方法。例如,以下列表显示了用于@Profile的实际条件实现:
@Override
public boolean matches(ConditionContext context, AnnotatedTypeMetadata metadata) {
// Read the @Profile annotation attributes
MultiValueMap<String, Object> attrs = metadata.getAllAnnotationAttributes(Profile.class.getName());
if (attrs != null) {
for (Object value : attrs.get("value")) {
if (context.getEnvironment().acceptsProfiles(((String[]) value))) {
return true;
}
}
return false;
}
return true;
}
有关更多详细信息,请参见@Conditional (opens new window)Javadoc。
组合Java和XML配置
Spring的@Configuration类支持并不是要成为Spring XML的100%完全替代品。某些设施(例如Spring XML命名空间)仍然是配置容器的理想方法。在XML方便或必要的情况下,您可以选择:如通过使用ClassPathXmlApplicationContext,“以XML为中心”的方式实例化容器,或通过使用AnnotationConfigApplicationContext,以“ java中心”方式实例化容器,这时@ImportResource可以按需导入XML文件。
以xml为中心的@Configuration类
最好是从XML引导Spring容器,并以特定方式包括@Configuration类。例如,在使用Spring XML的大型现有代码库中,更容易在需要的基础上创建@Configuration类并将其包括在现有XML文件中。在本节的稍后,我们介绍了在这种“以XML为中心”情况下使用@Configuration类的选项。
将@Configuration类声明为普通Spring<bean/>元素
请记住,@Configuration类最终是容器中定义的bean。在本系列示例中,我们创建了一个名为AppConfig的@Configuration类,并将其包含在system-test-config.xml中,作为<bean/>定义。
@Configuration
public class AppConfig {
@Autowired
private DataSource dataSource;
@Bean
public AccountRepository accountRepository() {
return new JdbcAccountRepository(dataSource);
}
@Bean
public TransferService transferService() {
return new TransferService(accountRepository());
}
}
以下示例显示了system-test-config.xml文件的一部分:
<beans>
<!-- enable processing of annotations such as @Autowired and @Configuration -->
<context:annotation-config/>
<context:property-placeholder location="classpath:/com/acme/jdbc.properties"/>
<bean class="com.acme.AppConfig"/>
<bean class="org.springframework.jdbc.datasource.DriverManagerDataSource">
<property name="url" value="${jdbc.url}"/>
<property name="username" value="${jdbc.username}"/>
<property name="password" value="${jdbc.password}"/>
</bean>
</beans>
以下示例显示了可能的jdbc.properties文件:
jdbc.url=jdbc:hsqldb:hsql://localhost/xdb
jdbc.username=sa
jdbc.password=
public static void main(String[] args) {
ApplicationContext ctx = new ClassPathXmlApplicationContext("classpath:/com/acme/system-test-config.xml");
TransferService transferService = ctx.getBean(TransferService.class);
// ...
}
ℹ️在system-test-config.xml文件中,AppConfig <bean/>不声明id元素。这样做是可以接受的,鉴于没有其他bean引用它,而且不太可能以名称从容器中明确获取。同样,DataSource仅通过类型自动注入,因此并不是严格要求明确的bean id。
使用<context:component-scan/>来获取@Configuration类
由于@Configuration是用@Component元注解的,因此 @Configuration注解的类自动用于组件扫描。使用与上一个示例中描述的相同方案,我们可以重新定义system-test-config.xml来利用组件扫描。请注意,在这种情况下,我们不需要明确声明<context:annotation-config/>,因为<context:component-scan/>启用相同的功能。
<beans>
<!-- picks up and registers AppConfig as a bean definition -->
<context:component-scan base-package="com.acme"/>
<context:property-placeholder location="classpath:/com/acme/jdbc.properties"/>
<bean class="org.springframework.jdbc.datasource.DriverManagerDataSource">
<property name="url" value="${jdbc.url}"/>
<property name="username" value="${jdbc.username}"/>
<property name="password" value="${jdbc.password}"/>
</bean>
</beans>
@Configuration使用结合@ImportResource导入XML
在@Configuration类是配置容器的主要机制的应用程序中,仍然有必要至少使用一些XML。在这些情况下,您可以使用@ImportResource,并仅定义所需的XML。这样做可以实现一种“以Java为中心”的方法来配置容器并最小化XML使用。
以下示例(其中包括配置类,properties 文件,定义bean的XML文件和main类)显示了如何使用@ImportResource来实现根据需要使用XML的“ Java中心”配置:
@Configuration
@ImportResource("classpath:/com/acme/properties-config.xml")
public class AppConfig {
@Value("${jdbc.url}")
private String url;
@Value("${jdbc.username}")
private String username;
@Value("${jdbc.password}")
private String password;
@Bean
public DataSource dataSource() {
return new DriverManagerDataSource(url, username, password);
}
}
properties-config.xml
<beans>
<context:property-placeholder location="classpath:/com/acme/jdbc.properties"/>
</beans>
jdbc.properties
jdbc.url=jdbc:hsqldb:hsql://localhost/xdb
jdbc.username=sa
jdbc.password=
public static void main(String[] args) {
ApplicationContext ctx = new AnnotationConfigApplicationContext(AppConfig.class);
TransferService transferService = ctx.getBean(TransferService.class);
// ...
}
# 1.13. Environment 抽象
Environment (opens new window)接口是集成在容器中的抽象,它模拟了应用程序环境的两个关键方面:profiles (opens new window)配置文件和properties (opens new window)属性。
配置文件是仅当给定配置文件处于激活的情况下,才能在容器中注册的命名的、逻辑的bean定义组。定义在XML或注解的bean都可以指派给配置文件。与配置文件有关的Environment对象的作用在于确定哪些配置文件(如果有)当前处于活动状态,以及默认情况下哪些配置文件(如果有)应处于活动状态。
属性在几乎所有应用中都起着重要的作用,可能源自各种来源:properties 文件,JVM系统属性,系统环境变量,JNDI,servlet上下文参数,特定Properties对象,Map对象等。与属性有关的Environment对象的作用是为用户提供方便的服务接口,以配置属性源和从中解析属性。
# 1.13.1. Bean定义配置文件
Bean定义配置文件在核心容器中提供了一种机制,可以在不同环境中注册不同的beans。“environment”一词对不同用户意味着不同的事物,此功能在许多场景下很有用,包括:
- 与开发环境的内存数据源相反,在QA或生产中,通过JNDI查找不同数据源。
- 在要求性能的环境中部署应用时,注册监听基础设施。
- 为客户A与客户B部署注册不同的自定义实现。
在需要数据源的实际应用中考虑第一种用例。在测试环境中,配置可能类似于以下内容:
@Bean
public DataSource dataSource() {
return new EmbeddedDatabaseBuilder()
.setType(EmbeddedDatabaseType.HSQL)
.addScript("my-schema.sql")
.addScript("my-test-data.sql")
.build();
}
现在,考虑如何将该应用程序部署到QA或生产环境中,假设该应用程序的数据源已在生产应用程序服务器的JNDI目录中注册,我们的dataSource现在看起来像以下列表:
@Bean(destroyMethod="")
public DataSource dataSource() throws Exception {
Context ctx = new InitialContext();
return (DataSource) ctx.lookup("java:comp/env/jdbc/datasource");
}
问题是如何根据当前环境在使用这两个变体之间进行切换。随着时间的流逝,Spring用户已经设计了多种方法来完成此操作,通常取决于系统环境变量和XML <import/>语句的组合,其中包含${placeholder}标记,这些标记可以根据环境变量值正确解析配置文件。Bean定义配置文件是为此问题提供解决方案的核心容器功能。
如果我们概括了前述特定环境Bean定义的用例,则最终需要在正确的上下文中注册正确的bean定义。您可能会说,您想在场景A、B中注册不同的bean配置文件。我们首先更新配置以反映这一需求。
使用@Profile
@Profile (opens new window)表明当一个或多个指定的配置文件处于活动状态时,组件有资格进行注册。使用前面的示例,我们可以按以下方式重写dataSource配置:
@Configuration
@Profile("development")
public class StandaloneDataConfig {
@Bean
public DataSource dataSource() {
return new EmbeddedDatabaseBuilder()
.setType(EmbeddedDatabaseType.HSQL)
.addScript("classpath:com/bank/config/sql/schema.sql")
.addScript("classpath:com/bank/config/sql/test-data.sql")
.build();
}
}
@Configuration
@Profile("production")
public class JndiDataConfig {
@Bean(destroyMethod="")
public DataSource dataSource() throws Exception {
Context ctx = new InitialContext();
return (DataSource) ctx.lookup("java:comp/env/jdbc/datasource");
}
}
ℹ️如前所述,使用@Bean方法,您通常会选择使用spring的JndiTemplate/JndiLocatorDelegatehe helpers或直接使用JNDI InitialContext,而不是JndiObjectFactoryBean(强制你声明返回类型为FactoryBean类型)。
配置文件字符串可能包含一个简单的配置文件名称(例如,production)或配置文件表达式。配置文件表达式允许表达更复杂的配置文件逻辑(例如,production & us-east)。配置文件表达式支持以下操作:
- !:配置文件的逻辑“非”
- &:配置文件的逻辑“与”
- |:配置文件的逻辑“或”
ℹ️您不能不适用括号就混合&和|操作。例如,production & us-east | eu-central不是有效的表达式。它必须表示为production & (us-east | eu-central)。
您可以将@Profile用作元注解 (opens new window),以创建自定义的注解。以下示例定义了自定义@Production注解,可以作为@Profile("production")的直接替换:
@Target(ElementType.TYPE)
@Retention(RetentionPolicy.RUNTIME)
@Profile("production")
public @interface Production {
}
💡如果用@Profile标记@Configuration类,则除非一个或多个指定的配置文件处于活动状态,否则与该类关联的所有@Bean方法和@Import注解都会忽略。如果用@Profile({"p1", "p2"})标记@Component或@Configuration类,则该类不会被注册或处理,除非激活了配置文件'p1'或'p2'。如果给定的配置文件有非操作(!)的前缀,则只有在配置文件不被激活的情况下才会注册带注解的元素。例如,给定的@Profile({"p1", "!p2"}),如果配置文件'p1'处于活动状态或配置文件'p2'未被活动,则会处理注册。
@Profile也可以在方法级别声明,仅包含一个配置类的一个特定bean(例如,对于特定bean的替代变体),如下示例显示:
@Configuration
public class AppConfig {
@Bean("dataSource")
@Profile("development") //standaloneDataSource 仅在development 配置文件中可用
public DataSource standaloneDataSource() {
return new EmbeddedDatabaseBuilder()
.setType(EmbeddedDatabaseType.HSQL)
.addScript("classpath:com/bank/config/sql/schema.sql")
.addScript("classpath:com/bank/config/sql/test-data.sql")
.build();
}
@Bean("dataSource")
@Profile("production") //jndiDataSource 仅在production 配置文件中可用
public DataSource jndiDataSource() throws Exception {
Context ctx = new InitialContext();
return (DataSource) ctx.lookup("java:comp/env/jdbc/datasource");
}
}
ℹ️@Bean方法上使用的@Profile,可能会适用特殊情况:在同一Java方法名称的重载@Bean方法(类似于构造函数的重载)的情况下,@Profile需要在所有重载方法上一致地声明。如果不一致,则仅在重载方法中首次声明的条件才重要。因此,@Profile不能用于选择具有特定参数签名的重载方法。同一bean的所有工厂方法在创建时遵循Spring的构造机制。
如果要定义具有不同配置文件条件的替代bean,使用@Bean名称属性指向同一bean名称的不同Java方法名称。如果参数签名都是相同的(例如,所有变体都有无参工厂的方法),这是在有效的Java类中代表这种排列的唯一方法(由于只能有一种特定名称和参数签名的方法)。
XML Bean定义配置文件
XML对应物是<beans>元素的profile属性。我们的前面示例配置可以在两个XML文件中重写,如下:
<beans profile="development"
xmlns="http://www.springframework.org/schema/beans"
xmlns:xsi="http://www.w3.org/2001/XMLSchema-instance"
xmlns:jdbc="http://www.springframework.org/schema/jdbc"
xsi:schemaLocation="...">
<jdbc:embedded-database id="dataSource">
<jdbc:script location="classpath:com/bank/config/sql/schema.sql"/>
<jdbc:script location="classpath:com/bank/config/sql/test-data.sql"/>
</jdbc:embedded-database>
</beans>
<beans profile="production"
xmlns="http://www.springframework.org/schema/beans"
xmlns:xsi="http://www.w3.org/2001/XMLSchema-instance"
xmlns:jee="http://www.springframework.org/schema/jee"
xsi:schemaLocation="...">
<jee:jndi-lookup id="dataSource" jndi-name="java:comp/env/jdbc/datasource"/>
</beans>
也可以避免在同一个文件中拆分和嵌套<beans/>元素,如下例所示:
<beans xmlns="http://www.springframework.org/schema/beans"
xmlns:xsi="http://www.w3.org/2001/XMLSchema-instance"
xmlns:jdbc="http://www.springframework.org/schema/jdbc"
xmlns:jee="http://www.springframework.org/schema/jee"
xsi:schemaLocation="...">
<!-- other bean definitions -->
<beans profile="development">
<jdbc:embedded-database id="dataSource">
<jdbc:script location="classpath:com/bank/config/sql/schema.sql"/>
<jdbc:script location="classpath:com/bank/config/sql/test-data.sql"/>
</jdbc:embedded-database>
</beans>
<beans profile="production">
<jee:jndi-lookup id="dataSource" jndi-name="java:comp/env/jdbc/datasource"/>
</beans>
</beans>
spring-bean.xsd已被限制,以允许仅作为文件中的最后一个元素。这应该有助于提供灵活性,而不会在XML文件中产生混乱。
ℹ️XML对应物不支持前面描述的配置文件表达式。但是,有可能使用!操作符排除一个配置文件。如下示例所示,也可以通过嵌套配置文件来应用逻辑“与”:
<beans xmlns="http://www.springframework.org/schema/beans" xmlns:xsi="http://www.w3.org/2001/XMLSchema-instance" xmlns:jdbc="http://www.springframework.org/schema/jdbc" xmlns:jee="http://www.springframework.org/schema/jee" xsi:schemaLocation="..."> <!-- other bean definitions --> <beans profile="production"> <beans profile="us-east"> <jee:jndi-lookup id="dataSource" jndi-name="java:comp/env/jdbc/datasource"/> </beans> </beans> </beans>在前面的示例中,如果production和us-east配置文件均处于活动状态,则dataSource被暴露。
激活配置文件
现在我们已经更新了配置,我们仍然需要指示spring哪个配置文件被激活。如果我们立即启动示例应用程序,我们会看到一个NoSuchBeanDefinitionException抛出,因为容器找不到名为dataSource的bean。
激活配置文件可以通过多种方式完成,但最直接的是通过应用程序上下文ApplicationContext中可用的Environment API进行编程进行操作。如以下示例显示:
AnnotationConfigApplicationContext ctx = new AnnotationConfigApplicationContext();
ctx.getEnvironment().setActiveProfiles("development");
ctx.register(SomeConfig.class, StandaloneDataConfig.class, JndiDataConfig.class);
ctx.refresh();
此外,您还可以通过spring.profiles.active属性声明激活配置文件,该属性可以通过系统环境变量,JVM系统属性,web.xml中的servlet Context参数,甚至作为JNDI中的条目来指定(参考PropertySource Abstraction (opens new window))。在集成测试中,可以使用spring-test模块中的@ActiveProfiles来激活配置文件(参考 context configuration with environment profiles (opens new window))。
请注意,配置文件不是一个“或者”命题。您可以一次激活多个配置文件。以编程方式,您可以为setActiveProfiles()方法提供多个配置文件名称,该方法接受String…参数。以下示例激活了多个配置文件:
ctx.getEnvironment().setActiveProfiles("profile1", "profile2");
声明地,spring.profiles.active可以接受逗号分隔的配置文件名称列表,如以下示例所示:
-Dspring.profiles.active="profile1,profile2"
默认配置文件
默认配置文件表示默认情况下启用的配置文件。考虑以下示例:
@Configuration
@Profile("default")
public class DefaultDataConfig {
@Bean
public DataSource dataSource() {
return new EmbeddedDatabaseBuilder()
.setType(EmbeddedDatabaseType.HSQL)
.addScript("classpath:com/bank/config/sql/schema.sql")
.build();
}
}
如果没有具体的配置文件,dataSource也被创建。您可以将其视为为一个或多个bean提供默认定义的一种方式。如果启用了任何配置文件,则不会使用默认配置文件。
您可以通过在Environment上使用setDefaultProfiles()或使用spring.profiles.default属性来更改默认配置文件的名称。
# 1.13.2. PropertySource 抽象
Spring的Environment抽象提供了有关属性源的可配置层次结构的搜索操作。考虑以下代码:
ApplicationContext ctx = new GenericApplicationContext();
Environment env = ctx.getEnvironment();
boolean containsMyProperty = env.containsProperty("my-property");
System.out.println("Does my environment contain the 'my-property' property? " + containsMyProperty);
在前面的片段中,我们看到了一种高级方法,询问spring是否为当前环境定义了my-property属性。为了回答这个问题,Environment对象对一组PropertySource (opens new window) 对象进行搜索。PropertySource是任何键值对源的简单抽象,Spring的StandardEnvironment (opens new window) 使用两个PropertySource 配置--一个代表JVM系统属性集(System.getProperties()),另一个代表一个代表系统环境变量集(System.getenv())。
ℹ️这些默认的属性源是StandardEnvironment,用于独立应用。
StandardServletEnvironment(opens new window)填充了其他默认属性源,包括servlet配置和servlet上下文参数。它可以选择启用JndiPropertySource(opens new window)。有关详细信息,请参见Javadoc。
具体而言,当您使用StandardEnvironment时,如果在运行时出现了my-property系统属性或my-property环境变量,则调用env.containsProperty("my-property")将返回true。
💡执行的搜索是分层的。默认情况下,系统属性优先于环境变量。因此,如果my-property属性在两个地方都设值了,在调用env.getProperty("my-property")时,将返回系统属性值“ wins”。请注意,属性值不会合并,而是完全被优先的条目覆盖。
对于StandardServletEnvironment,完整的层次结构如下,优先级高的在前:
- ServletConfig参数(如果适用,例如,在DispatcherServlet上下文的情况下)
- ServletContext参数(web.xml上下文entry)
- JNDI环境变量(java:comp/env/)
- JVM系统属性(-D命令行参数)
- JVM系统环境(操作系统环境变量)
最重要的是,整个机制都是可配置的。也许您有一个自定义的属性来源,要将其集成到此搜索中。为此,实现并实例化您自己的PropertySource,并将其添加到当前Environment的PropertySources集中。如下所示:
ConfigurableApplicationContext ctx = new GenericApplicationContext();
MutablePropertySources sources = ctx.getEnvironment().getPropertySources();
sources.addFirst(new MyPropertySource());
在前面的代码中,在搜索中添加了MyPropertySource的优先级。如果它包含my-property属性,该属性将被检测并返回。MutablePropertySources (opens new window)API暴露了许多方法,这些方法允许精确操纵属性源。
# 1.13.3. 使用@PropertySource
@PropertySource (opens new window)提供了一种方便且声明的机制,可以在spring Environment中添加PropertySource。
给定一个名为app.properties的文件,其中包含键值对testbean.name = myTestBean,以下@Configuration类使用@PropertySource,在调用testBean.getName()时返回myTestBean:
@Configuration
@PropertySource("classpath:/com/myco/app.properties")
public class AppConfig {
@Autowired
Environment env;
@Bean
public TestBean testBean() {
TestBean testBean = new TestBean();
testBean.setName(env.getProperty("testbean.name"));
return testBean;
}
}
@PropertySource资源位置中存在的任何${…}占位符都可以根据环境中已注册的源解析,如以下示例显示:
@Configuration
@PropertySource("classpath:/com/${my.placeholder:default/path}/app.properties")
public class AppConfig {
@Autowired
Environment env;
@Bean
public TestBean testBean() {
TestBean testBean = new TestBean();
testBean.setName(env.getProperty("testbean.name"));
return testBean;
}
}
假设my.placeholder存在于已经注册的属性源之一(例如,系统属性或环境变量)中,则占位符会被解析为相应的值,如果没有,则将default/path用作默认值。如果未指定默认值且无法解析属性,则会抛出IllegalArgumentException。
ℹ️根据Java 8,@PropertySource注释是可重复的。但是,所有此类@PropertySource都需要在同一级别上,直接在配置类或同一自定义注解中的元注解处声明。不建议混合直接注解和元注解,因为直接注解会有效地覆盖元注解。
# 1.13.4. 语句中的占位符解析
从历史上看,只有针对JVM系统属性或环境变量,可以解析占位符。但现在不是了。由于Environment抽象是在整个容器中集成的,因此很容易通过它来解析占位符。这意味着您可以以任何你喜欢的方式配置解析方案。您可以更改通过系统属性和环境变量进行搜索的优先级,或者完全删除它们。你也可以适当地添加自己的属性源。
具体而言,无论customer属性如何定义,只要在Environment中可用,以下声明都可以使用:
<beans>
<import resource="com/bank/service/${customer}-config.xml"/>
</beans>
# 1.14. 注册LoadTimeWeaver
Spring使用LoadTimeWeaver在将类加载到Java Virtual Machine(JVM)时作动态转换。
要启用load-time weaving,您可以将@EnableLoadTimeWeaving添加到您的任一@Configuration类中,如以下示例所示:
@Configuration
@EnableLoadTimeWeaving
public class AppConfig {
}
另外,对于XML配置,您可以使用context:load-time-weaver元素:
<beans>
<context:load-time-weaver/>
</beans>
一旦配置为ApplicationContext,该ApplicationContext中的任何bean都可以实现LoadTimeWeaverAware,从而接收到 load-time weaver实例的引用。这对于组合 Spring的JPA支持 (opens new window) 很有用,因为在JPA类转换中load-time weaving可能是必要的。详情可参考LocalContainerEntityManagerFactoryBean (opens new window) javadoc。有关AspectJ load-time weaving的更多信息,参考Load-time Weaving with AspectJ in the Spring Framework (opens new window)。
# 1.15. ApplicationContext的附加功能
如前述章节简介 (opens new window)中所述,org.springframework.beans.factory软件包为管理和操纵bean(包括以程序化的方式)提供了基本功能。org.springframework.context软件包添加了ApplicationContext (opens new window) 接口,它扩展了BeanFactory接口,除了扩展其他接口以在更面向应用程序框架的样式中提供其他功能。许多人以完全声明的方式使用ApplicationContext,甚至没有以编程方式创建它,而是依靠支持类(例如ContextLoader)自动实例化ApplicationContext作为Java EE Web应用程序的正常启动过程的一部分。为了在更面向框架的样式中增强BeanFactory功能,context 包还提供了以下功能:
- 通过MessageSource接口访问i18n风格中的消息。
- 通过ResourceLoader接口访问资源,例如URL和文件。
- 事件发布,即通过使用ApplicationEventPublisher接口来实现ApplicationListener接口的bean。
- 多个(分层)上下文的加载,让每个上下文都集中在一个特定层上,例如应用程序的Web层,通过HierarchicalBeanFactory接口
# 1.15.1. 使用MessageSource国际化
ApplicationContext接口继承一个称为MessageSource的接口,因此提供了国际化(“i18n”)功能。Spring还提供了HierarchicalMessageSource接口,可以分层解析消息。这些接口共同为Spring解析消息提供了基础。这些接口中的方法包括:
- String getMessage(String code, Object[] args, String default, Locale loc):从MessageSource检索消息的基本方法。当未找到指定语言环境的消息时,使用默认消息。使用标准库提供的MessageFormat功能,传递的任何参数将被替换。
- String getMessage(String code, Object[] args, Locale loc):本质上与上一个方法相同,但有一个区别:没有指定默认消息。如果找不到该消息,则会抛出一个NoSuchMessageException。
- String getMessage(MessageSourceResolvable resolvable, Locale locale):前面方法中使用的所有属性包装在名为MessageSourceResolvable的类中。
当ApplicationContext被加载时,它会自动搜索上下文中定义的MessageSource。改bean必须具名为messageSource。如果找到了这样的bean,则将所有对先前方法的调用都委派给了消息源。如果找不到消息源,则ApplicationContext尝试去父容器寻找。如果ApplicationContext找不到任何消息源,则实例化了一个空DelegatingMessageSource,以便能够接受上述方法的调用。
Spring提供了两个MessageSource实现,ResourceBundleMessageSource和StaticMessageSource。两者都实现了HierarchicalMessageSource,以便进行嵌套消息传递。一般很少使用StaticMessageSource,但提供了将消息添加到源的程序化方法。以下示例显示了ResourceBundleMessageSource:
<beans>
<bean id="messageSource"
class="org.springframework.context.support.ResourceBundleMessageSource">
<property name="basenames">
<list>
<value>format</value>
<value>exceptions</value>
<value>windows</value>
</list>
</property>
</bean>
</beans>
该示例假设您有三个称为format,exceptions和windows的资源捆绑包在您的类路径中定义。解析消息的任何请求都是以JDK标准的方式通过ResourceBundle对象来处理。就示例而言,假设上述两个资源捆绑文件的内容如下:
# in format.properties
message=Alligators rock!
# in exceptions.properties
argument.required=The {0} argument is required.
下一个示例显示了运行MessageSource功能的程序。请记住,所有ApplicationContext也是MessageSource的实现,因此可以将其转型为MessageSource接口。
public static void main(String[] args) {
MessageSource resources = new ClassPathXmlApplicationContext("beans.xml");
String message = resources.getMessage("message", null, "Default", Locale.ENGLISH);
System.out.println(message);
//输入Alligators rock!
}
总而言之,MessageSource是在名为beans.xml的文件中定义的,beans.xml在根类路径中。messageSource通过basenames引用大量资源包。列表中传递给basenames属性的三个文件(format.properties,exceptions.properties,windows.properties)存在于跟类路径中。
下一个示例显示传递给消息查找的参数。这些参数被转换为字符串对象,并在查找消息中插入占位符。
<beans>
<!-- this MessageSource is being used in a web application -->
<bean id="messageSource" class="org.springframework.context.support.ResourceBundleMessageSource">
<property name="basename" value="exceptions"/>
</bean>
<!-- lets inject the above MessageSource into this POJO -->
<bean id="example" class="com.something.Example">
<property name="messages" ref="messageSource"/>
</bean>
</beans>
public class Example {
private MessageSource messages;
public void setMessages(MessageSource messages) {
this.messages = messages;
}
public void execute() {
String message = this.messages.getMessage("argument.required",
new Object [] {"userDao"}, "Required", Locale.ENGLISH);
System.out.println(message);
//输出The userDao argument is required.
}
}
关于国际化("i18n"),Spring的各种MessageSource实现遵循与标准JDK ResourceBundle相同的本地化方案和回调规则。简而言之,继续使用前面定义的示例messageSource,如果您想解决针对英国(en-GB)语言环境的消息,则分别创建称为format_en_GB.properties,exceptions_en_GB.properties和windows_en_GB.properties的文件。
通常,本地化方案由应用程序的周围环境管理。在下面的示例中,手动指定了(英国)消息的本地化:
# in exceptions_en_GB.properties
argument.required=Ebagum lad, the ''{0}'' argument is required, I say, required.
public static void main(final String[] args) {
MessageSource resources = new ClassPathXmlApplicationContext("beans.xml");
String message = resources.getMessage("argument.required",
new Object [] {"userDao"}, "Required", Locale.UK);
System.out.println(message);
//输出Ebagum lad, the 'userDao' argument is required, I say, required.
}
您还可以使用MessageSourceAware接口来获取对已定义的任何MessageSource的引用。ApplicationContext中实现了MessageSourceAware接口的bean在创建和配置时,会和应用程序上下文的MessageSource一起注入。
ℹ️作为ResourceBundleMessageSource的替代方案,Spring提供了ReloadableResourceBundleMessageSource类。该变体支持相同的捆绑文件格式,但比基于标准JDK的ResourceBundleMessageSource实现更灵活。特别是,它允许从任何Spring的资源位置(不仅是类路径)读取文件,并支持捆绑属性文件的热加载(在有效地缓存它们之间)。有关详细信息,请参见
ReloadableResourceBundleMessageSource(opens new window) Javadoc。
# 1.15.2 标准和自定义事件
ApplicationEvent类和ApplicationListener接口提供了应用程序中的事件处理。如果一个实现ApplicationListener的bean部署到上下文中,每次一个ApplicationEvent发布到ApplicationContext中,该bean就会被通知。本质上,这就是标准的观察者模式。
从Spring4.2开始,事件基础架构已得到显着改进,并提供了 基于注解的模型 (opens new window)以及发布任何任意事件的能力(也就是说,事件对象不必须继承ApplicationEvent)。当那样的对象被发布时,Spring自动将其包装在事件中。
下表描述了Spring提供的标准事件:
| 事件 | 说明 |
|---|---|
| ContextRefreshedEvent | ApplicationContext被初始化或刷新时发布(例如,使用ConfigurableApplicationContext接口的refresh()方法)。在这里,“初始化”意味着所有bean都被加载,后置处理器bean被检测并激活,单例已预先实例化,并且ApplicationContext对象已准备就绪。只要上下文尚未关闭,就可以多次触发刷新,只要选择的ApplicationContext实际上支持这种“热”刷新。例如,XmlWebApplicationContext支持热刷新,但GenericApplicationContext不支持。 |
| ContextStartedEvent | 调用ConfigurableApplicationContext接口的start()方法启动ApplicationContext时发布。在这里,“开始”意味着所有生命周期bean都会收到明确的开始信号。通常,此信号在显示停止后用于重新启动bean,但也可以用于启动尚未配置为autostart的组件。例如,尚未开始初始化的组件。 |
| ContextStoppedEvent | 调用ConfigurableApplicationContext接口的stop()方法停止ApplicationContext时发布。在这里,“停止”意味着所有生命周期bean都会收到明确的停止信号。停止的上下文可能通过调用start()重启。 |
| ContextClosedEvent | 调用ConfigurableApplicationContext接口的close()方法或通过JVM关闭hook关闭ApplicationContext时发布。在这里,“关闭”意味着所有单例bean将被销毁。一旦上下文被关闭,它就到了生命周期的尽头,无法刷新或重新启动。 |
| RequestHandledEvent | 一个特定于web的事件告诉所有bean,已经服务了HTTP请求。请求完成后发布此事件。此事件仅适用于使用Spring的DispatcherServlet的Web应用程序。 |
| ServletRequestHandledEvent | 添加特定于Servlet的上下文信息的RequestHandledEvent的子类。 |
您还可以创建和发布自己的自定义事件。以下示例显示了一个简单的类,该类继承了ApplicationEvent:
public class BlockedListEvent extends ApplicationEvent {
private final String address;
private final String content;
public BlockedListEvent(Object source, String address, String content) {
super(source);
this.address = address;
this.content = content;
}
// accessor and other methods...
}
调用ApplicationEventPublisher的publishEvent()方法发布自定义ApplicationEvent。通常,这是通过创建一个实现ApplicationEventPublisherAware接口的类并将其注册为Spring bean来完成的。以下示例显示了这样的类:
public class EmailService implements ApplicationEventPublisherAware {
private List<String> blockedList;
private ApplicationEventPublisher publisher;
public void setBlockedList(List<String> blockedList) {
this.blockedList = blockedList;
}
public void setApplicationEventPublisher(ApplicationEventPublisher publisher) {
this.publisher = publisher;
}
public void sendEmail(String address, String content) {
if (blockedList.contains(address)) {
publisher.publishEvent(new BlockedListEvent(this, address, content));
return;
}
// send email...
}
}
在配置时,spring容器检测到EmailService实现了ApplicationEventPublisherAware并自动调用setApplicationEventPublisher()。实际上,传递的参数是Spring容器本身。你正在通过其ApplicationEventPublisher接口与应用程序上下文进行交互。
要接收自定义ApplicationEvent,您可以创建一个实现ApplicationListener的类并将其注册为Spring Bean。以下示例显示了这样的类:
public class BlockedListNotifier implements ApplicationListener<BlockedListEvent> {
private String notificationAddress;
public void setNotificationAddress(String notificationAddress) {
this.notificationAddress = notificationAddress;
}
public void onApplicationEvent(BlockedListEvent event) {
// notify appropriate parties via notificationAddress...
}
}
请注意,ApplicationListener通常使用自定义事件的类型(上一个示例中是BlockedListEvent)进行参数化。这意味着onApplicationEvent()方法可以保持类型安全,避免了向下转型。您可以根据需要注册尽可能多的事件监听,但请注意,**默认情况下,事件监听同步接收到事件。这意味着publishEvent()方法会阻塞直到所有监听器完成事件的处理。这种同步和单线程方法的优点之一是,当监听器接收事件时,如果事务上下文可用,它在发布者的事务上下文中运行。**如果要执行事件发布的另一种策略,请参见Spring的ApplicationEventMulticaster (opens new window) 接口和SimpleApplicationEventMulticaster (opens new window) 实现以获取配置选项。
以下示例显示了用于注册和配置上述每个类的bean定义:
<bean id="emailService" class="example.EmailService">
<property name="blockedList">
<list>
<value>known.spammer@example.org</value>
<value>known.hacker@example.org</value>
<value>john.doe@example.org</value>
</list>
</property>
</bean>
<bean id="blockedListNotifier" class="example.BlockedListNotifier">
<property name="notificationAddress" value="blockedlist@example.org"/>
</bean>
当调用sendEmail()方法时,如果有任何电子邮件应该被拦截,则会发布BlockedListEvent类型的自定义事件。blockedListNotifierBean注册为ApplicationListener并接收BlockedListEvent,此时它可以通知各接收方。
ℹ️Spring的事件机制设计用于在同一应用程序上下文中bean之间的简单通信。但是,对于更复杂的企业集成需求,单独维护的Spring Integration (opens new window)为构建轻量,面向模式的,事件驱动的架构提供了完整的支持,这些架构建立在众所周知的Spring编程模型上。
基于注解的事件监听
从spring 4.2开始,您可以使用@EventListener在任何Spring bean的公共方法上注册事件侦听器。BlockedListNotifier可以按以下方式重写:
public class BlockedListNotifier {
private String notificationAddress;
public void setNotificationAddress(String notificationAddress) {
this.notificationAddress = notificationAddress;
}
@EventListener
public void processBlockedListEvent(BlockedListEvent event) {
// notify appropriate parties via notificationAddress...
}
}
方法签名再次声明了它监听的事件类型,但是这次具有更灵活的名称,而无需实现特定的侦听器接口。只要实际事件类型可以在其实现层次结构中解析您的泛型参数,就可以通过泛型缩小事件类型。
如果您的方法应监听几个事件,或者您根本不用参数定义它,则事件类型也可以在注释本身上指定。以下示例显示了如何做:
@EventListener({ContextStartedEvent.class, ContextRefreshedEvent.class})
public void handleContextStart() {
// ...
}
还可以通过用使用SpEL 表达式 (opens new window) 的condition属性来添加其他运行时过滤,该属性应匹配特定事件。
下面的示例显示,只有在事件的content属性等于my-event时,才调用发布事件:
@EventListener(condition = "#blEvent.content == 'my-event'")
public void processBlockedListEvent(BlockedListEvent blockedListEvent) {
// notify appropriate parties via notificationAddress...
}
每个SpEL表达式都会根据专用上下文进行评估。下表列出了可用于上下文的项目,以便您可以将其用于有条件的事件处理:
| 名称 | 位置 | 描述 | 示例 |
|---|---|---|---|
| Event | 根对象 | 实际ApplicationEvent。 | #root.event或event |
| 参数数组 | 根对象 | 用于调用该方法的参数(作为对象数组)。 | #root.args或args;args [0]访问第一个参数。 |
| 参数名称 | 推断上下文 | 任何方法参数的名称。如果出于某种原因,这些名称不可用(例如,由于编译字节代码中没有调试信息),则也可以使用#a<#arg>语法代表单个参数,其中<#arg>代表参数索引(从0开始)。 | #blEvent或#a0(您还可以使用#p0或#p<#arg>参数符号作为别名) |
请注意,即使您的方法签名实际上是指已发布的事件,#root.event使您可以访问任意事件。如果您需要因处理另一个事件而发布事件,则可以更改方法签名以返回应发布的事件,如以下示例所示:
@EventListener
public ListUpdateEvent handleBlockedListEvent(BlockedListEvent event) {
// notify appropriate parties via notificationAddress and
// then publish a ListUpdateEvent...
}
ℹ️异步监听器 (opens new window)不支持此功能
此新方法为上述方法处理的每个BlockedListEvent发布了一个新的ListUpdateEvent。如果您需要发布多个事件,则可以返回事件集合。
异步监听器
如果您希望特定的监听器异步处理事件,则可以重复使用常规@Async支持。以下示例显示了如何做:
@EventListener
@Async
public void processBlockedListEvent(BlockedListEvent event) {
// BlockedListEvent is processed in a separate thread
}
使用异步事件时,请注意以下限制:
- 如果异步事件侦听器抛出异常,则不会向调用者传播。有关更多详细信息,请参见AsyncUncaughtExceptionHandler。
- 异步事件侦听器方法无法通过返回值来发布后续事件。如果您需要作为处理结果发布另一个事件,请注入
ApplicationEventPublisher(opens new window)手动发布该事件。
有序监听器
如果您需要在另一个监听器之前调用一个监听器,则可以将@Order添加到方法声明中,如以下示例所示:
@EventListener
@Order(42)
public void processBlockedListEvent(BlockedListEvent event) {
// notify appropriate parties via notificationAddress...
}
泛型事件
您也可以使用泛型进一步定义事件的结构。考虑使用EntityCreatedEvent<T>,其中T是创建的实际实体的类型。例如,您可以创建以下监听器定义以仅接收Person的EntityCreatedEvent:
@EventListener
public void onPersonCreated(EntityCreatedEvent<Person> event) {
// ...
}
由于类型擦除,只有在事件被解析的情况下才能解决事件监听过滤器的泛型参数(类似class PersonCreatedEvent extends EntityCreatedEvent<Person> { … })。在某些情况下,如果所有事件都遵循相同的结构,这可能会变得非常啰嗦(如前一个示例中的事件一样)。在这种情况下,您可以实现ResolvableTypeProvider,以指导框架涵盖运行时环境所提供的内容。以下事件显示了如何这样做:
public class EntityCreatedEvent<T> extends ApplicationEvent implements ResolvableTypeProvider {
public EntityCreatedEvent(T entity) {
super(entity);
}
@Override
public ResolvableType getResolvableType() {
return ResolvableType.forClassWithGenerics(getClass(), ResolvableType.forInstance(getSource()));
}
}
ℹ️这不仅适用于ApplicationEvent,还适用于您作为事件发送的任何任意对象。
# 1.15.3. 方便地访问资源
为了最佳使用和对应用程序上下文的理解,您应该熟悉Spring的Resource抽象,如 Resources (opens new window)中所述。
应用程序上下文是ResourceLoader,可用于加载Resource对象。资源本质上是JDK java.net.URL类的更丰富的版本。实际上,Resource的实现适当地包装java.net.URL的实例。Resource可以以透明的方式从几乎任何位置获得资源,包括从类路径,文件系统位置,可用标准URL描述的任何地方以及其他一些变体。如果资源位置字符串是一个简单的路径,而没有任何特殊的前缀,则这些资源的位置是特定的,并且适用于实际的应用程序上下文类型。
提供给ApplicationContext构造函数的位置路径或路径实际上是资源字符串,并以简单的形式根据特定上下文实现进行适当处理。例如,ClassPathXmlApplicationContext将简单的位置路径视为类路径位置。您还可以使用带有特殊前缀的位置路径(资源字符串)来强制从类路径或URL加载定义,而与实际上下文类型无关。
# 1.15.4. 应用程序启动跟踪
ApplicationContext管理Spring应用程序的生命周期,并提供围绕组件的丰富编程模型。复杂的应用程序可以具有同样复杂的组件图和启动阶段。使用特定的指标跟踪应用程序启动步骤可以帮助您了解在启动阶段花费的时间,但也可以作为一种更好地了解整个上下文生命周期的方式。
AbstractApplicationContext(及其子类)装配了ApplicationStartup,该应用程序收集有关各种启动阶段的启动数据:
- 应用程序上下文生命周期(基本软件包扫描,配置类管理)
- beans生命周期(实例化,智能初始化,后置处理)
- 应用程序事件处理
这是AnnotationConfigApplicationContext中的示例:
// create a startup step and start recording
StartupStep scanPackages = this.getApplicationStartup().start("spring.context.base-packages.scan");
// add tagging information to the current step
scanPackages.tag("packages", () -> Arrays.toString(basePackages));
// perform the actual phase we're instrumenting
this.scanner.scan(basePackages);
// end the current step
scanPackages.end();
应用程序上下文对多个步骤进行了数据读取。记录后,可以使用特定工具收集,显示和分析这些启动步骤。有关现有启动步骤的完整列表,您可以查看专用的附录部分 (opens new window)。
默认的ApplicationStartup实现是最小开销的空操作变体。这意味着默认情况下,在应用程序启动期间不会收集指标。Spring框架具有用于跟踪启动步骤的FlightRecorderApplicationStartup。要使用此变体,您必须在上下文创建时将其实例配置到ApplicationContext中。
如果开发人员希望收集更精确的数据或使用ApplicationStartup基础架构,也可以提供自己的AbstractApplicationContext子类。
⚠️ApplicationStartup仅在应用程序启动期间和核心容器中使用;这不是Java性能测试工具或 Micrometer (opens new window)等指标库的替代。
要开始收集自定义StartupStep,组件可以直接从应用程序上下文中获取ApplicationStartup实例,使其组件实现ApplicationStartupAware,或在任何注入点上注入ApplicationStartup。
ℹ️开发人员在创建自定义启动步骤时不应使用“spring.*”命名空间。该命名空间保留用于Spring内部情况,并且可能会更改。
# 1.15.5. web应用程序方便地实例化ApplicationContext
您可以通过使用例如ContextLoader来声明性地创建ApplicationContext实例。当然,您还可以使用ApplicationContext的实现之一编码式地创建ApplicationContext实例。
您也可以使用ContextLoaderListener注册ApplicationContext,如下示例显示:
<context-param>
<param-name>contextConfigLocation</param-name>
<param-value>/WEB-INF/daoContext.xml /WEB-INF/applicationContext.xml</param-value>
</context-param>
<listener>
<listener-class>org.springframework.web.context.ContextLoaderListener</listener-class>
</listener>
监听器检查contextConfigLocation参数。如果参数不存在,则监听器将/WEB-INF/applicationContext.xml用作默认值。当参数确实存在时,监听器使用预定义的分隔符(逗号,分号和空格)将字符串分开并将该值用作搜索应用程序上下文的位置。也支持Ant风格的路径模式。示例为/WEB-INF/*Context.xml(对于所有以Context.xml结尾的文件,并且位于WEB-INF目录中)和/WEB-INF/**/*Context.xml(所有位于WEB-INF的任何子目录中的此类文件)。
# 1.15.6. 将Spring ApplicationContext部署为Java EE RAR文件
可以将Spring ApplicationContext作为RAR文件部署,将上下文及其所有必需的bean类和库封装在Java EE RAR部署单元中。等效于引导独立ApplicationContext(仅在Java EE环境中托管)能够访问Java EE服务器设施。RAR部署是部署无头信息WAR文件的场景的更自然的替代方法--实际上,一个没有任何HTTP入口点的WAR文件,仅用于在Java EE环境中引导Spring ApplicationContext。
RAR部署是不需要HTTP入口点的应用程序上下文的理想选择,而仅由消息端点和定时任务组成。在这样的上下文中的bean可以使用应用程序服务器资源,例如JTA 事务管理和JNDI结合的JDBC DataSource实例和JMS ConnectionFactory实例,还可以向平台的JMX服务器注册--通过Spring的标准事务管理以及JNDI和JMX支持设施。应用程序组件还可以通过Spring的TaskExecutor抽象与应用程序服务器的JCA WorkManager进行交互。
有关RAR部署涉及的配置详细信息,请参见SpringContextResourceAdapter (opens new window)。简单地以Java EE RAR文件部署Spring ApplicationContext步骤如下:
- 将所有应用程序类都包装到RAR文件中(这是具有不同文件扩展名的标准JAR文件)。将所有必需的库添加到RAR存档的根部。添加META-INF/ra.xml部署描述符(如SpringContextResourceAdapter的Javadoc所示)和相应的Spring XML bean定义文件(通常为META-INF/applicationContext.xml)。
- 将生成的RAR文件放入应用程序服务器的部署目录中。
ℹ️这种RAR部署单元通常是独立的。他们不会将组件暴露于外界,甚至没有将组件暴露于同一应用程序的其他模块。与基于RAR的ApplicationContext的交互通常是通过与其他模块共享的JMS目标发生的。例如,基于RAR的ApplicationContext也可以安排一些任务或对文件系统(或类似)中的新文件做出反应。如果需要从外部进行同步访问,则可以(例如)导出RMI端点,这可以由同一机器上的其他应用程序模块使用。
# 1.16. BeanFactory
BeanFactory API为Spring的IOC功能提供了基础。它的特定约定主要用于与Spring的其他部分和相关第三方框架集成,并且其DefaultListableBeanFactory实现是高层GenericApplicationContext容器中的关键委托。
BeanFactory和相关接口(例如BeanFactoryAware,InitializingBean,DisposableBean)是其他框架组件的重要集成点。不需要任何注解甚至反射,它们允许容器及其组件之间可以交互。应用程序级别的bean可以使用相同的回调接口,但通常会通过注解或通过编程配置来代替声明性依赖注入。
请注意,BeanFactory 核心API及其默认的DefaultListableBeanFactory实现不会对配置格式或要使用的任何组件注解做出推断。所有这些通过扩展而来(例如XmlBeanDefinitionReader和AutowiredAnnotationBeanPostProcessor),并以共享的BeanDefinition对象作为核心元数据表示。这是使Spring容器如此灵活和扩展的根源。
# 1.16.1. BeanFactory 还是ApplicationContext?
本节解释了BeanFactory和ApplicationContext容器级别之间的差异以及对引导程序的影响。除非您有充分的理由不这样做,否则您应该使用ApplicationContext,GenericApplicationContext及其子类AnnotationConfigApplicationContext作为自定义启动的常见实现。这些是Spring核心容器的主要入口:加载配置文件,触发类路径扫描,编码式注册bean定义和注解的类,以及(从5.0开始)注册功能性bean定义。
因为ApplicationContext包括BeanFactory的所有功能,通常,建议在普通的BeanFactory使用它,除了需要对bean处理完全控制的场景。在ApplicationContext(例如GenericApplicationContext实现)中,几种bean约定被检测(也就是说,按bean名称或bean类型,特别是后处理器),而普通的DefaultListableBeanFactory对任何特殊beans都不可知。
对于许多扩展的容器功能,例如注解处理和AOP代理,BeanPostProcessor (opens new window)扩展点是必不可少的。如果您仅使用普通的DefaultListableBeanFactory,则该后处理器不会被检测到并默认激活。这种情况可能会令人困惑,因为您的Bean配置实际上没有任何错误。相反,在这种情况下,需要通过其他设置来完全引导容器。
下表列出了由BeanFactory和ApplicationContext接口和实现提供的功能。
| 功能 | BeanFactory | ApplicationContext |
|---|---|---|
| Bean实例化/装配 | Yes | Yes |
| 集成的生命周期管理 | No | Yes |
| 自动BeanPostProcessor注册 | No | Yes |
| 自动BeanFactoryPostProcessor注册 | No | Yes |
| 方便MessageSource的访问(国际化) | No | Yes |
| 内置ApplicationEvent发布机制 | No | Yes |
要用DefaultListableBeanFactory显示注册bean 后处理器,您需要编程调用addBeanPostProcessor,如以下示例所示:
DefaultListableBeanFactory factory = new DefaultListableBeanFactory();
// populate the factory with bean definitions
// now register any needed BeanPostProcessor instances
factory.addBeanPostProcessor(new AutowiredAnnotationBeanPostProcessor());
factory.addBeanPostProcessor(new MyBeanPostProcessor());
// now start using the factory
要将BeanFactoryPostProcessor应用于普通的DefaultListableBeanFactory,您需要调用其后处理方法,如以下示例所示:
DefaultListableBeanFactory factory = new DefaultListableBeanFactory();
XmlBeanDefinitionReader reader = new XmlBeanDefinitionReader(factory);
reader.loadBeanDefinitions(new FileSystemResource("beans.xml"));
// bring in some property values from a Properties file
PropertySourcesPlaceholderConfigurer cfg = new PropertySourcesPlaceholderConfigurer();
cfg.setLocation(new FileSystemResource("jdbc.properties"));
// now actually do the replacement
cfg.postProcessBeanFactory(factory);
在这两种情况下,显示地注册步骤都是不方便的,这就是为什么在Spring支持的应用程序中,各种ApplicationContext变体优先于普通DefaultListableBeanFactory,尤其是在典型的企业设置中依赖BeanFactoryPostProcessor和BeanPostProcessor实例扩展容器功能时。
ℹ️AnnotationConfigApplicationContext已注册了所有常见的注解后置处理器,并且可以通过配置注解(例如@EnableTransactionManagement)引入其他处理器。在Spring基于注解的配置模型的抽象水平上,Bean后置处理器的概念成为一个内部容器细节。
# 2.Resources
本章介绍了spring如何处理资源以及如何在spring中使用资源。它包括以下主题:
- 简介
- Resource接口
- 内置Resource实现
- ResourceLoader
- ResourceLoaderAware接口
- Resources作为依赖
- 应用程序上下文和Resource路径
# 2.1. 简介
不幸的是,Java的标准java.net.URL类和标准处理程序不足以访问所有低级资源。例如,没有标准化的URL实现可以用于访问需要从类路径或ServletContext获得的资源。虽然可以为专门的URL前缀注册新处理程序(类似于http:等前缀的现有处理程序),这通常非常复杂,URL接口仍然缺乏一些理想的功能,例如检查指向的资源的存在的方法。
# 2.2. Resource接口
Spring的资源接口旨在成为抽象访问低级资源的功能更强大的接口。以下列表显示了资源接口定义:
public interface Resource extends InputStreamSource {
boolean exists();
boolean isOpen();
URL getURL() throws IOException;
File getFile() throws IOException;
Resource createRelative(String relativePath) throws IOException;
String getFilename();
String getDescription();
}
如Resource接口所示的定义,它继承了InputStreamSource接口。以下列表显示了InputStreamSource接口的定义:
public interface InputStreamSource {
InputStream getInputStream() throws IOException;
}
Resource接口中一些最重要的方法是:
getInputStream():找到并打开资源,返回一个从资源中读取的InputStream。预计每个调用都会返回新的输入流。关闭流是调用者的责任。exists():返回boolean,指示此资源是否真正以物理形式存在。isOpen():返回boolean,指示此资源是否代表带有打开流的句柄。如果为true,则不能多次读取InputStream,并且必须仅读取一次,然后关闭以避免资源泄漏。除InputStreamResource外,所有常规资源实现都会返回false。getDescription():返回此资源的描述,用于使用资源时用于错误输出。这通常是全限定的文件名或资源的实际URL。
其他方法可让您获得代表资源的实际URL或文件对象(如果基础实现是兼容并支持该功能的)。
Spring本身广泛使用Resource抽象,作为需要资源的许多方法签名中的参数类型。某些Spring API中的其他方法(例如各种ApplicationContext实现的构造函数)采用一个字符串,该字符串以未经修饰或简单的形式用于创建适合该上下文实现的资源,或者通过字符串路径上的特殊前缀,让调用者指定必须创建和使用特定的资源实现。
虽然Spring经常使用Resource接口,但它实际上在您自己的代码中用作接收资源的工具类很有用,即使您的代码不知道或不关心任何其他Spring部分。尽管这将您的代码耦合到Spring,但实际上只有将其耦合到这组少量的工具类类中,它们可以用作URL的替代品,并且同等于其他类似的库。
:ℹ️Resource抽象不会替代功能。它会在可能的情况下包装。例如,UrlResource包装URL并使用包装的URL来完成其工作。
# 2.3. 内置Resource实现
Spring包括下列Resource实现
- UrlResource
- ClassPathResource
- FileSystemResource
- ServletContextResource
- InputStreamResource
- ByteArrayResource
# 2.3.1. UrlResource
UrlResource包装java.net.URL,可用于访问通常通过URL访问的任何对象,例如文件,HTTP目标,FTP目标等。所有URL均具有标准化的字符串表示形式,这种适当的标准化前缀用来指示另一种URL类型,包括file:用于访问文件系统路径,http:用于通过HTTP协议访问资源,ftp:用于通过FTP访问资源等。
UrlResource是由Java代码通过明确使用UrlResource构造函数创建的,但是当您传递表示路径的String参数调用API方法时,通常会隐式地创建。对于后一种情况,JavaBeans PropertyEditor最终决定要创建哪种类型的Resource。如果路径字符串包含众所周知的前缀(例如classpath:),则为该前缀创建适当的专用Resource。但是如果它无法识别前缀,它将假定字符串是标准URL字符串并创建UrlResource。
# 2.3.2. ClassPathResource
该类代表应从类路径获得的资源。它使用线程上下文类加载器,给定的类加载器或给定的类来加载资源。
此Resource实现作为java.io.File支持文件系统中的路径资源,但是不支持在jar包中的类路径资源和尚未暴露到文件系统中的资源(取决于servlet引擎或者环境)。为了解决这个问题,各种Resource实现始终支持java.net.URL。
ClassPathResource是由Java代码通过明确使用ClassPathResource构造函数来创建的,但是当您传递表示路径的String参数调用API方法时,通常会隐式地创建。对于后一种情况,JavaBeans PropertyEditor识别路径字符串上特殊的前缀classpath:并在这种情况下创建ClassPathResource。
# 2.3.3. FileSystemResource
这是java.io.File和java.nio.file.Path的Resource实现。它支持File和URL的解决方案。
# 2.3.4. ServletContextResource
这是ServletContext资源的Resource实现,可解析相关Web应用程序根目录中的相对路径。它始终支持流访问和URL访问,但仅在Web应用程序存档目录在文件系统上扩展时,才允许java.io.File访问。无论是否在文件系统上进行扩展,还是直接从JAR或其他地方访问,例如数据库(可能)实际上取决于Servlet容器。
# 2.3.5. InputStreamResource
InputStreamResource是给定InputStream的Resource实现。仅当没有合适的特定资源实现时,才应使用它。在可能的情况下,更建议使用ByteArrayResource或任何基于文件的Resource实现。
与其他Resource实现相反,这是已经打开的资源的描述符。因此,isOpen()返回true。如果您需要将资源描述符保留在某个地方或需要多次阅读流,请勿使用它。
# 2.3.6. ByteArrayResource
这是给定字节数组的Resource实现。它为给定的字节数组创建一个ByteArrayInputStream。它对于从任何给定的字节数组中加载内容很有用,而无需InputStreamResource。
# 2.4. ResourceLoader
ResourceLoader接口旨在返回Resource实例。以下列表显示了ResourceLoader接口定义:
public interface ResourceLoader {
Resource getResource(String location);
}
所有应用程序上下文实现了ResourceLoader接口。因此,所有应用程序上下文均可用于获得Resource实例。
当您在特定的应用程序上下文上调用getResource(),并且指定的位置路径没有特定的前缀时,您将获得适合该特定应用程序上下文的Resource类型。例如,假设以下代码段是针对ClassPathXmlApplicationContext实例运行的:
Resource template = ctx.getResource("some/resource/path/myTemplate.txt");
对于ClassPathXmlApplicationContext,该代码返回ClassPathResource。如果相同的方法在FileSystemXmlApplicationContext实例上调用,则它将返回FileSystemResource。对于WebApplicationContext,它将返回ServletContextResource。它类似地返回每个上下文适当的对象。您可以以适合特定应用程序上下文的方式加载资源。
另一方面,您也可以通过指定特殊classpath:前缀强制返回ClassPathResource,如下示例显示:
Resource template = ctx.getResource("classpath:some/resource/path/myTemplate.txt");
同样,您可以通过指定任何标准的java.net.URL前缀来强制使用UrlResource。以下示例使用file和http前缀:
Resource template = ctx.getResource("file:///some/resource/path/myTemplate.txt");
Resource template = ctx.getResource("https://myhost.com/resource/path/myTemplate.txt");
下表总结了将String对象转换为Resource对象的策略:
| 前缀 | 示例 | 说明 |
|---|---|---|
| classpath: | classpath:com/myapp/config.xml | 从类路径中加载 |
| file: | [file:///data/config.xml](file:///data/config.xml) | 从文件系统中加载URL。参考FileSystemResource注意事项 (opens new window). |
| http: | https://myserver/logo.png | 作为URL加载 |
| 无前缀 | /data/config.xml | 依赖底层ApplicationContext |
# 2.5. ResourceLoaderAware接口
ResourceLoaderAware接口是一个特殊的回调接口,它标识了希望提供ResourceLoader引用的组件。以下代码展示了ResourceLoaderAware接口定义:
public interface ResourceLoaderAware {
void setResourceLoader(ResourceLoader resourceLoader);
}
当实现ResourceLoaderAware的类部署到应用程序上下文(作为Spring管理的bean)中时,它被应用程序上下文识别为ResourceLoaderAware。然后,应用程序上下文调用setResourceLoader(ResourceLoader),将自己作为参数提供(请记住,Spring中的所有应用程序上下文实现了Resoursceloader接口)。
由于ApplicationContext是ResourceLoader,因此这种bean还可以实现ApplicationContextAware接口,并直接使用所提供的应用程序上下文来加载资源。但是如果您需要的话,最好使用专门的ResourceLoader接口。该代码仅与资源加载接口(可以视为实用工具接口),而不会耦合到整个Spring ApplicationContext接口。
在应用程序组件中,您也可以依靠自动注入ResourceLoader作为实现ResourceLoaderAware接口的替代方案。“传统的”constructor和byType自动注入模式(如[自动注入协作者](#1.4.5. 自动装配协作者))能够分别为构造函数参数或setter方法参数提供ResourceLoader。要获得更大的灵活性(包括字段注入和多参数方法注入的能力),请考虑使用基于注解的注入功能。在这种情况下,Resoursceloader被自动注入@Autowired标注的个字段,构造函数参数或方法参数中。
# 2.6. Resources作为依赖
如果bean本身要通过某种动态过程来确定并提供资源路径,那么bean使用ResourceLoader接口加载资源可能是有意义的。例如,考虑某种模板的加载,其中所需的特定资源取决于用户的角色。如果资源是静态的,则完全消除ResourceLoader接口的使用是有意义的,让bean暴露所需的Resource属性,并期望将它们注入其中。
所有应用程序上下文都注册并使用特殊的JavaBeans PropertyEditor,它可以将String路径转换为Resource对象。因此,如果myBean具有Resource类型的模板属性,则可以为该资源配置一个简单的字符串,如以下示例所示:
<bean id="myBean" class="...">
<property name="template" value="some/resource/path/myTemplate.txt"/>
</bean>
请注意,资源路径没有前缀。因此,由于应用程序上下文本身将用作ResourceLoader,资源本身是通过ClassPathResource,FileSystemResource或ServletContextResource加载的,具体取决于上下文的类型。
如果您需要强制使用特定的Resource类型,则可以使用前缀。以下两个示例显示了如何强制ClassPathResource和UrlResource(后者用于访问文件系统文件):
<property name="template" value="classpath:some/resource/path/myTemplate.txt">
<property name="template" value="file:///some/resource/path/myTemplate.txt"/>
# 2.7. 应用程序上下文和资源路径
本节涵盖了如何使用资源创建应用程序上下文,包括使用XML的快捷方式,如何使用通配符以及其他详细信息。
# 2.7.1. 构造应用程序上下文
应用程序上下文构造函数(对于特定的应用程序上下文类型)通常将字符串或字符串数组作为资源的位置路径,例如构成上下文定义的XML文件。
当这样的位置路径没有前缀时,特定Resource类型从该路径构建并用于加载bean定义,并且适用于特定的应用程序上下文。例如以下示例,该示例创建ClassPathXmlApplicationContext:
ApplicationContext ctx = new ClassPathXmlApplicationContext("conf/appContext.xml");
bean定义是从类路径加载的,因为使用了ClassPathResource。但是,请考虑以下示例,该示例创建FileSystemXmlApplicationContext:
ApplicationContext ctx =
new FileSystemXmlApplicationContext("conf/appContext.xml");
现在,bean定义是从文件系统位置加载的(在这种情况下,相对于当前的工作目录)。
请注意,在位置路径上使用特殊类路径前缀或标准URL前缀会覆盖默认加载的Resource。考虑以下示例:
ApplicationContext ctx =
new FileSystemXmlApplicationContext("classpath:conf/appContext.xml");
使用FileSystemXmlApplicationContext加载类路径的bean定义。然而,它还是FileSystemXmlApplicationContext。如果随后用作ResourceLoader,则任何无前缀的路径仍被视为文件系统路径。
构造ClassPathXmlApplicationContext 实例--快捷方式
ClassPathXmlApplicationContext暴露了大量构造器以便实例化。您可以提供仅包含XML文件本身文件名(没有父路径信息)的字符串数组,还可以提供类。然后,ClassPathXmlApplicationContext从提供的类得到路径信息。考虑以下目录结构:
com/
foo/
services.xml
daos.xml
MessengerService.class
下面的示例显示了如何实例化由名为services.xml和daos.xml(类路径上)的bean定义组成的ClassPathXmlApplicationContext实例。
ApplicationContext ctx = new ClassPathXmlApplicationContext(
new String[] {"services.xml", "daos.xml"}, MessengerService.class);
有关各种构造函数的详细信息,请参见ClassPathXmlApplicationContext (opens new window) Javadoc。
# 2.7.2. 应用程序上下文中的通配符构造器资源路径
应用程序上下文中的资源路径构造函数值可能是简单的路径(如前所述),每个路径都有到目标资源一对一的映射,或者可能包含特殊的“ classpath*:”前缀或内部Ant风格正则表达式(通过使用Spring的PathMatcher工具匹配)。
这种机制的一种用途是您需要打包组件式应用程序。所有组件都可以将上下文定义片段“发布”到众所周知的位置路径,并且当使用classpath*:前缀创建最终的应用程序上下文时,所有组件片段都会自动拾取。
请注意,这种通配符是特定于在应用程序上下文构造函数中使用资源路径(或直接使用PathMatcher工具类)并在构造时解析的。它与Resource类型本身无关。您不能使用classpath*:前缀来构建实际Resource,因为资源一次指向一个资源。
**Ant风格模式句型
路径位置可以包含Ant风格的句型,如以下示例所示
/WEB-INF/*-context.xml
com/mycompany/**/applicationContext.xml
file:C:/some/path/*-context.xml
classpath:com/mycompany/**/applicationContext.xml
当路径位置包含Ant风格的句型时,解析器有一个更复杂的步骤来试图解析通配符。它为通往最后一个非通配符的路径生产资源,并从中获得一个URL。如果此URL不是jar:URL或容器特定的变体(例如WebLogic中的zip:,WebSphere中的wsjar等),则从ava.io.File获得它,并用于遍历文件系统来解析该通配符。对于jar URL,解析器要么从中获取java.net.JarURLConnection,要么手动解析jar URL,然后遍历jar文件的内容以解析通配符。
可移植性
如果指定的路径已经是文件URL(因为基本资源ResourceLoader显示地或隐式地是一个文件系统),则能保证通配符以完全可移植式的方式工作。如果指定的路径是类路径位置,则解析器必须通过调用Classloader.getResource()调用来获得最后的非通配符URL路径段。由于这只是路径的一个节点(不是末尾的文件),无论返回哪种URL,它实际上是未定义的(在ClassLoader Javadoc中)。实际上,它始终是代表目录(类路径资源解析到文件系统位置)或某种类型的jar URL(类路径资源解析到jar位置)的java.io.File。尽管如此,此操作仍然存在移植性问题。
如果在最后一个非通配符段获得了jar URL,则解析器必须能够从中获得java.net.JarURLConnection,或者手动解析jar URL,以便能够获得jar的内容并解析通配符。这确实在大多数环境中都起作用,但在其他环境中会失败,我们强烈建议在使用jar包的资源通配符解析之前先进行全面的测试。
classpath:前缀
在构建基于XML的应用程序上下文时,位置字符串可以使用classpath*:前缀:如下示例显示:
ApplicationContext ctx =
new ClassPathXmlApplicationContext("classpath*:conf/appContext.xml");
这个特殊的前缀指定必须获得匹配给定名称的所有classpath 资源(这实质上是通过呼叫ClassLoader.getResources(…)进行的),然后合并以形成最终的应用程序上下文定义。
ℹ️通配符classpath依赖于基础classloader的getResources()方法。如今,大多数应用程序服务器都提供自己的classloader ,因此行为可能有所不同,尤其是在处理JAR文件时。一个简单的测试来检查
classpath*是否工作是使用classloader从classpath上的jar中加载文件:getClass().getClassLoader().getResources("<someFileInsideTheJar>")。尝试使用具有相同名称但位置不同的两个文件执行此测试。如果返回不合适的结果,请查看应用程序服务器文档以检查是否存在可能影响classloader 行为的设置。
您还可以将classpath*:前缀与位置路径的其余部分中的PathMatcher句型组合在一起(例如,classpath*:META-INF/*-beans.xml)。在这种情况下,解析策略非常简单:ClassLoader.getResources()在最后一个非通配符路径段中使用,以获取类加载程序层次结构中的所有匹配资源,然后在每个资源中,相同的PathMatcher解析子路径上的通配符。
通配符相关的备注
请注意,当与Ant风格的模式结合使用时,只有在模式启动之前至少有一个根目录可用,除非实际目标文件位于文件系统中。这意味着诸如classpath*:*.xml之类的句型可能不会从jar文件的根部检索文件,而仅从暴露的目录的根部中检索文件。
Spring检索classpath条目的能力源自JDK的ClassLoader.getResources()方法,该方法仅返回一个空字符串的文件系统位置(指示可能的根以搜索)。Spring评估URLClassLoader运行时配置和jar文件中java.class.path manifests,但不能保证会导致移植性行为。
ℹ️扫描classpath包需要在类路径中存在相应的目录条目。当您用Ant构建JARs 时,请勿激活JAR 任务的files-only开关。此外,基于某些环境中的安全策略类路,径目录可能不会暴露--例如,JDK 1.7.0_45及以上的独立应用(这需要在您的manifests中设置“Trusted-Library”。)参考 https://stackoverflow.com/questions/19394570/java-jre-7u45-breaks-classloader-getresources。
在JDK 9的模块路径(Jigsaw)上,Spring的类路径扫描通常可以按预期工作。在这里也强烈推荐将资源放入专用目录中,从而避免在跟目录上搜索jar文件产生上述的可移植性问题。
如果在多个类路径位置都可搜索到跟包,带有Ant风格的classpath:资源不一定能找到匹配的资源。考虑以下资源位置的示例:
com/mycompany/package1/service-context.xml
现在考虑找到该文件的Ant风格路径:
classpath:com/mycompany/**/service-context.xml
这样的资源可能只在一个位置,但是当试图解析前面示例的路径时,解析器通过getResource("com/mycompany")返回(第一个)URL。如果此基本软件包节点存在于多个classloader位置中,则实际的末尾资源可能不存在。因此,在这种情况下,您更应该使用classpath*:,该模式搜索包含根包的所有类路径位置。
# 2.7.3. FileSystemResource 注意事项
未附加到FileSystemApplicationContext(即,当FileSystemApplicationContext不是实际的ResourceLoader)的FileSystemResource如您所期望的对待您的绝对和相对路径。相对路径相对于当前的工作目录,而绝对路径相对于文件系统的根目录。
但是,出于向后兼容性(历史)原因,当FileSystemApplicationContext是ResourceLoader时,这种情况会发生变化。FileSystemApplicationContext强制所有附加的FileSystemResource实例将所有位置路径视为相对路径,无论它们是否以斜杠开始。实际上,这意味着以下示例是等效的:
ApplicationContext ctx =
new FileSystemXmlApplicationContext("conf/context.xml");
ApplicationContext ctx =
new FileSystemXmlApplicationContext("/conf/context.xml");
实际上,如果您需要真正的绝对文件系统路径,则应避免在FileSystemResource或FileSystemXmlApplicationContext中使用绝对路径,并通过使用file:URL前缀强制使用UrlResource。以下示例显示了如何这样做:
// actual context type doesn't matter, the Resource will always be UrlResource
ctx.getResource("file:///some/resource/path/myTemplate.txt");
// force this FileSystemXmlApplicationContext to load its definition via a UrlResource
ApplicationContext ctx =
new FileSystemXmlApplicationContext("file:///conf/context.xml");
# 3. 校验,数据绑定和类型转换
将验证视为业务逻辑需要权衡,Spring提供了用于验证(和数据绑定)的设计,这些设计并不排除其中任何一个。特别的,验证不应与Web层息息相关,并且应该易于本地化,并且应该可以集成到任何可用的验证器。考虑到这些问题,Spring提供了一份Validator约定,在应用程序的每一层中既基础又非常可用。
数据绑定对于让用户输入动态绑定到应用程序的域模型(或用于处理用户输入的任何对象)很有用。Spring提供了DataBinder来做到这一点。Validator和DataBinder组成了validation包,该包主要用于但不限于Web层。
BeanWrapper是春季框架中的一个基本概念,在许多地方都使用。但是,您可能无需直接使用BeanWrapper。但是,因为这是参考文档,所以我们会做一些解释。我们在本章中解释了BeanWrapper,如果您要使用它,则在尝试将数据绑定到对象时使用。
Spring的DataBinder和低级BeanWrapper都使用PropertyEditorSupport实现来解析和格式化属性值。PropertyEditor和PropertyEditorSupport类型是JavaBeans 规范的一部分,也在本章中进行了解释。Spring 3引入了core.convert软件包,该软件包提供了一个通用类型的转换设施,以及用于格式化UI字段值的高级“format”包。您可以将这些软件包用作PropertyEditorSupport实现的简单替代方案。本章也讨论了它们。
Spring通过设置基础架构和Spring自己的Validator约定的适配器以支持Java Bean验证。如 Java Bean Validation (opens new window)中所述,应用程序可以在全局范围内启用Bean验证,并专门用于所有验证需求。在Web层中,应用程序可以进一步注册每个DataBinder的controller-local Spring Validator实例,如Configuring a DataBinder (opens new window)所述,这对于插入自定义验证逻辑很有用。
# 3.1. 使用Spring的Validator
Spring特有Validator接口,您可以用来验证对象。验证器接口通过使用Errors对象来工作,以便在验证时,验证器可以将验证失败报告给错误对象。
考虑一个小数据对象的以下示例:
public class Person {
private String name;
private int age;
// the usual getters and setters...
}
下一个示例通过实现org.springframework.validation.Validator接口的以下两种方法来为Person类提供验证行为:
supports(Class):该验证器可以验证提供的类的实例吗?validate(Object, org.springframework.validation.Errors):验证给定的对象,如果发生验证错误,将错误信息传递给Errors对象。
实现Validator非常简单,尤其是当您知道Spring框架还提供ValidationUtils辅助类。以下示例为Person实例Validator实现:
public class PersonValidator implements Validator {
/**
* This Validator validates only Person instances
*/
public boolean supports(Class clazz) {
return Person.class.equals(clazz);
}
public void validate(Object obj, Errors e) {
ValidationUtils.rejectIfEmpty(e, "name", "name.empty");
Person p = (Person) obj;
if (p.getAge() < 0) {
e.rejectValue("age", "negativevalue");
} else if (p.getAge() > 110) {
e.rejectValue("age", "too.darn.old");
}
}
}
ValidationUtils类上的静态rejectIfEmpty(..)方法用于拒绝name属性,如果该属性为null或空字符串。请查看ValidationUtils (opens new window) javadoc,以查看除了前面显示的示例外提供了什么功能。
虽然当然可以实现一个单个Validator类来验证丰富对象中的每个嵌套对象,但最好将每个嵌套对象类的验证逻辑封装在其自己的Validator实现中。“丰富”对象的一个简单示例是由两个String属性(一个名称和第二个名称)和一个复杂Address对象组成的Customer。Address对象可以独立于Customer对象使用,因此已经实现了不同的AddressValidator。如果您希望您的CustomerValidator重复使用AddressValidator类中包含的逻辑,而无需求复制粘贴,则可以在CustomerValidator中依赖注入或实例化AddressValidator,如下示例显示:
public class CustomerValidator implements Validator {
private final Validator addressValidator;
public CustomerValidator(Validator addressValidator) {
if (addressValidator == null) {
throw new IllegalArgumentException("The supplied [Validator] is " +
"required and must not be null.");
}
if (!addressValidator.supports(Address.class)) {
throw new IllegalArgumentException("The supplied [Validator] must " +
"support the validation of [Address] instances.");
}
this.addressValidator = addressValidator;
}
/**
* This Validator validates Customer instances, and any subclasses of Customer too
*/
public boolean supports(Class clazz) {
return Customer.class.isAssignableFrom(clazz);
}
public void validate(Object target, Errors errors) {
ValidationUtils.rejectIfEmptyOrWhitespace(errors, "firstName", "field.required");
ValidationUtils.rejectIfEmptyOrWhitespace(errors, "surname", "field.required");
Customer customer = (Customer) target;
try {
errors.pushNestedPath("address");
ValidationUtils.invokeValidator(this.addressValidator, customer.getAddress(), errors);
} finally {
errors.popNestedPath();
}
}
}
验证错误将报告给Errors对象并传递给验证器。对于Spring Web MVC,您可以使用<spring:bind/>标签来检查错误消息,但也可以自己检查Errors对象。有关其提供的方法的更多信息,可以在javadoc (opens new window)中找到。
# 3.2. 将代码解析为错误消息
我们介绍了数据绑定和验证。本节涵盖了与验证错误相对应的输出消息。在上一节中显示的示例中,我们拒绝了name和age字段。如果我们想使用MessageSource输出错误消息,则可以使用拒绝字段时提供的错误代码来进行。当您(直接或间接地通过使用ValidationUtils类)调用rejectValue或来自Errors接口的其他reject方法之一,基础实现不仅注册您传递的代码,还会注册其他错误代码。MessageCodesResolver确定Errors接口注册哪些错误代码。默认情况下,使用的是DefaultMessageCodesResolver,它不仅在您提供的代码中注册消息,还注册了包含您传递给拒绝方法的字段名称的消息。因此,如果您通过使用rejectValue("age", "too.darn.old")拒绝字段,除了too.darn.old,Spring也会注册too.darn.old.age和too.darn.old.age.int(第一个包含字段名,第二个包含字段类型)。这是为了以便帮助开发人员定位错误消息。
有关MessageCodesResolver和默认策略的更多信息,可以分别在MessageCodesResolver (opens new window)和DefaultMessageCodesResolver (opens new window)的Javadoc中找到。
# 3.3. Bean操作和BeanWrapper
org.springframework.beans软件包遵守JavaBeans 标准。JavaBeans 是一个具有默认无参构造器的类,并遵循命名约定,例如,一个名为bingoMadness的属性将具有setter方法setBingoMadness(..)和getter方法getBingoMadness()。有关JavaBeans的更多信息,请参见javabeans (opens new window)。
beans 软件包中的一个非常重要的类是BeanWrapper接口及其相应的实现(BeanWrapperImpl)。正如javadoc引用的那样,BeanWrapper提供了设置和获取属性值(单独或批量),获取属性描述符和查询属性的功能,以确定它们是可读还是可写的。此外,BeanWrapper提供了对嵌套属性的支持,使子属性设置为无限的深度。BeanWrapper还支持添加标准Javabeans PropertyChangeListeners和VetoableChangeListeners的能力,而无需在目标类中编写支持代码。另外,BeanWrapper为设置索引属性提供了支持。BeanWrapper通常不直接通过应用程序代码使用,而是由DataBinder和BeanFactory使用。
BeanWrapper的工作方式部分由其名称表明:它包装bean以在该bean上执行操作,例如设置和检索属性。
# 3.3.1. 设置获取基础和嵌套属性
设置和获取属性是通过BeanWrapper的setPropertyValue和getPropertyValue重载方法完成的。有关详细信息,请参见他们的Javadoc。下表显示了这些约定的一些例子:
| 表达式 | 说明 |
|---|---|
| name | 对应于getName()或isName()和setName(..)方法的属性名称。 |
| account.name | 对应于getAccount().setName()或getAccount().getName()方法的属性名称。 |
| account[2] | account属性的第三个元素。索引属性可以是array,list或其他自然排序的集合。 |
| account[COMPANYNAME] | account Map属性的以COMPANYNAME为key的entry |
(如果您不打算直接使用BeanWrapper,那么下一节对您来说并不重要。如果您仅使用DataBinder和BeanFactory及其默认实现,则应跳至[内置PropertyEditor实现](#3.3.2. 内置PropertyEditor实现)。)
以下两个示例类使用BeanWrapper获取并设置属性:
public class Company {
private String name;
private Employee managingDirector;
public String getName() {
return this.name;
}
public void setName(String name) {
this.name = name;
}
public Employee getManagingDirector() {
return this.managingDirector;
}
public void setManagingDirector(Employee managingDirector) {
this.managingDirector = managingDirector;
}
}
public class Employee {
private String name;
private float salary;
public String getName() {
return this.name;
}
public void setName(String name) {
this.name = name;
}
public float getSalary() {
return salary;
}
public void setSalary(float salary) {
this.salary = salary;
}
}
以下代码片段显示了如何检索和操纵Companies和Employees实例的某些属性:
BeanWrapper company = new BeanWrapperImpl(new Company());
// setting the company name..
company.setPropertyValue("name", "Some Company Inc.");
// ... can also be done like this:
PropertyValue value = new PropertyValue("name", "Some Company Inc.");
company.setPropertyValue(value);
// ok, let's create the director and tie it to the company:
BeanWrapper jim = new BeanWrapperImpl(new Employee());
jim.setPropertyValue("name", "Jim Stravinsky");
company.setPropertyValue("managingDirector", jim.getWrappedInstance());
// retrieving the salary of the managingDirector through the company
Float salary = (Float) company.getPropertyValue("managingDirector.salary");
# 3.3.2. 内置PropertyEditor实现
spring使用PropertyEditor来处理Object和String之间的转换。以与对象本身不同的方式表示属性可能很方便。例如,可以以人类可读的方式表示日期(如String:'2007-14-09'),而我们仍然可以将人类可读的形式转换回原始日期(甚至将人类可读的日期形式转为Date对象)。可以通过注册java.beans.PropertyEditor的自定义编辑器来实现此行为。在BeanWrapper上注册自定义编辑器,或者在特定的IOC容器中(如上一章中提到)注册自定义编辑器,使其了解如何将属性转换为所需类型。有关PropertyEditor的更多信息,请参阅 the javadoc of the java.beans package from Oracle (opens new window)。
在Spring使用属性编辑的几个示例:
- 通过使用PropertyEditor实现设置bean上的属性。当您将字符串用作在XML文件中声明的某些bean的属性值时,Spring(如果相应属性的设置具有Class参数)使用ClassEditor来尝试将参数解析为Class对象。
- Spring的MVC框架通过使用所有在CommandController的所有子类中手动绑定的PropertyEditor实现,解析HTTP请求参数。
Spring具有许多内置的PropertyEditor实现,他们全部在org.springframework.beans.propertyeditors包中。默认情况下,大多数(但不是全部,如下表所示)由BeanWrapperImpl注册。属性编辑器可以以某种方式配置,您仍然可以注册自己的变体以覆盖默认版本。下表描述了Spring提供的各种PropertyEditor的实现:
| 类 | 说明 |
|---|---|
| ByteArrayPropertyEditor | byte数组编辑器。将字符串转换为其相应的字节表示。默认情况下由BeanWrapperImpl注册。 |
| ClassEditor | 解析字符串实际代表的类,反之亦然。当找不到class 时,就会抛出IllegalArgumentException。默认情况下,由BeanWrapperImpl注册。 |
| CustomBooleanEditor | Boolean属性的可自定义属性编辑器。默认情况下,由BeanWrapperImpl注册,但可以通过将其自定义实例注册为自定义编辑器来覆盖。 |
| CustomCollectionEditor | collections的属性编辑器,将任何Collection转换为给定的目标Collection类型。 |
| CustomDateEditor | java.util.Date的可自定义属性编辑器,支持自定义DateFormat。默认情况下未注册。必须由用户根据需要使用适当的格式注册。 |
| CustomNumberEditor | 任何Number子类的可自定义属性编辑器,例如Integer,Long,Float或Double。默认情况下,由BeanWrapperImpl注册,但可以通过将其自定义实例注册为自定义编辑器来覆盖。 |
| FileEditor | 将字符串解析为java.io.File对象。默认情况下,由BeanWrapperImpl注册。 |
| InputStreamEditor | 单向属性编辑器,可以使用字符串并通过中间ResourceEditor和Resource生产一个输入流,以便可以将InputStream属性直接设置为字符串。请注意,默认用法不会为您关闭InputStream。默认情况下,由BeanWrapperImpl注册。 |
| LocaleEditor | 可以将字符串解析为Locale对象,反之亦然(字符串格式为*[country]*[variant],与Locale的toString()方法相同)。默认情况下,由BeanWrapperImpl注册。 |
| PatternEditor | 可以将字符串解析为java.util.regex.Pattern对象,反之亦然。 |
| PropertiesEditor | 可以将字符串(用java.util.Properties类中的javadoc中定义的格式格式化)解析为为Properties对象。默认情况下,由BeanWrapperImpl注册。 |
| StringTrimmerEditor | trim字符串的属性编辑器。(可选)允许将空字符串转换为null值。默认情况下未注册 - 必须由用户注册。 |
| URLEditor | 可以将URL的字符串表示形式解析为实际的URL对象。默认情况下,由BeanWrapperImpl注册。 |
Spring使用java.beans.PropertyEditorManager设置可能需要的属性编辑器的搜索路径。搜索路径还包括sun.bean.editors,其中包括针对Font,Color和大多数原始类型的PropertyEditor实现。还要注意,标准Javabeans基础架构会使用Editor自动发现PropertyEditor类(无需明确注册),如果它们与他们处理的类在同一个包,并且与该类别具有相同的名称。例如具有以下类和软件包结构,这足以使SomethingEditor被识别并用作Something类型的PropertyEditor。
com
chank
pop
Something
SomethingEditor // the PropertyEditor for the Something class
请注意,您也可以在此处使用标准的BeanInfo Javabeans机制(参考 (opens new window))。以下示例使用BeanInfo机制注册一个或多个相关类的属性的PropertyEditor实例:
com
chank
pop
Something
SomethingBeanInfo // the BeanInfo for the Something class
以下java源码引用SomethingBeanInfo类,该类关联Something类age属性的CustomNumberEditor。
public class SomethingBeanInfo extends SimpleBeanInfo {
public PropertyDescriptor[] getPropertyDescriptors() {
try {
final PropertyEditor numberPE = new CustomNumberEditor(Integer.class, true);
PropertyDescriptor ageDescriptor = new PropertyDescriptor("age", Something.class) {
public PropertyEditor createPropertyEditor(Object bean) {
return numberPE;
};
};
return new PropertyDescriptor[] { ageDescriptor };
}
catch (IntrospectionException ex) {
throw new Error(ex.toString());
}
}
}
注册额外的自定义PropertyEditor 实现
将bean属性设置为字符串值时,Spring IOC容器最终使用标准Javabeans PropertyEditor实现将这些字符串转换为属性的复杂类型。Spring预注册了许多自定义PropertyEditor实现(例如,将以字符串表示的类名称转换为Class对象)。此外,Java的标准JavaBeans PropertyEditor查找机制使一个类的PropertyEditor可以适当地命名,并将其放置在与提供支持的类的同一包中,以便可以自动找到它。
如果需要注册其他自定义PropertyEditors,则可以使用几种机制。假设您有BeanFactory引用,最常见的手动方法但不推荐是使用ConfigurableBeanFactory接口的registerCustomEditor()方法。另一个(更方便点)机制是使用一种特殊的bean工厂post处理器,称为CustomEditorConfigurer。尽管您可以将bean factory的post处理器与BeanFactory实现一起使用,但CustomEditorConfigurer具有嵌套的属性设置,因此我们强烈建议您将其与ApplicationContext一起使用,您可以在其中以类似的方式部署到任何bean或能自动检测并应用的地方。
请注意,所有bean工厂和应用程序上下文自动使用许多内置属性编辑器,通过使用BeanWrapper来处理属性转换。上一节 (opens new window).中列出了BeanWrapper注册的标准属性编辑器。此外,ApplicationContexts还覆盖或添加其他编辑器以适合特定应用程序上下文类型的方式处理资源查找。
标准Javabeans PropertyEditor实例用于将表示为字符串的属性值转换为属性的实际复杂类型。您可以使用CustomEditorConfigurer后处理器来方便地为ApplicationContext添加其他PropertyEditor实例。
考虑以下示例,该示例定义了一个名为ExoticType的用户类,另一个称为DependsOnExoticType的类,它需要设置ExoticType属性:
package example;
public class ExoticType {
private String name;
public ExoticType(String name) {
this.name = name;
}
}
public class DependsOnExoticType {
private ExoticType type;
public void setType(ExoticType type) {
this.type = type;
}
}
当正确设置事物时,我们希望能够将类型属性分配为字符串,PropertyEditor将其转换为实际的ExoticType实例。以下bean定义显示了如何设置此关系:
<bean id="sample" class="example.DependsOnExoticType">
<property name="type" value="aNameForExoticType"/>
</bean>
PropertyEditor看起来类似于以下内容:
// converts string representation to ExoticType object
package example;
public class ExoticTypeEditor extends PropertyEditorSupport {
public void setAsText(String text) {
setValue(new ExoticType(text.toUpperCase()));
}
}
最后,以下示例显示了如何使用CustomEditorConfigurer向ApplicationContext注册新PropertyEditor,然后可以根据需要使用它:
<bean class="org.springframework.beans.factory.config.CustomEditorConfigurer">
<property name="customEditors">
<map>
<entry key="example.ExoticType" value="example.ExoticTypeEditor"/>
</map>
</property>
</bean>
使用PropertyEditorRegistrar
在Spring容器中注册属性编辑器的另一种机制是创建和使用PropertyEditorRegistrar。当您需要在几种不同情况下使用相同的属性编辑器集时,此接口特别有用。您可以编写相应的注册器并在每种情况下重复使用。PropertyEditorRegistrar实例与称为PropertyEditorRegistry的接口协同工作,该接口是由Spring BeanWrapper(和DataBinder)实现的接口。与CustomEditorConfigurer一起使用时,PropertyEditorRegistrar的实例特别方便,该属性公开了一个称为setPropertyEditorRegistrars(..)的属性。以这种方式添加到CustomEditorConfigurer中的PropertyEditorRegistrar实例可以与DataBinder和Spring MVC控制器共享。此外,它避免了在自定义编辑器上同步的需求:PropertyEditorRegistrar期望为每个bean尝试创建新PropertyEditor实例。
以下示例显示了如何创建自己的PropertyEditorRegistrar实现:
package com.foo.editors.spring;
public final class CustomPropertyEditorRegistrar implements PropertyEditorRegistrar {
public void registerCustomEditors(PropertyEditorRegistry registry) {
// it is expected that new PropertyEditor instances are created
registry.registerCustomEditor(ExoticType.class, new ExoticTypeEditor());
// you could register as many custom property editors as are required here...
}
}
另请参见org.springframework.beans.support.ResourceEditorRegistrar,以获取PropertyEditorRegistrar实现示例。请注意,在其registerCustomEditors(..)方法实现中,为每个属性编辑器创建新实例。
下一个示例显示了如何配置CustomEditorConfigurer并将我们的CustomPropertyEditorRegistrar的实例注入其中:
<bean class="org.springframework.beans.factory.config.CustomEditorConfigurer">
<property name="propertyEditorRegistrars">
<list>
<ref bean="customPropertyEditorRegistrar"/>
</list>
</property>
</bean>
<bean id="customPropertyEditorRegistrar"
class="com.foo.editors.spring.CustomPropertyEditorRegistrar"/>
最后(在本章中,使用Spring的MVC Web框架与本章的重点有所不同),使用PropertyEditorRegistrars与数据绑定Controllers(例如SimpleFormController)结合使用,可能非常方便。以下示例使用PropertyEditorRegistrar的initBinder(..)的实现:
public final class RegisterUserController extends SimpleFormController {
private final PropertyEditorRegistrar customPropertyEditorRegistrar;
public RegisterUserController(PropertyEditorRegistrar propertyEditorRegistrar) {
this.customPropertyEditorRegistrar = propertyEditorRegistrar;
}
protected void initBinder(HttpServletRequest request,
ServletRequestDataBinder binder) throws Exception {
this.customPropertyEditorRegistrar.registerCustomEditors(binder);
}
// other methods to do with registering a User
}
这种PropertyEditor注册方式非常简洁(initBinder(..)的实现仅是一行长),并让一般的PropertyEditor注册代码封装在类中,然后根据需要在尽可能多的Controllers共享。
# 3.4. Spring类型转换
Spring 3引入了core.convert软件包,该软件包提供了一个通用类型的转换系统。该系统定义一个SPI来实现类型转换逻辑和在运行时执行类型转换的API。在Spring容器中,您可以将此系统用作PropertyEditor实现的替代方案,将外部化bean属性值字符串转换为所需的属性类型。您还可以在需要类型转换的任何地方使用此公共API。
# 3.4.1. SPI转换器
SPI实现类型转换逻辑是简单且强类型的,如以下接口定义所示:
package org.springframework.core.convert.converter;
public interface Converter<S, T> {
T convert(S source);
}
要创建自己的转换器,请实现Converter接口,然后参数化S作为您转换的源类型和T作为您转换的目标类型。如果需要转换为T的数组或T集合,则也可以透明地应用这样的转换器,前提是还已经注册了委托数组或收集转换器(默认情况下为DefaultConversionService)。
对于每个convert(S)的调用,需保证源参数不会为null。如果转换失败,您的Converter可能会抛出任何不受检异常。特别的,它应该抛出IllegalArgumentException以报告无效的源值。注意确保您的转换器实现是线程安全的。
为方便起见,在core.convert.support软件包中提供了几个转换器实现。包括从字符串到数字和其他常见类型的转换器。以下列表显示了StringToInteger类,这是一个典型的转换器实现:
package org.springframework.core.convert.support;
final class StringToInteger implements Converter<String, Integer> {
public Integer convert(String source) {
return Integer.valueOf(source);
}
}
# 3.4.2. 使用ConverterFactory
当您需要集中整个类层次结构的转换逻辑(例如,从String到Enum对象转换时)时,您可以实现ConverterFactory,如下示例显示:
package org.springframework.core.convert.converter;
public interface ConverterFactory<S, R> {
<T extends R> Converter<S, T> getConverter(Class<T> targetType);
}
参数化类型S是要转换的类型,R定义了您可以转换为的类型。然后实现getConverter(Class<T>),其中T是R的子类。参考StringToEnumConverterFactory示例:
package org.springframework.core.convert.support;
final class StringToEnumConverterFactory implements ConverterFactory<String, Enum> {
public <T extends Enum> Converter<String, T> getConverter(Class<T> targetType) {
return new StringToEnumConverter(targetType);
}
private final class StringToEnumConverter<T extends Enum> implements Converter<String, T> {
private Class<T> enumType;
public StringToEnumConverter(Class<T> enumType) {
this.enumType = enumType;
}
public T convert(String source) {
return (T) Enum.valueOf(this.enumType, source.trim());
}
}
}
# 3.4.3. 使用GenericConverter
当您需要复杂的Converter实现时,请考虑使用GenericConverter接口。与Converter相比,GenericConverter具有更灵活的签名,其支持在多种源和目标类型之间转换。此外,GenericConverter在实现转换逻辑时可以使用源和目标字段上下文。这样的上下文使类型转换由字段注释或在字段签名上声明的泛型信息驱动。以下列表显示了GenericConverter的接口定义:
package org.springframework.core.convert.converter;
public interface GenericConverter {
public Set<ConvertiblePair> getConvertibleTypes();
Object convert(Object source, TypeDescriptor sourceType, TypeDescriptor targetType);
}
要实现GenericConverter,请让getConvertibleTypes()返回支持的源→目标类型对。然后实现convert(Object, TypeDescriptor, TypeDescriptor)以包含您的转换逻辑。源TypeDescriptor提供对源字段的访问权限,该源字段保留了要转换的值。目标TypeDescriptor提供对要设置转换值的目标字段的访问。
GenericConverter的示例之一是可以在Java数组和集合之间进行转换的转换器。这样的ArrayToCollectionConverter自省木集合类型字段以解析集合元素类型。这使源数组中的每个元素都可以在集合在目标字段上设置之前将其转换为集合元素类型。
ℹ️由于GenericConverter是一个更复杂的SPI接口,因此您仅在需要时才能使用它。对于基本类型转换需求,使用Converter或ConverterFactory即可
使用ConditionalGenericConverter
有时,您只有在特定条件下才能运行Converter。例如,您可能只有在目标字段上存在特定的注释时才能运行Converter,或者只有在目标类中定义了特定方法(例如static valueOf方法)时,您才运行Converter。ConditionalGenericConverter是GenericConverter和ConditionalConverter接口的联合,可让您定义此类自定义匹配条件:
public interface ConditionalConverter {
boolean matches(TypeDescriptor sourceType, TypeDescriptor targetType);
}
public interface ConditionalGenericConverter extends GenericConverter, ConditionalConverter {
}
ConditionalGenericConverter的一个很好的示例是EntityConverter,可在实体标识符和实体引用之间转换。此类EntityConverter只有在目标实体类型声明静态查找器方法(例如,findAccount(Long))时才匹配。您可以在matches(TypeDescriptor, TypeDescriptor)的实现中执行此类查找器方法检查。
# 3.4.4. ConversionService API
ConversionService定义了用于在运行时执行类型转换逻辑的统一API。转换器通常在以下门面接口后运行:
package org.springframework.core.convert;
public interface ConversionService {
boolean canConvert(Class<?> sourceType, Class<?> targetType);
<T> T convert(Object source, Class<T> targetType);
boolean canConvert(TypeDescriptor sourceType, TypeDescriptor targetType);
Object convert(Object source, TypeDescriptor sourceType, TypeDescriptor targetType);
}
大多数ConversionService实现还实现ConverterRegistry,其为注册转换器提供了SPI。在内部,ConversionService实现委托给了其注册的转换器,以执行类型的转换逻辑。
core.convert.support软件包提供了强大的ConversionService实现。GenericConversionService是适合在大多数环境中使用的通用实现。ConversionServiceFactory提供了一个方便的工厂,用于创建常见的ConversionService配置。
# 3.4.5. 配置ConversionService
ConversionService是一个无状态对象,旨在在应用程序启动时实例化,然后在多个线程之间共享。在Spring应用程序中,您通常为每个Spring容器(或ApplicationContext)配置ConversionService实例。Spring可以接收ConversionService,并在需要通过框架执行类型转换时使用它。您还可以将此ConversionService注入任何bean类并直接调用。
ℹ️如果未在Spring注册ConversionService,则使用原始的基于PropertyEditor的系统。
要在Spring注册默认的ConversionService,请添加以下bean定义,其中包括conversionService的id:
<bean id="conversionService"
class="org.springframework.context.support.ConversionServiceFactoryBean"/>
默认ConversionService可以在strings,numbers,enums,collections,maps和其他常见类型之间转换。要使用您自己的自定义转换器补充或覆盖默认转换器,请设置converters属性。属性值可以实现任何Converter,ConverterFactory或GenericConverter接口。
<bean id="conversionService"
class="org.springframework.context.support.ConversionServiceFactoryBean">
<property name="converters">
<set>
<bean class="example.MyCustomConverter"/>
</set>
</property>
</bean>
在Spring MVC应用程序中使用ConversionService也很常见。请参阅spring MVC章中的Conversion and Formatting (opens new window)。
在某些情况下,您可能希望在转换过程中格式化。参见FormattingConversionServiceFactoryBean 使用The FormatterRegistry SPI (opens new window) 详情。
# 3.4.6. 编程式使用ConversionService
要以编程方式使用ConversionService实例,您可以像其他任何bean一样注入对它的引用。以下示例显示了如何做到的:
@Service
public class MyService {
public MyService(ConversionService conversionService) {
this.conversionService = conversionService;
}
public void doIt() {
this.conversionService.convert(...)
}
}
对于大多数用例,您可以使用指定目标类型的convert方法,但它无法应用于更复杂的类型(例如collection参数)。例如,如果要以编程方式将Integer的List转换为String的List,则需要对源和目标类型进行正式定义。
幸运的是,TypeDescriptor提供了各种选择,使其简单地做到这一点,如以下示例所示:
DefaultConversionService cs = new DefaultConversionService();
List<Integer> input = ...
cs.convert(input,
TypeDescriptor.forObject(input), // List<Integer> type descriptor
TypeDescriptor.collection(List.class, TypeDescriptor.valueOf(String.class)));
请注意,DefaultConversionService会自动注册适合大多数环境的转换器。这包括collection 转换器,scalar 转换器和基本Object-to-String转换器。您可以通过使用DefaultConversionService类上的static addDefaultConverters方法向任何ConverterRegistry注册相同的转换器。
数组和集合值类型的转换器能重复使用,因此假设标准集合处理是合适的,则无需创建特定的转换器即可从S集合转换为T集合。
# 3.5. Spring字段格式化
如上一节所述,core.convert (opens new window)是一种通用类型的转换系统。它提供了一个统一的ConversionService API以及一个强大的Converter SPI,用于实现一种从一种类型到另一种类型的转换逻辑。Spring容器使用此系统绑定bean性值。此外,Spring表达语言(SPEL)和DataBinder都使用此系统来绑定字段值。例如,当SpEL 需要吧Short强转为Long以完成expression.setValue(Object bean, Object value)尝试时,core.convert系统会强制执行。
现在考虑类型装换需要典型的客户端环境,例如Web或桌面应用程序。在这样的环境中,您通常会从String转换以支持客户端回发过程,并返回字符串以支持视图渲染过程。此外,您通常需要本地化字符串值。更通用的core.convert Converter SPI不会直接解决此类格式要求。为了直接解决它们,Spring 3引入了便捷的Formatter SPI,该SPI为客户环境提供了简单且可靠的替代方案。
总之,当您需要实现通用类型转换逻辑时,您可以使用Converter SPI,例如,用于在java.util.Date和Long之间转换。当您在客户端环境(例如Web应用程序)中工作时,您可以使用Formatter SPI,并且需要解析和打印本地化字段值。ConversionService为SPI提供了统一的类型转换API。
# 3.5.1. Formatter SPI
Formatter SPI实现字段格式化逻辑简单且强类型。以下列表显示了Formatter接口的定义:
package org.springframework.format;
public interface Formatter<T> extends Printer<T>, Parser<T> {
}
Formatter继承了Printer和Parser接口。以下显示了这两个接口的定义:
public interface Printer<T> {
String print(T fieldValue, Locale locale);
}
import java.text.ParseException;
public interface Parser<T> {
T parse(String clientValue, Locale locale) throws ParseException;
}
实现Formatter接口以创建你自己的Formatter。参数T是您要格式化的对象的类型,例如java.util.Date。实现print()操作打印T的实例,以在客户端语言环境中显示。实现parse()操作以从客户端语言环境返回的格式化表示解析T实例。如果解析尝试失败,则您的Formatter应抛出ParseException或IllegalArgumentException。注意确保您的Formatter实现是线程安全的。
format子包为方便起见提供了多个Formatter的实现。number包提供了NumberStyleFormatter,CurrencyStyleFormatter和PercentStyleFormatter,它们使用java.text.NumberFormat格式化Number对象。datetime包提供了DateFormatter使用java.text.DateFormat格式化java.util.Date对象。
下列DateFormatter是Formatter的实现:
package org.springframework.format.datetime;
public final class DateFormatter implements Formatter<Date> {
private String pattern;
public DateFormatter(String pattern) {
this.pattern = pattern;
}
public String print(Date date, Locale locale) {
if (date == null) {
return "";
}
return getDateFormat(locale).format(date);
}
public Date parse(String formatted, Locale locale) throws ParseException {
if (formatted.length() == 0) {
return null;
}
return getDateFormat(locale).parse(formatted);
}
protected DateFormat getDateFormat(Locale locale) {
DateFormat dateFormat = new SimpleDateFormat(this.pattern, locale);
dateFormat.setLenient(false);
return dateFormat;
}
}
srping团队欢迎社区驱动的Formatter贡献。请参阅GitHub Issues (opens new window) 以做出贡献。
# 3.5.2. 注解驱动Formatting
字段格式化可以通过字段类型或注解配置。要将注解绑定到Formatter器,请实现AnnotationFormatterFactory。以下列表显示了AnnotationFormatterFactory接口的定义:
package org.springframework.format;
public interface AnnotationFormatterFactory<A extends Annotation> {
Set<Class<?>> getFieldTypes();
Printer<?> getPrinter(A annotation, Class<?> fieldType);
Parser<?> getParser(A annotation, Class<?> fieldType);
}
创建实现:参数A是您希望与格式化逻辑相关联的字段annotationType--例如org.springframework.format.annotation.DateTimeFormat。
让getFieldTypes()返回可以使用注解的字段类型。让getPrinter()返回Printer以打印注解字段的值。让getParser()返回Parser以解析带注解的字段的clientValue。
以下AnnotationFormatterFactory实现将@NumberFormat绑定到格式化器,以指定一个数字样式或模式:
public final class NumberFormatAnnotationFormatterFactory
implements AnnotationFormatterFactory<NumberFormat> {
public Set<Class<?>> getFieldTypes() {
return new HashSet<Class<?>>(asList(new Class<?>[] {
Short.class, Integer.class, Long.class, Float.class,
Double.class, BigDecimal.class, BigInteger.class }));
}
public Printer<Number> getPrinter(NumberFormat annotation, Class<?> fieldType) {
return configureFormatterFrom(annotation, fieldType);
}
public Parser<Number> getParser(NumberFormat annotation, Class<?> fieldType) {
return configureFormatterFrom(annotation, fieldType);
}
private Formatter<Number> configureFormatterFrom(NumberFormat annotation, Class<?> fieldType) {
if (!annotation.pattern().isEmpty()) {
return new NumberStyleFormatter(annotation.pattern());
} else {
Style style = annotation.style();
if (style == Style.PERCENT) {
return new PercentStyleFormatter();
} else if (style == Style.CURRENCY) {
return new CurrencyStyleFormatter();
} else {
return new NumberStyleFormatter();
}
}
}
}
要触发格式化,您可以用@NumberFormat注解字段,如以下示例所示:
public class MyModel {
@NumberFormat(style=Style.CURRENCY)
private BigDecimal decimal;
}
格式化注解API
org.springframework.format.annotation软件包中存在用于格式化的注解API。您可以使用@NumberFormat格式化Number字段,例如Double和Long;@DateTimeFormat格式化java.util.Date,java.util.Calendar,Long(用于毫秒的时间戳)以及JSR-310 java.time。
以下示例使用@DateTimeFormat将java.util.date格式化为ISO日期(yyyy-mm-dd):
public class MyModel {
@DateTimeFormat(iso=ISO.DATE)
private Date date;
}
# 3.5.3. FormatterRegistry SPI
FormatterRegistry是用于注册格式和转换器的SPI。FormattingConversionService是适用于大多数环境的FormatterRegistry的实现。您可以通过编程或声明地将此变体配置为spring bean,例如通过使用FormattingConversionServiceFactoryBean。因为此实现也实现了ConversionService,因此您可以将其直接配置为与Spring的DataBinder和Spring表达式语言(SpEL)一起使用。
以下列表显示了FormatterRegistry SPI:
package org.springframework.format;
public interface FormatterRegistry extends ConverterRegistry {
void addFormatterForFieldType(Class<?> fieldType, Printer<?> printer, Parser<?> parser);
void addFormatterForFieldType(Class<?> fieldType, Formatter<?> formatter);
void addFormatterForFieldType(Formatter<?> formatter);
void addFormatterForAnnotation(AnnotationFormatterFactory<?> factory);
}
如前所述,您可以按字段类型或注解注册格式化器。
FormatterRegistry SPI使您可以集中配置格式化规则,而不是在控制器上重复此类配置。例如,您可能需要强制所有日期字段以某种方式格式化,或者具有特定注解的字段以某种方式格式化。有了共享的FormatterRegistry,您只需定义这些规则一次,并且在需要格式化时将其应用。
# 3.5.4. FormatterRegistrar SPI
FormatterRegistrar是通过FormatterRegistry进行注册格式化器和转换器的SPI。以下列表显示其接口定义:
package org.springframework.format;
public interface FormatterRegistrar {
void registerFormatters(FormatterRegistry registry);
}
在为给定格式类别(例如日期格式化)注册多个相关的转换器和格式化器时,FormatterRegistrar很有用。在声明性注册不适用的情况下,这也可能很有用 - 例如,当需要在不同于它自身<T>的特定字段类型下或在注册Printer/Parser对时,需要格式化器可索引。下一节将提供有关转换器和格式注册的更多信息。
# 3.5.5. 在Spring MVC中配置格式化
请参阅Spring MVC中的 Conversion and Formatting (opens new window)。
# 3.6. 配置全局Date和Time格式化
默认情况下,未用@DateTimeFormat注解的日期和时间字段通过使用DateFormat.SHORT样式从字符串转换。你可以通过定义自己的全局格式来更改此行为。
为此,请确保Spring没有注册默认格式化器。相反,请在以下类帮助下手动注册格式器。
org.springframework.format.datetime.standard.DateTimeFormatterRegistrarorg.springframework.format.datetime.DateFormatterRegistrar
例如,以下Java配置注册了全局yyyyMMdd格式:
@Configuration
public class AppConfig {
@Bean
public FormattingConversionService conversionService() {
// Use the DefaultFormattingConversionService but do not register defaults
DefaultFormattingConversionService conversionService = new DefaultFormattingConversionService(false);
// Ensure @NumberFormat is still supported
conversionService.addFormatterForFieldAnnotation(new NumberFormatAnnotationFormatterFactory());
// Register JSR-310 date conversion with a specific global format
DateTimeFormatterRegistrar registrar = new DateTimeFormatterRegistrar();
registrar.setDateFormatter(DateTimeFormatter.ofPattern("yyyyMMdd"));
registrar.registerFormatters(conversionService);
// Register date conversion with a specific global format
DateFormatterRegistrar registrar = new DateFormatterRegistrar();
registrar.setFormatter(new DateFormatter("yyyyMMdd"));
registrar.registerFormatters(conversionService);
return conversionService;
}
}
如果您喜欢基于XML的配置,则可以使用FormattingConversionServiceFactoryBean。以下示例显示了如何做:
<?xml version="1.0" encoding="UTF-8"?>
<beans xmlns="http://www.springframework.org/schema/beans"
xmlns:xsi="http://www.w3.org/2001/XMLSchema-instance"
xsi:schemaLocation="
http://www.springframework.org/schema/beans
https://www.springframework.org/schema/beans/spring-beans.xsd>
<bean id="conversionService" class="org.springframework.format.support.FormattingConversionServiceFactoryBean">
<property name="registerDefaultFormatters" value="false" />
<property name="formatters">
<set>
<bean class="org.springframework.format.number.NumberFormatAnnotationFormatterFactory" />
</set>
</property>
<property name="formatterRegistrars">
<set>
<bean class="org.springframework.format.datetime.standard.DateTimeFormatterRegistrar">
<property name="dateFormatter">
<bean class="org.springframework.format.datetime.standard.DateTimeFormatterFactoryBean">
<property name="pattern" value="yyyyMMdd"/>
</bean>
</property>
</bean>
</set>
</property>
</bean>
</beans>
请注意,在Web应用程序中配置日期和时间格式化时,会有额外的注意事项。请参阅WebMVC Conversion and Formatting (opens new window) 或 WebFlux Conversion and Formatting (opens new window)。
# 3.7. Java Bean校验
Spring框架为Java Bean Validation (opens new window) API提供了支持。
# 3.7.1. Bean校验概览
Bean验证通过约束声明和元数据为Java应用程序的提供了一种常见的验证方式。要使用它,您可以使用声明性的校验约束注解域模型属性,在运行时它们会被强制执行。有内置的约束,您还可以定义自己的约束。
考虑以下示例,该示例显示一个具有两个属性的简单PersonForm模型:
public class PersonForm {
private String name;
private int age;
}
Bean 验证使您可以声明约束,如以下示例所示:
public class PersonForm {
@NotNull
@Size(max=64)
private String name;
@Min(0)
private int age;
}
Bean验证验证器基于声明的约束来验证该类的实例。有关API的一般信息,请参见Bean Validation (opens new window)。有关特定约束,请参见Hibernate Validator (opens new window) 文档。要了解如何将bean验证器设置为spring bean,请继续阅读。
# 3.7.2. 配置Bean验证提供器
Spring为Bean验证API提供了全面的支持,包括将Bean验证提供者作为Spring bean引导。这使您可以在应用程序中需要验证的地方注入javax.validation.ValidatorFactor或javax.validation.Validator。
您可以使用LocalValidatorFactoryBean配置默认的验证器bean,如以下示例所示:
import org.springframework.validation.beanvalidation.LocalValidatorFactoryBean;
@Configuration
public class AppConfig {
@Bean
public LocalValidatorFactoryBean validator() {
return new LocalValidatorFactoryBean();
}
}
前面示例中的基本配置触发了bean验证以使用其默认的引导机制来初始化。Bean验证提供者(例如Hibernate验证器)期望在类路径中存在并自动检测到。
注入验证器
LocalValidatorFactoryBean和Spring的org.springframework.validation.Validator一样同时实现javax.validation.ValidatorFactory和javax.validation.Validator。您可以将这些接口中的任何一个注入需要调用验证逻辑的bean中。
如果您喜欢直接使用bean验证API,您可以注入javax.validation.Validator的引用,如以下示例所示:
import javax.validation.Validator;
@Service
public class MyService {
@Autowired
private Validator validator;
}
如果您的bean需要弹spring验证API,您可以注入org.springframework.validation.Validator的引用,如以下示例所示:
import org.springframework.validation.Validator;
@Service
public class MyService {
@Autowired
private Validator validator;
}
配置自定义约束
每个bean验证约束都由两个部分组成:
- @Constraint注解,声明约束及其可配置的属性。
- 实现了约束行为的javax.validation.ConstraintValidator接口的实现。
为了将声明与实现相关联,每个@Constraint引用了相应的ConstraintValidator实现类。在运行时,当您的域模型中遇到约束注解时,ConstraintValidatorFactory会实例化该引用的实现。
默认情况下,LocalValidatorFactoryBean配置了SpringConstraintValidatorFactory,其使用Spring创建ConstraintValidator实例。这使您的自定义约束像其他任何Spring bean一样受益于依赖注入。
下面的示例显示了一个自定义@Constraint声明,其关联了一个使用Spring进行依赖注入的ConstraintValidator实现:
@Target({ElementType.METHOD, ElementType.FIELD})
@Retention(RetentionPolicy.RUNTIME)
@Constraint(validatedBy=MyConstraintValidator.class)
public @interface MyConstraint {
}
import javax.validation.ConstraintValidator;
public class MyConstraintValidator implements ConstraintValidator {
@Autowired;
private Foo aDependency;
// ...
}
如前一个示例所示,ConstraintValidator实现可以像其他任何Spring bean一样使用 @Autowired。
Spring驱动的方法验证
您可以通过MethodValidationPostProcessor bean定义将Bean Validation 1.1支持(Hibernate Validator 4.3也作为自定义扩展)的方法验证功能集成到Spring上下文中:
import org.springframework.validation.beanvalidation.MethodValidationPostProcessor;
@Configuration
public class AppConfig {
@Bean
public MethodValidationPostProcessor validationPostProcessor() {
return new MethodValidationPostProcessor();
}
}
要使用Spring方法验证,需要用Spring的@Validated来标注所有目标类,同时可以选择地声明要使用的验证组。有关设置Hibernate验证器和Bean Validation 1.1提供者详细信息,请参见MethodValidationPostProcessor (opens new window)。
💡方法验证依赖于目标类使用了AOP Proxies (opens new window),或者接口方法的 JDK动态代理或CGLIB代理。使用代理有一定的局限性,其中一些在Understanding AOP Proxies (opens new window)中进行了描述。此外,请记住始终在代理类上使用方法和访问函数;直接访问字段将不起作用。
额外的配置选项
在大多数情况下,默认的LocalValidatorFactoryBean配置就足够了。从message interpolation到traversal resolution,有许多用于各种Bean验证构造的配置选项。参考LocalValidatorFactoryBean (opens new window)获取更多信息。
# 3.7.3. 配置DataBinder
从Spring 3开始,您可以使用Validator配置DataBinder实例。配置后,您可以通过binder.validate()来调用Validator。任何验证错误都会自动添加到绑定器的BindingResult中。
下面的示例显示了如何在绑定到目标对象之后编程式使用DataBinder以调用验证逻辑:
Foo target = new Foo();
DataBinder binder = new DataBinder(target);
binder.setValidator(new FooValidator());
// bind to the target object
binder.bind(propertyValues);
// validate the target object
binder.validate();
// get BindingResult that includes any validation errors
BindingResult results = binder.getBindingResult();
您还可以通过dataBinder.addValidators和dataBinder.replaceValidators配置有多个Validator的DataBinder。当将全局配置的bean验证与在DataBinder实例上本地配置的Spring Validator结合时,这很有用。参考 Spring MVC Validation Configuration (opens new window)。
# 3.7.4. Spring MVC 3验证
参考Spring MVC章节的Validation (opens new window) 。
# 4. Spring表达式语言(SpEL)
Spring表达语言(简称“ SpEL”)是一种强大的表达语言,它支持在运行时进行查询和操纵对象图。语言语法类似于统一的EL,但提供了其他功能,最著名的是方法调用和基本字符串模板功能。
虽然还有其他几种Java表达式语言(OGNL,MVEL和JBOSS EL,仅举几例。Spring表达式语言被创建以向Spring社区提供良好支持的表达语言,可以在所有Spring产品中使用。它的语言功能由Spring集成项目的要求驱动,包括在 Spring Tools for Eclipse (opens new window)中对代码完成支持的工具要求。也就是说,SpEL 基于技术敏捷的API,该API使其他表达语言实现在需要时可以集成。
尽管SpEL是Spring项目组中表达计算的基础,但它与Spring没有直接绑定,可以独立使用。要自我包含,本章中的许多示例都使用SpEL,就好像它是一种独立的表达语言一样。这需要创建一些引导基础架构类,例如解析器。大多数Spring用户不需要处理此基础架构,而是仅对表达式字符串进行计算。这种典型用途的一个示例是将SpEL集成到创建XML或基于注解的bean定义中,如 Expression support for defining bean definitions (opens new window)所示。
本章涵盖了表达语言,其API和其语言语法的特征。在好几个地方,Inventor和Society被用作表达式计算的目标对象。这些类声明和用于填充它们的数据在本章末尾列出。
表达语言支持以下功能:
- Literal expressions(字面意义表达)
- Boolean and relational operators(Boolean和相关操作)
- Regular expressions(正则表达)
- Class expressions(类表达)
- Accessing properties, arrays, lists, and maps(访问属性,数组,列表和maps)
- Method invocation(方法调用)
- Relational operators(关系运算)
- Assignment(赋值)
- Calling constructors(调用构造器)
- Bean references(bean引用)
- Array construction(数组构造)
- Inline lists(内联列表)
- Inline maps(内联maps)
- Ternary operator(三元运算)
- Variables(变量声明)
- User-defined functions(用户定义函数)
- Collection projection(集合映射)
- Collection selection(集合挑选)
- Templated expressions(模板表达式)
# 4.1. 计算
本节介绍了SpEL 接口及其表达语言的简单使用。完整的语言参考可以在Language Reference (opens new window).中找到。
以下代码介绍了SpEL API,以计算字符串表达式Hello World。
ExpressionParser parser = new SpelExpressionParser();
Expression exp = parser.parseExpression("'Hello World'");
String message = (String) exp.getValue();//'Hello World'
您最有可能使用的SpEL 类和接口位于org.springframework.expression及其子包中,例如spel.support。
ExpressionParser接口负责解析表达字符串。在前面的示例中,表达式字符串是一个用单引号标记表示的字符串。Expression接口负责计算先前定义的表达式字符串。分别调用parser.parseExpression和exp.getValue时,可以抛出ParseException和EvaluationException。
SPEL支持广泛的功能,例如调用方法,访问属性和调用构造函数。在方法调用的以下示例中,我们在字符串文字上调用concat方法:
ExpressionParser parser = new SpelExpressionParser();
Expression exp = parser.parseExpression("'Hello World'.concat('!')");
String message = (String) exp.getValue();//'Hello World!'
下面调用JavaBean 属性的示例,调用String的Bytes属性:
ExpressionParser parser = new SpelExpressionParser();
// invokes 'getBytes()'
Expression exp = parser.parseExpression("'Hello World'.bytes");
byte[] bytes = (byte[]) exp.getValue();
SpEL 还使用标准点符号(例如prop1.prop2.prop3)以及属性值的相应设置来支持嵌套属性。也可以访问public字段。
以下示例显示了如何使用点符号来获得字符串的长度:
ExpressionParser parser = new SpelExpressionParser();
// invokes 'getBytes().length'
Expression exp = parser.parseExpression("'Hello World'.bytes.length");
int length = (Integer) exp.getValue();
可以调用字符串的构造函数,而不是使用字符串字面量,如以下示例所示:
ExpressionParser parser = new SpelExpressionParser();
Expression exp = parser.parseExpression("new String('hello world').toUpperCase()");
String message = exp.getValue(String.class);
注意泛型方法的使用:public <T> T getValue(Class<T> desiredResultType)。使用此方法就不必强转返回类型。如果无法将返回值转为T类型或使用注册类型的转换器转换为T型,则将抛出EvaluationException。
SpEL 的更常见用法是提供一个根据特定对象实例(称为root对象)计算的表达式字符串。以下示例显示了如何从Inventor类的实例中检索名称属性或创建布尔条件:
// Create and set a calendar
GregorianCalendar c = new GregorianCalendar();
c.set(1856, 7, 9);
// The constructor arguments are name, birthday, and nationality.
Inventor tesla = new Inventor("Nikola Tesla", c.getTime(), "Serbian");
ExpressionParser parser = new SpelExpressionParser();
Expression exp = parser.parseExpression("name"); // Parse name as an expression
String name = (String) exp.getValue(tesla);
// name == "Nikola Tesla"
exp = parser.parseExpression("name == 'Nikola Tesla'");
boolean result = exp.getValue(tesla, Boolean.class);
// result == true
# 4.1.1. 理解EvaluationContext
在计算表达式以解析属性,方法或字段并帮助执行类型转换时,使用了EvaluationContext接口。Spring提供了两个实现。
SimpleEvaluationContext:为不需要全部SpEL语言语法且应受到有意义限制的表达式类别,暴露基本SpEL语言功能和配置选项的子集。StandardEvaluationContext:暴露SpEL语言功能和配置选项的全集。您可以使用它来指定默认的根对象并配置每个可用的计算相关策略。
SimpleEvaluationContext仅支持SpEL语言语法的一个子集。它不包括Java类型引用,构造函数和bean引用。它还要求您明确选择表达式中属性和方法的支持级别。默认情况下,create()静态工厂方法启用只能读取属性。您还可以获取一个构建器来配置所需的确切支持级别,以以下方面的一个或某种组合:
- 仅自定义PropertyAccessor(无反射)
- 只读访问权限的数据绑定属性
- 可读可写的数据绑定属性
类型转换
默认情况下,SpEL使用Spring Core(org.springframework.core.convert.ConversionService)中可用的转换服务。此转换服务带有许多用于常见转换的内置转换器,但也完全可扩展,因此您可以在类型之间添加自定义转换。此外,它支持泛型。这意味着,当您在表达式中使用泛型时,SpEL尝试转换以维持其遇到的任何对象的类型正确性。
这在实践中意味着什么?假设使用setValue()赋值。该属性的类型实际上是List<Boolean>。SpEL检测到列表的元素在放置在其中之前需要转换为布尔值。以下示例显示了如何做到的:
class Simple {
public List<Boolean> booleanList = new ArrayList<Boolean>();
}
Simple simple = new Simple();
simple.booleanList.add(true);
EvaluationContext context = SimpleEvaluationContext.forReadOnlyDataBinding().build();
// "false" is passed in here as a String. SpEL and the conversion service
// will recognize that it needs to be a Boolean and convert it accordingly.
parser.parseExpression("booleanList[0]").setValue(context, simple, "false");
// b is false
Boolean b = simple.booleanList.get(0);
# 4.1.2. Parser 配置
可以使用解析器配置对象(org.springframework.expression.spel.SpelParserConfiguration)配置SpEL表达式解析器。配置对象控制某些表达式组件的行为。例如,如果索引到数组或集合中,并且指定索引处的元素为null,则SpEL可以自动创建元素。当使用由属性参引用组成的表达式时,这很有用。如果索引数组或列表,且索引超出数组或列表当前大小,SpEL可以自动扩容。为了在指定的索引上添加元素,SpEL将在设置指定值之前尝试使用元素类型的默认构造函数创建元素。如果元素类型没有默认构造函数,则将null添加到数组或列表中。如果没有内置或自定义转换器知道如何设置该值,则null将保留在指定索引处的数组或列表中。以下示例演示了如何自动扩容列表:
class Demo {
public List<String> list;
}
// Turn on:
// - auto null reference initialization
// - auto collection growing
SpelParserConfiguration config = new SpelParserConfiguration(true,true);
ExpressionParser parser = new SpelExpressionParser(config);
Expression expression = parser.parseExpression("list[3]");
Demo demo = new Demo();
Object o = expression.getValue(demo);
// demo.list will now be a real collection of 4 entries
// Each entry is a new empty String
# 4.1.3. SpEL编译
spring框架4.1包括基本的表达式编译器。表达式通常是解释的,在计算过程中提供了许多动态灵活性,但不能提供最佳性能。对于偶尔的表达式使用情况,这很好,但是,当由其他组件(例如Spring集成)使用时,性能可能非常重要,并且没有真正的动态需求。
SpEL 编译器旨在满足这一需求。在计算过程中,编译器生成一个Java类,该类在运行时体现了表达式的行为,并使用该类来实现更快的表达计算。由于缺乏表达式分类,编译器使用在执行编译时对表达式的解释计算中收集的信息。例如,它不知道表达式的属引用的类型,但是在第一次解释计算期间,它就能知道。当然,如果各种表达元素的类型随时间变化,则基于此类派生信息的基础编译会产生问题。因此,编译最适合其类型信息不会在重复计算中改变的表达式。
考虑一下基础表达式:
someArray[0].someProperty.someOtherProperty < 0.1
由于前面的表达式涉及数组访问,某些属性引用和数字操作,因此性能增益可能非常明显。在一个50000迭代的微型基准运行示例中,使用解释器耗时75ms,使用表达式编译仅耗时3ms。
编译器配置
默认情况下,编译器未打开,但是您可以以两种不同的方式将其打开。您可以使用Parser配置过程(前面讨论)或在另一个组件中嵌入SpEL时使用系统属性。
编译器可以以三种模式之一的方式操作,这些模式在org.springframework.expression.spel.SpelCompilerMode枚举中列出。模式如下:
OFF(默认):编译器关闭IMMEDIATE:在即时模式下,表达式会尽快编译。这通常是在第一次解释计算之后。如果编译的表达式失败(通常是由于类型更改,如前所述),则表达式计算的调用者者会收到异常。MIXED:在混合模式下,表达式随着时间的推移在解释和编译模式之间静默地切换。经过一定数量的解释运行后,它们切换到编译形式,如果编译式出现问题(例如,如前所述,类型更改),则表达式会自动切换回解释模式。稍后,它可能会生成另一个编译的形式并切换到它。基本上,用户处于IMMEDIATE模式的异常是内部处理的。
存在IMMEDIATE模式,因为MIXED模式可能会因具有副作用的表达式导致问题。如果编译的表达在部分成功后爆炸增长,它可能已经做了影响系统状态的事情。如果发生这种情况,调用者可能不希望它在解释的模式下默默地重新运行,因为该表达式的一部分可能运行两次。
选择模式后,请使用SpelParserConfiguration配置解析器。以下示例显示了如何做到的:
SpelParserConfiguration config = new SpelParserConfiguration(SpelCompilerMode.IMMEDIATE,
this.getClass().getClassLoader());
SpelExpressionParser parser = new SpelExpressionParser(config);
Expression expr = parser.parseExpression("payload");
MyMessage message = new MyMessage();
Object payload = expr.getValue(message);
指定编译器模式时,还可以指定类加载器(允许传null)。编译的表达式是在提供的任何子类加载器中定义的。必须确保那一点,如果指定了类加载器,则其可以看到表达式计算过程中涉及的所有类型。如果未指定类加载器,则使用默认的类加载器(通常是在表达式计算期间运行的线程的上下文类加载器)。
配置编译器的第二种方法是在其他组件中嵌入SpEL时使用,并且可能无法通过配置对象进行配置。在这种情况下,可以使用系统属性。您可以将spring.expression.compiler.mode属性设置为SpelCompilerMode枚举值之一(off,immediate或mixed)。
编译器限制
从Spring 4.1开始,基本的编译框架就可用了。但是,该框架尚未支持所有种类的表达式。最初的重点是在性能要求高的环境中使用的一般表达式。目前无法编译以下表达式:
- 包含复制的表达式
- 依赖conversion service的表达式
- 使用自定义解析器或访问器的表达式
- 使用 selection(选择)或 projection(映射)的表达式
# 4.2. Bean定义中的表达式
您可以将SpEL表达式与基于XML或基于注解的配置元数据一起定义BeanDefinition实例。在这两种情况下,定义表达式的语法都是#{ <expression string> }形式。
# 4.2.1. XML配置
属性或构造函数参数值可以通过使用表达式设置,如以下示例所示:
<bean id="numberGuess" class="org.spring.samples.NumberGuess">
<property name="randomNumber" value="#{ T(java.lang.Math).random() * 100.0 }"/>
<!-- other properties -->
</bean>
应用程序上下文中的所有bean都可以作为预定义变量,并带有其公共bean名称。这包括标准上下文bean,例如environment(类型org.springframework.core.env.Environment)以及systemProperties和systemEnvironment(类型Map<String, Object>),以访问运行时环境。
下面的示例显示了以SpEL变量访问systemProperties的示例:
<bean id="taxCalculator" class="org.spring.samples.TaxCalculator">
<property name="defaultLocale" value="#{ systemProperties['user.region'] }"/>
<!-- other properties -->
</bean>
请注意,此处您不必在预定义变量前使用#符号前缀。
您也可以按名称引用其他bean属性,如以下示例所示:
<bean id="numberGuess" class="org.spring.samples.NumberGuess">
<property name="randomNumber" value="#{ T(java.lang.Math).random() * 100.0 }"/>
<!-- other properties -->
</bean>
<bean id="shapeGuess" class="org.spring.samples.ShapeGuess">
<property name="initialShapeSeed" value="#{ numberGuess.randomNumber }"/>
<!-- other properties -->
</bean>
# 4.2.2. 注解配置
要指定默认值,您可以将@Value放在字段,方法和或构造函数参数上。以下示例设置字段的默认值:
public class FieldValueTestBean {
@Value("#{ systemProperties['user.region'] }")
private String defaultLocale;
public void setDefaultLocale(String defaultLocale) {
this.defaultLocale = defaultLocale;
}
public String getDefaultLocale() {
return this.defaultLocale;
}
}
以下示例显示了等效的但在属性setter方法上:
public class PropertyValueTestBean {
private String defaultLocale;
@Value("#{ systemProperties['user.region'] }")
public void setDefaultLocale(String defaultLocale) {
this.defaultLocale = defaultLocale;
}
public String getDefaultLocale() {
return this.defaultLocale;
}
}
方法和构造函数自动注入也可以使用@Value,如以下示例所示:
public class SimpleMovieLister {
private MovieFinder movieFinder;
private String defaultLocale;
@Autowired
public void configure(MovieFinder movieFinder,
@Value("#{ systemProperties['user.region'] }") String defaultLocale) {
this.movieFinder = movieFinder;
this.defaultLocale = defaultLocale;
}
// ...
}
public class MovieRecommender {
private String defaultLocale;
private CustomerPreferenceDao customerPreferenceDao;
public MovieRecommender(CustomerPreferenceDao customerPreferenceDao,
@Value("#{systemProperties['user.country']}") String defaultLocale) {
this.customerPreferenceDao = customerPreferenceDao;
this.defaultLocale = defaultLocale;
}
// ...
}
# 4.3. 语言参考
本节描述了Spring表达语言的工作原理。
# 4.3.1. 文本表达式
支持的文本表达式的类型包括字符串,numeric 值(int,real,hex),boolean和null。字符串由单引号界定。要将单个引号标记在字符串中,请使用两个单引号标记字符。
以下列表显示了简单的文字用法。通常,它们不在这样的孤立状态中使用,而是作为更复杂的表达式的一部分,例如,在逻辑比较操作的一侧使用。
ExpressionParser parser = new SpelExpressionParser();
// evals to "Hello World"
String helloWorld = (String) parser.parseExpression("'Hello World'").getValue();
double avogadrosNumber = (Double) parser.parseExpression("6.0221415E+23").getValue();
// evals to 2147483647
int maxValue = (Integer) parser.parseExpression("0x7FFFFFFF").getValue();
boolean trueValue = (Boolean) parser.parseExpression("true").getValue();
Object nullValue = parser.parseExpression("null").getValue();
数字支持使用负符号,指数符号和小数点的使用。默认情况下,使用Double.parseDouble()来解析实数。
# 4.3.2. 属性,数组,列表,Maps和索引
用属性引用导航很容易。为此,请使用一个句点引用嵌套属性值。Inventor类的实例,pupin和tesla,填充了示例中需要的数据。为了向下导航并获得Tesla的出生年份和Pupin的出生城市,我们使用以下表达:
// evals to 1856
int year = (Integer) parser.parseExpression("birthdate.year + 1900").getValue(context);
String city = (String) parser.parseExpression("placeOfBirth.city").getValue(context);
ℹ️属性名的首字母大小写不敏感。因此,上述示例中的表达方式可以写为Birthdate.Year + 1900和PlaceOfBirth.City。此外,可以选择通过方法调用来访问属性,例如getPlaceOfBirth().getCity()。
数组和列表的内容是通过使用方括号符号获得的,如以下示例:
ExpressionParser parser = new SpelExpressionParser();
EvaluationContext context = SimpleEvaluationContext.forReadOnlyDataBinding().build();
// Inventions Array
// evaluates to "Induction motor"
String invention = parser.parseExpression("inventions[3]").getValue(
context, tesla, String.class);
// Members List
// evaluates to "Nikola Tesla"
String name = parser.parseExpression("members[0].name").getValue(
context, ieee, String.class);
// List and Array navigation
// evaluates to "Wireless communication"
String invention = parser.parseExpression("members[0].inventions[6]").getValue(
context, ieee, String.class);
通过指定括号内的文本键值获得map的内容。在下面的示例中,由于officers的key是字符串,我们可以指定字符串文字:
// Officer's Dictionary
Inventor pupin = parser.parseExpression("officers['president']").getValue(
societyContext, Inventor.class);
// evaluates to "Idvor"
String city = parser.parseExpression("officers['president'].placeOfBirth.city").getValue(
societyContext, String.class);
// setting values
parser.parseExpression("officers['advisors'][0].placeOfBirth.country").setValue(
societyContext, "Croatia");
# 4.3.3. 内联列表
您可以使用{}直接在表达式中表式列表。
// evaluates to a Java list containing the four numbers
List numbers = (List) parser.parseExpression("{1,2,3,4}").getValue(context);
List listOfLists = (List) parser.parseExpression("{{'a','b'},{'x','y'}}").getValue(context);
{}本身意味着一个空列表。出于性能原因,如果列表本身完全由固定文字组成,则创建一个常数列表来表示表达式(而不是在每次计算时构建新列表)。
# 4.3.4. 内联Maps
您还可以使用{key:value}直接表式表达式中的map。以下示例显示了如何做到的:
// evaluates to a Java map containing the two entries
Map inventorInfo = (Map) parser.parseExpression("{name:'Nikola',dob:'10-July-1856'}").getValue(context);
Map mapOfMaps = (Map) parser.parseExpression("{name:{first:'Nikola',last:'Tesla'},dob:{day:10,month:'July',year:1856}}").getValue(context);
{:}本身意味着一个空的map。出于性能原因,如果map本身由固定的文字或其他嵌套常数结构(列表或地图)组成,则创建一个常数映射以表示表达式(而不是在每次计算时构建新的map)。map的key可以用引号包裹。上面的示例没有使用引用键。
# 4.3.5. 数组构造
您可以使用熟悉的Java语法来构建数组,可以提供初始化器以便在构造时填充数组。以下示例显示了如何做到的:
int[] numbers1 = (int[]) parser.parseExpression("new int[4]").getValue(context);
// Array with initializer
int[] numbers2 = (int[]) parser.parseExpression("new int[]{1,2,3}").getValue(context);
// Multi dimensional array
int[][] numbers3 = (int[][]) parser.parseExpression("new int[4][5]").getValue(context);
当您构建多维数组时,当前无法提供初始化器。
# 4.3.6. 方法
您可以使用典型的Java编程语法调用方法。您还可以以文本字面量调用方法。也支持可变参数。以下示例显示了如何调用方法:
// string literal, evaluates to "bc"
String bc = parser.parseExpression("'abc'.substring(1, 3)").getValue(String.class);
// evaluates to true
boolean isMember = parser.parseExpression("isMember('Mihajlo Pupin')").getValue(
societyContext, Boolean.class);
# 4.3.7. 操作符
Spring表达式语言支持以下类型的操作符:
- 关系运算符
- 逻辑运算符
- 数学运算符
- 赋值运算符
关系运算符
使用标准操作符以支持关系运算(==,!=,<,<=,>,>=)。以下清单显示了运营商的一些示例:
// evaluates to true
boolean trueValue = parser.parseExpression("2 == 2").getValue(Boolean.class);
// evaluates to false
boolean falseValue = parser.parseExpression("2 < -5.0").getValue(Boolean.class);
// evaluates to true
boolean trueValue = parser.parseExpression("'black' < 'block'").getValue(Boolean.class);
ℹ️与null的大于或小于比较,遵循一个简单的规则:null被认为什么也不是(不是视为0)。因此,任何其他值始终都大于null(x> null始终是正确的),并且其他任何非null值都不会小于null(x <null始终是false)。
如果您更喜欢数字比较,请避免基于数字的null比较,而是与0的比较(例如,x> 0或x <0)。
除标准关系运算符外,SpEL还支持基于正则表达式和instanceof操作符。以下清单显示了两者的示例:
// evaluates to false
boolean falseValue = parser.parseExpression(
"'xyz' instanceof T(Integer)").getValue(Boolean.class);
// evaluates to true
boolean trueValue = parser.parseExpression(
"'5.00' matches '^-?\\d+(\\.\\d{2})?$'").getValue(Boolean.class);
//evaluates to false
boolean falseValue = parser.parseExpression(
"'5.0067' matches '^-?\\d+(\\.\\d{2})?$'").getValue(Boolean.class);
🔔要小心处理原始类型,因为它们会隐式地装箱为包装类型,因此
1 instanceof T(int)结果为false,而1 instanceof T(Integer)结果为true。
每个操作符也可以指定为纯粹的字母。这避免了所使用的符号对表达式在嵌入的文档类型中具有特殊含义的问题(例如XML文档中)。文本等效物是:
lt(<)gt(>)le(<=)ge(>=)eq(==)ne(!=)div(/)mod(%)not(!)
所有的文本操作符都是大小写不敏感的。
逻辑运算符
SpEL支持以下逻辑运算符
and(&&)or(||)not(!)
以下示例显示了如何使用逻辑运算符:
// -- AND --
// evaluates to false
boolean falseValue = parser.parseExpression("true and false").getValue(Boolean.class);
// evaluates to true
String expression = "isMember('Nikola Tesla') and isMember('Mihajlo Pupin')";
boolean trueValue = parser.parseExpression(expression).getValue(societyContext, Boolean.class);
// -- OR --
// evaluates to true
boolean trueValue = parser.parseExpression("true or false").getValue(Boolean.class);
// evaluates to true
String expression = "isMember('Nikola Tesla') or isMember('Albert Einstein')";
boolean trueValue = parser.parseExpression(expression).getValue(societyContext, Boolean.class);
// -- NOT --
// evaluates to false
boolean falseValue = parser.parseExpression("!true").getValue(Boolean.class);
// -- AND and NOT --
String expression = "isMember('Nikola Tesla') and !isMember('Mihajlo Pupin')";
boolean falseValue = parser.parseExpression(expression).getValue(societyContext, Boolean.class);
数学运算符
您可以在数字和字符串上使用加法运算符。您只能在数字上使用减法,乘法和除法运算符。您也可以使用模运算符(%)和指数运算符(^)。标准操作符的优先级是强制执行的。以下示例显示了使用的数学运算符:
// Addition
int two = parser.parseExpression("1 + 1").getValue(Integer.class); // 2
String testString = parser.parseExpression(
"'test' + ' ' + 'string'").getValue(String.class); // 'test string'
// Subtraction
int four = parser.parseExpression("1 - -3").getValue(Integer.class); // 4
double d = parser.parseExpression("1000.00 - 1e4").getValue(Double.class); // -9000
// Multiplication
int six = parser.parseExpression("-2 * -3").getValue(Integer.class); // 6
double twentyFour = parser.parseExpression("2.0 * 3e0 * 4").getValue(Double.class); // 24.0
// Division
int minusTwo = parser.parseExpression("6 / -3").getValue(Integer.class); // -2
double one = parser.parseExpression("8.0 / 4e0 / 2").getValue(Double.class); // 1.0
// Modulus
int three = parser.parseExpression("7 % 4").getValue(Integer.class); // 3
int one = parser.parseExpression("8 / 5 % 2").getValue(Integer.class); // 1
// Operator precedence
int minusTwentyOne = parser.parseExpression("1+2-3*8").getValue(Integer.class); // -21
赋值运算符
要设置属性,请使用赋值操作员(=)。这通常是调用setValue完成的,但也可以调用getValue完成。以下清单显示了使用赋值运算的两种方法:
Inventor inventor = new Inventor();
EvaluationContext context = SimpleEvaluationContext.forReadWriteDataBinding().build();
parser.parseExpression("name").setValue(context, inventor, "Aleksandar Seovic");
// alternatively
String aleks = parser.parseExpression(
"name = 'Aleksandar Seovic'").getValue(context, inventor, String.class);
# 4.3.8. 类型
您可以使用特殊T运算符来指定java.lang.Class(类型)的实例。也使用此操作符调用静态方法。StandardEvaluationContext使用TypeLocator来查找类型,StandardTypeLocator(可以被替换)在java.lang包中。这意味着T()对java.lang中类型的引用不需要完全限定,但是所有其他类型的引用都必须完全限定。下面的示例显示了如何使用T运算符:
Class dateClass = parser.parseExpression("T(java.util.Date)").getValue(Class.class);
Class stringClass = parser.parseExpression("T(String)").getValue(Class.class);
boolean trueValue = parser.parseExpression(
"T(java.math.RoundingMode).CEILING < T(java.math.RoundingMode).FLOOR")
.getValue(Boolean.class);
# 4.3.9. 构造器
您可以使用new操作符调用构造函数。您应该为除原始类型(int,float等)和String使用完全限定的类名称。以下示例显示了如何使用new操作符调用构造函数:
Inventor einstein = p.parseExpression(
"new org.spring.samples.spel.inventor.Inventor('Albert Einstein', 'German')")
.getValue(Inventor.class);
//create new inventor instance within add method of List
p.parseExpression(
"Members.add(new org.spring.samples.spel.inventor.Inventor(
'Albert Einstein', 'German'))").getValue(societyContext);
# 4.3.10. 变量
您可以使用#variablename语法在表达式中引用变量。通过使用EvaluationContext实现的setVariable方法来设置变量。
ℹ️有效的变量名称必须由一个或多个支持字符组成。
- 字母:
AtoZandatoz- 数字:
0to9- 下划线:
_- 美元符号:
$
以下示例显示了如何使用变量。
Inventor tesla = new Inventor("Nikola Tesla", "Serbian");
EvaluationContext context = SimpleEvaluationContext.forReadWriteDataBinding().build();
context.setVariable("newName", "Mike Tesla");
parser.parseExpression("name = #newName").getValue(context, tesla);
System.out.println(tesla.getName()) // "Mike Tesla"
**#this和#root**变量
#this变量始终定义,并指当前计算对象。#root变量始终定义,并指向根上下文对象。尽管#this可能会随着表达式的组成部分的计算而有所不同,但#root总是指向根。以下示例显示了如何使用它们:
// create an array of integers
List<Integer> primes = new ArrayList<Integer>();
primes.addAll(Arrays.asList(2,3,5,7,11,13,17));
// create parser and set variable 'primes' as the array of integers
ExpressionParser parser = new SpelExpressionParser();
EvaluationContext context = SimpleEvaluationContext.forReadOnlyDataAccess();
context.setVariable("primes", primes);
// all prime numbers > 10 from the list (using selection ?{...})
// evaluates to [11, 13, 17]
List<Integer> primesGreaterThanTen = (List<Integer>) parser.parseExpression(
"#primes.?[#this>10]").getValue(context);
# 4.3.11. 函数
您可以通过注册可以在表达式字符串中调用的用户定义功能来扩展SpEL。该函数通过EvaluationContext注册。以下示例显示了如何注册用户定义的函数:
Method method = ...;
EvaluationContext context = SimpleEvaluationContext.forReadOnlyDataBinding().build();
context.setVariable("myFunction", method);
例如,考虑以下翻转字符串的实用程序方法:
public abstract class StringUtils {
public static String reverseString(String input) {
StringBuilder backwards = new StringBuilder(input.length());
for (int i = 0; i < input.length(); i++) {
backwards.append(input.charAt(input.length() - 1 - i));
}
return backwards.toString();
}
}
然后,您可以注册并使用上述方法,如以下示例所示:
ExpressionParser parser = new SpelExpressionParser();
EvaluationContext context = SimpleEvaluationContext.forReadOnlyDataBinding().build();
context.setVariable("reverseString",
StringUtils.class.getDeclaredMethod("reverseString", String.class));
String helloWorldReversed = parser.parseExpression(
"#reverseString('hello')").getValue(context, String.class);
# 4.3.12. Bean引用
如果计算上下文已配置了bean解析器,则可以使用 @符号从表达式查找bean。以下示例显示了如何做到的:
ExpressionParser parser = new SpelExpressionParser();
StandardEvaluationContext context = new StandardEvaluationContext();
context.setBeanResolver(new MyBeanResolver());
// This will end up calling resolve(context,"something") on MyBeanResolver during evaluation
Object bean = parser.parseExpression("@something").getValue(context);
要访问工厂bean本身,您应该将bean名称前加上&前缀。以下示例显示了如何做到的:
ExpressionParser parser = new SpelExpressionParser();
StandardEvaluationContext context = new StandardEvaluationContext();
context.setBeanResolver(new MyBeanResolver());
// This will end up calling resolve(context,"&foo") on MyBeanResolver during evaluation
Object bean = parser.parseExpression("&foo").getValue(context);
# 4.3.13. 三元运算符
您可以使用三元运算符在表达式内部执行 if-then-else条件逻辑。以下列表显示了一个示例:
String falseString = parser.parseExpression(
"false ? 'trueExp' : 'falseExp'").getValue(String.class);
在这种情况下,布尔值false会导致返回字符串值“ falseExp”。一个更现实的例子如下:
parser.parseExpression("name").setValue(societyContext, "IEEE");
societyContext.setVariable("queryName", "Nikola Tesla");
expression = "isMember(#queryName)? #queryName + ' is a member of the ' " +
"+ Name + ' Society' : #queryName + ' is not a member of the ' + Name + ' Society'";
String queryResultString = parser.parseExpression(expression)
.getValue(societyContext, String.class);
// queryResultString = "Nikola Tesla is a member of the IEEE Society"
有关三元运算符的较短语法,请参见Elvis操作符。
# 4.3.14. Elvis 操作符
Elvis 操作符是三元运算符语法的缩短,在Groovy (opens new window) 重使用。使用三元运算符语法,您通常必须重复两次变量,如以下示例所示:
String name = "Elvis Presley";
String displayName = (name != null ? name : "Unknown");
相反,您可以使用Elvis 操作符(与猫王的发型相似)。以下示例显示了如何使用Elvis 操作符:
ExpressionParser parser = new SpelExpressionParser();
String name = parser.parseExpression("name?:'Unknown'").getValue(new Inventor(), String.class);
System.out.println(name); // 'Unknown'
以下列表显示了一个更复杂的示例:
ExpressionParser parser = new SpelExpressionParser();
EvaluationContext context = SimpleEvaluationContext.forReadOnlyDataBinding().build();
Inventor tesla = new Inventor("Nikola Tesla", "Serbian");
String name = parser.parseExpression("name?:'Elvis Presley'").getValue(context, tesla, String.class);
System.out.println(name); // Nikola Tesla
tesla.setName(null);
name = parser.parseExpression("name?:'Elvis Presley'").getValue(context, tesla, String.class);
System.out.println(name); // Elvis Presley
ℹ️您可以使用Elvis 操作符在表达式中应用默认值。以下示例显示了如何在@Value表达式中使用Elvis 操作符:
@Value("#{systemProperties['pop3.port'] ?: 25}")如果定义了系统属性pop3.port,则注入它的值,否则注入25。
# 4.3.15. 安全导航运算符
安全导航运算符用于避免NullPointerException,来自Groovy语言。通常,当您引用一个对象时,您可能需要在访问对象的方法或属性之前验证它不是null。为了避免这种情况,安全导航运算符返回null而不是抛出异常。以下示例显示了如何使用安全导航运算符:
ExpressionParser parser = new SpelExpressionParser();
EvaluationContext context = SimpleEvaluationContext.forReadOnlyDataBinding().build();
Inventor tesla = new Inventor("Nikola Tesla", "Serbian");
tesla.setPlaceOfBirth(new PlaceOfBirth("Smiljan"));
String city = parser.parseExpression("placeOfBirth?.city").getValue(context, tesla, String.class);
System.out.println(city); // Smiljan
tesla.setPlaceOfBirth(null);
city = parser.parseExpression("placeOfBirth?.city").getValue(context, tesla, String.class);
System.out.println(city); // null - does not throw NullPointerException!!!
# 4.3.16. 集合选择
Selection 是一种强大的表达语言功能,可让您通过从源集合条目中选择来将源集合转换为另一个集合。选择使用.?[selectionExpression]的语法。它过滤了集合并返回一个包含原始元素子集的新集合。例如,选择使我们可以轻松获取Serbian inventors列表,如以下示例所示:
List<Inventor> list = (List<Inventor>) parser.parseExpression(
"members.?[nationality == 'Serbian']").getValue(societyContext);
在列表和map上都可以选择。对于列表,针对列表每个单独元素应用选择标准。在map上,针对每个entry(Java的Map.Entry对象)应用选择标准。每个entry都有可访问的键和值,可在选择中使用。
以下表达式返回了由原map中值小于27的entry组成的新map:
Map newMap = parser.parseExpression("map.?[value<27]").getValue();
除了返回所有选定的元素外,您还可以检索第一个或最后一个值。获得与选择相匹配的第一个条目的语法为.^[selectionExpression]。获得最后匹配的值的语法为.$[selectionExpression]。
# 4.3.17. 集合Projection
Projection使集合可以驱动对子表达的计算,结果是一个新集合。其语法为.![projectionExpression]。例如,假设我们有一份inventors 列表,但想要他们出生的城市列表。我们希望计算inventors 列表中每个条目的“placeOfBirth.city”。以下示例使用Projection来做到这一点:
// returns ['Smiljan', 'Idvor' ]
List placesOfBirth = (List)parser.parseExpression("members.![placeOfBirth.city]");
您还可以使用map驱动Projection,在这种情况下,对map中的每个entry计算Projection表达式。其结果是一个列表,该列表包括针对每个map entry的Projection表达式的计算结果。
# 4.3.18. 表达式模板
表达式模板允许将字面文本与一个或多个计算块混合。每个计算块都用可以定义的前缀和后缀字符界定。一个常见的选择是将#{ }用作定界符,如下示例显示:
String randomPhrase = parser.parseExpression(
"random number is #{T(java.lang.Math).random()}",
new TemplateParserContext()).getValue(String.class);
// evaluates to "random number is 0.7038186818312008"
通过拼接字符串和#{}内的表达式结果得到最终计算结果。parseExpression()方法的第二个参数类型是ParserContext。ParserContext接口用于影响表达式解析的方式,以支持表达模板功能。TemplateParserContext的定义如下:
public class TemplateParserContext implements ParserContext {
public String getExpressionPrefix() {
return "#{";
}
public String getExpressionSuffix() {
return "}";
}
public boolean isTemplate() {
return true;
}
}
# 4.4. 示例中使用的类
本节列出了本章中示例中使用的类。
package org.spring.samples.spel.inventor;
import java.util.Date;
import java.util.GregorianCalendar;
public class Inventor {
private String name;
private String nationality;
private String[] inventions;
private Date birthdate;
private PlaceOfBirth placeOfBirth;
public Inventor(String name, String nationality) {
GregorianCalendar c= new GregorianCalendar();
this.name = name;
this.nationality = nationality;
this.birthdate = c.getTime();
}
public Inventor(String name, Date birthdate, String nationality) {
this.name = name;
this.nationality = nationality;
this.birthdate = birthdate;
}
public Inventor() {
}
public String getName() {
return name;
}
public void setName(String name) {
this.name = name;
}
public String getNationality() {
return nationality;
}
public void setNationality(String nationality) {
this.nationality = nationality;
}
public Date getBirthdate() {
return birthdate;
}
public void setBirthdate(Date birthdate) {
this.birthdate = birthdate;
}
public PlaceOfBirth getPlaceOfBirth() {
return placeOfBirth;
}
public void setPlaceOfBirth(PlaceOfBirth placeOfBirth) {
this.placeOfBirth = placeOfBirth;
}
public void setInventions(String[] inventions) {
this.inventions = inventions;
}
public String[] getInventions() {
return inventions;
}
}
package org.spring.samples.spel.inventor;
public class PlaceOfBirth {
private String city;
private String country;
public PlaceOfBirth(String city) {
this.city=city;
}
public PlaceOfBirth(String city, String country) {
this(city);
this.country = country;
}
public String getCity() {
return city;
}
public void setCity(String s) {
this.city = s;
}
public String getCountry() {
return country;
}
public void setCountry(String country) {
this.country = country;
}
}
package org.spring.samples.spel.inventor;
import java.util.*;
public class Society {
private String name;
public static String Advisors = "advisors";
public static String President = "president";
private List<Inventor> members = new ArrayList<Inventor>();
private Map officers = new HashMap();
public List getMembers() {
return members;
}
public Map getOfficers() {
return officers;
}
public String getName() {
return name;
}
public void setName(String name) {
this.name = name;
}
public boolean isMember(String name) {
for (Inventor inventor : members) {
if (inventor.getName().equals(name)) {
return true;
}
}
return false;
}
}
# 5. Spring面向切面编程
面向切面的编程(AOP)通过提供另一种思考程序结构的方式来补充面向对象的编程(OOP)。OOP中模块化的关键单位是类,而在AOP中,模块化单位是切面。切面使模块化的关注点(例如事务管理)跨多种类型和对象。(此类关注点通常被称为AOP文献中的“横切”问题。)
Spring的关键组成部分之一是AOP框架。虽然Spring IOC容器不依赖AOP(这意味着您不需要使用AOP),但AOP补充了Spring IOC,以提供功能强大的中间件解决方案。
Spring AOP使用AspectJ切点
Spring通过使用schema-based approach (opens new window) 方法或@AspectJ annotation style (opens new window)来编写自定义切面。这两种方式都提供了完全类型化的通知,并使用了AspectJ 切点语言,同时仍使用Spring AOP进行编织。本章讨论了基于schema和基于@AspectJ的AOP支持。下一章将讨论较底层的AOP支持。
AOP在Spring框架中用于:
- 提供声明性的企业服务。最重要的服务是声明式的事务管理。
- 让用户实现自定义切面,并使用AOP补充对OOP的使用。
ℹ️如果您仅对通用声明服务或其他预先包装的声明中间件服务(例如pooling)感兴趣,则无需直接使用Spring AOP,并且可以跳过本章的大部分。
# 5.1. AOP概念
让我们首先定义一些核心的AOP概念和术语。这些术语不是特定于Spring的。不幸的是,AOP术语不是特别直观。但是,如果Spring使用自己的术语,那将更加令人困惑。
- 切面(Aspect):跨多个类的模块化的关注点。事务管理是企业Java应用程序中关注的横切问题的一个很好的例子。在Spring AOP中,通过使用常规类(基于schema (opens new window)的方法)或@Aspect注解( @AspectJ style (opens new window))注释的常规类实现切面。
- 连接点(Join point):执行程序期间的一个点,例如方法或异常处理的执行。在Spring AOP中,连接点始终表示方法执行。
- 通知(Advice):在特定的连接点上采取的行动。不同类型的通知包括“around”,“before”和“after”建议。(Advice 类型将在后面讨论。)许多AOP框架,包括Spring,为拦截器建模,并围绕连接点维护一系列拦截器。
- 切点(Poincut):与连接点匹配的谓词。Advice 与切点表达式相关联,并在与切点匹配的任何连接点上运行(例如,执行具有特定名称的方法)。与切点表达式相匹配的连接点的概念对于AOP至关重要,Spring默认情况下使用了AspectJ 切点表达式语言。
- 引进(Introduction):代表一种类型声明其他方法或字段。Spring AOP使您可以将新的接口(以及相应的实现)引入任何advised的对象。例如,您可以使用introduction使bean实现IsModified接口,以简化缓存。(introduction 在AspectJ 社区中被称为inter-type声明。)
- 目标对象(Target objec):一个或多个切面通知的对象。也称为“被通知的对象”。由于Spring AOP由运行时代理实现,因此该对象始终是代理对象。
- AOP代理(AOP proxy):AOP框架创建的对象,以实现切面约定(通知方法执行等)。在Spring框架中,AOP代理是JDK动态代理或CGLIB代理。
- 织入(Weaving):将切面与其他应用程序类型或对象链接起来,以创建通知的对象。这可以在编译时(例如使用AspectJ编译器),加载时或运行时完成。像其他纯Java AOP框架一样,Spring AOP在运行时进行织入。
Spring AOP包括以下类型的通知:
- Before advice: 在连接点之前运行的通知,但没有能力防止执行流程延伸到连接点(除非引发异常)。
- After returning advice: 在连接点正常完成后要运行的通知(例如,如果方法返回而不抛出异常)。
- After throwing advice: 如果方法通过抛出异常来退出时运行的通知。
- After (finally) advice:不管连接点退出的手段(正常或异常返回),都必须运行的通知。
- Around advice: 围绕切入点(例如方法调用)的通知。这是最强大的通知。环绕通知可以在方法调用之前和之后执行自定义行为。它还负责选择是通过返回自己的返回值或抛出异常来继续执行到切点还是缩短被通知的方法执行。
环绕通知是最普遍的通知。Spring AOP,像AspectJ一样,提供各种通知了类型,我们建议您使用可以实现所需行为的最小强度的通知类型。例如,如果您只需要使用方法的返回值更新缓存,那么您最好实现after returning advice而不是around advice,尽管around advice可以完成同一件事。使用最特定的通知类型提供了更简单的编程模型,发生错误的几率小。例如,您无需调用用于环绕通知的JoinPoint上的proceed()方法,因此,您不可能调用失败。
所有通知参数都是静态键入的,因此您可以使用适当类型的通知参数(例如,从方法执行中的返回值的类型)而不是对象数组。
与切点相匹配的连接点的概念是AOP的关键,它将其与仅提供拦截的旧技术区分开。切点使通知能够独立于面向对象的层次结构。例如,您可以应用环绕通知,将声明式事务管理提供给跨多个对象的一组方法(例如服务层中的所有业务操作)。
# 5.2. Spring AOP功能和目标
Spring AOP用纯Java中实现。不需要特殊的编译处理。Spring AOP不需要控制类加载程序层次结构,因此适用于Servlet容器或应用程序服务器。
Spring AOP当前仅支持方法执行连接点(通知Spring bean方法执行)。尽管可以添加对字段拦截的支持,而不会破坏Spring AOP核心 API,但未实现字段拦截。如果您需要通知字段访问并更新连接点,请考虑一种语言,例如AspectJ。
Spring AOP的AOP方法与大多数其他AOP框架的方法不同。目的不是提供最完整的AOP实现(尽管Spring AOP非常有能力)。相反,目的是提供AOP实现和Spring IOC之间的密切集成,以帮助解决企业应用程序中的共同问题。
因此,例如,Spring框架的AOP功能通常与Spring IOC容器结合使用。通过使用普通的Bean定义语法配置切面(尽管这允许强大的“auto-proxying”功能)。这与其他AOP实现非常不同。您不能使用Spring AOP轻松或有效地执行某些事情,例如通知非常细粒的对象(通常是域对象)。在这种情况下,AspectJ是最佳选择。但是,我们的经验是,Spring AOP为适用AOP企业Java应用程序中的大多数问题提供了一个绝佳的解决方案。
Spring AOP从不努力与AspectJ竞争,以提供全面的AOP解决方案。我们认为,诸如Spring AOP等基于代理的框架和诸如AspectJ之类的成熟框架都是有价值的,它们是互补的,而不是互相竞争。Spring无缝将Spring AOP和IOC与AspectJ集成,以在一致的基于Spring的应用程序体系结构中启用AOP的所有用法。该集成不会影响Spring AOP API或AOP联盟API。Spring AOP保持向后兼容。
ℹ️Spring框架的中心宗旨之一是无侵入性。您不应被迫将特定于框架的类和接口引入业务或域模型。但是,在某些地方,Spring框架确实为您提供了将特定于Spring框架的依赖项引入代码库中的选项。为您提供此类选择的理由是,在某些情况下,以这种方式读取或编码某些特定功能可能很容易。但是,Spring框架(几乎)总是为您提供选择:您可以自由做出明智的决定,即哪种选项最适合您的特定用例或场景。
与本章相关的是讨论选择哪种AOP框架(以及AOP方式)。您可以选择AspectJ,Spring AOP或两者兼而有之。您还可以选择@AspectJ 注解风格的方法或Spring XML配置风格的方法。本章选择首先介绍 @AspectJ风格的方式,但不说明Spring团队更喜欢@AspectJ风格的方法,而不是Spring XML配置方式。
请参阅 Choosing which AOP Declaration Style to Use (opens new window),以更完整地讨论每种样式的“来龙去脉”。
# 5.3. AOP代理
Spring AOP默认使用标准JDK动态代理作为AOP代理。这使得可以代理任何接口(或一组接口)。
Spring AOP也可以使用CGLIB代理。这是代理类所必需的。默认情况下,如果业务对象未实现接口,则使用CGLIB代理。由于最好是为接口而不是class编程,因此业务类通常实现一个或多个业务接口。在您需要通知非接口上声明的方法或需要将代理对象作为具体类型传递给方法,可以强制使用CGLIB (opens new window)(希望很少见)。
重要的是要掌握Spring AOP是基于代理的事实。请参阅 Understanding AOP Proxies (opens new window),以彻底查阅该实现细节的实际含义。
# 5.4. @AspectJ支持
@AspectJ 指用带有该注解的常规Java类声明切面。@AspectJ 是由 AspectJ project (opens new window)引入的,作为AspectJ 5版本的一部分。Spring使用AspectJ 提供的库来解释与AspectJ 5相同的注解,以分析和匹配切点。但是,AOP运行时仍然是纯Spring AOP,并且对AspectJ 编译器或织入没有依赖。
ℹ️使用AspectJ 编译器和编织器允许使用完整的AspectJ 语言,并在Using AspectJ with Spring Applications (opens new window)中讨论。
# 5.4.1. 启用@AspectJ支持
要在Spring配置中使用@AspectJ 切面,您需要启用Spring支持,以配置基于@AspectJ切面和 auto-proxying bean的Spring AOP,不管这些bean是否是被通知的对象。我们的意思是,通过auto-proxying,如果Spring确定bean被一个或多个切面通知,它将自动生成代理以拦截该bean的方法调用,并确保根据需要运行通知。
可以使用XML或Java式配置启用@AspectJ 支持。无论哪种情况,您还都需要确保AspectJ 的aspectjweaver.jar库在您的应用程序的类中(版本1.8或更高版本)。该库可在AspectJ 发行的lib目录或Maven中央仓库中获得。
使用Java配置启用@AspectJ支持
要使用Java @Configuration启用@AspectJ 支持,请添加@EnableAspectJAutoProxy注解,如以下示例所示:
@Configuration
@EnableAspectJAutoProxy
public class AppConfig {
}
使用XML配置启用@AspectJ支持
要使用基于XML的配置启用@AspectJ支持,请使用aop:aspectj-autoproxy元素,如下示例显示:
<aop:aspectj-autoproxy/>
这假设您使用 XML Schema-based configuration (opens new window)中所述的schema 支持。有关如何导入AOP命名空间中的标签,请参见the AOP schema (opens new window)。
# 5.4.2. 声明切面
启用@AspectJ 支持后,应用程序上下文中定义的任何@AspectJ bean(具有@Aspect注解)将被Spring自动检测到并用于配置Spring AOP。接下来的两个示例显示了一个无用的切面所需的最小定义。
两个示例中的第一个显示了应用程序上下文中的常规bean定义,该定义指向具有@Aspect注解的bean类:
<bean id="myAspect" class="org.xyz.NotVeryUsefulAspect">
<!-- configure properties of the aspect here -->
</bean>
两个示例中的第二个示例显示了NotVeryUsefulAspect类定义,该定义用org.aspectj.lang.annotation.Aspect进行注解:
package org.xyz;
import org.aspectj.lang.annotation.Aspect;
@Aspect
public class NotVeryUsefulAspect {
}
切面(用@Aspect注解的类)可以具有方法和字段,与任何其他类相同。它们还可以包含切点,通知和引入(inter-type)声明。
ℹ️通过组件扫描自动探测切面
您可以在Spring XML配置中像常规类一样注册切面类,或通过类路径扫描自动检测它们 - 与其他任何Spring管理的Bean相同。但是,请注意,@Aspect注解不足以在类路径中自动检测。为此,您需要添加一个单独的@Component注解(或者,根据Spring的组件扫描仪的规则,自定义限定的原型注解)。
ℹ️使用其他切面通知切面?
在Spring AOP中,各个切面本身不能成为其他切面的通知目标。类上的@Aspect注解将其标记为一个切面,因此,将在auto-proxying时排除。
# 5.4.3. 声明切点
切点确定了关注的连接点,从而使我们能够控制通知何时运行。Spring AOP仅支持Spring Beans的方法连接点,因此您可以将点切点视为匹配Spring Bean上的方法的执行。切点声明有两个部分:一个包含名称和任何参数的签名和一个确定了我们感兴趣的执行方法的切点表达式。在@AspectJ 注解的AOP风格中,通过常规方法定义提供了切点签名,并且通过使用@Pointcut注解来表示切点表达式(用作切点签名的方法必须具有void返回类型)。
一个示例可能有助于展示切点签名和切点表达式之间的区别。下面的示例定义了一个名为anyOldTransfer的切点,该切点与任何名为transfer的方法执行匹配:
@Pointcut("execution(* transfer(..))") // the pointcut expression
private void anyOldTransfer() {} // the pointcut signature
构成@Pointcut注解值的切点表达式是常规的AspectJ 5切点表达式。有关AspectJ的切点语言的完整讨论,请参见 AspectJ Programming Guide (opens new window) (以及AspectJ 5 Developer’s Notebook (opens new window))或一本关于AspectJ 的书籍(例如Colyer et. al.编写的Eclipse AspectJ或Ramnivas Laddad编写的AspectJ in Action,)。
支持的切点标识符
Spring AOP支持以下用于切点表达式的切点标识符(PCD):
execution: 匹配方法执行的连接点。 这是在Spring AOP中使用的主要切点标识符。within: 连接点限制在确定的类型内(使用Spring AOP时,在匹配类型中声明的方法执行)。this: 限制与连接点使用Spring AOP时的方法执行)的匹配(,其中bean引用(Spring AOP代理)是给定类型的实例。target: 限制与连接点(使用Spring AOP时的方法执行)的匹配,其中目标对象(被代理的应用程序对象)是给定类型的实例。args: 限制与连接点(使用Spring AOP时的方法执行)的匹配,其中实参是给定类型的实例。@target: 限制与连接点(使用Spring AOP时的方法执行)的匹配,其中正在执行的对象类有给定类型的注解。@args: 限制与连接点(使用Spring AOP时的方法执行)的匹配,其中实参的运行时类型有给定类型的注解。@within: 连接点限制在确定的被给定注解标注的类型内(使用Spring AOP时,使用给定注解标注的类中声明的方法执行)。@annotation:限制与连接点的匹配,其中连接点的主体(在Spring AOP中运行的方法)具有给定的注解。
其他切点类型
完整的AspectJ 语言支持Spring中不支持的其他切点标识符:
call,get,set,preinitialization,staticinitialization,initialization,handler,adviceexecution,withincode,cflow,cflowbelow,if,@this, 和@withincode。在Spring AOP解释的切点表达式中,使用这些点切点标识符会导致抛出IllegalArgumentException。在未来的发行版中,Spring AOP可能支持更多AspectJ 切点标识符。
由于Spring AOP限制了仅与方法执行连接点匹配,因此先前讨论给出的切点标识符定义比您在AspectJ 编程指南中找到的更少。此外,AspectJ 本身具有基于类型的语义,并且在执行连接点时,this和target都引用相同对象:执行该方法的对象。Spring AOP是一个基于代理的系统,并区分代理对象本身(绑定this)和代理背后的目标对象(绑定target)。
ℹ️由于Spring AOP框架的基于代理的性质,目标对象中的调用不是通过拦截而是通过定义。对于JDK代理,只能拦截代理上的公共接口方法调用。使用CGLIB,可以对代理的公共和受保护的方法调用拦截(如有必要,甚至是包可见的方法)。但是,一般通过public的签名设计基于代理的交互。
请注意,切点定义通常与任何被拦截的方法匹配。如果严格来说,即使在存在潜在非public交互的CGLIB代理方案中,也需要相应地定义它。
如果您的拦截需求包括方法调用甚至是目标类中的构造函数,请考虑使用Spring驱动的native AspectJ weaving (opens new window)而不是Spring的基于代理的AOP框架。这构成了具有不同特征的AOP使用模式,因此请务必在做出决定之前先熟悉织入。
Spring AOP还支持一个名为bean的额外的PCD。该PCD使您可以将连接点的匹配限制为特定命名的Spring bean或一组命名的Spring bean(使用通配符)。bean PCD具有以下形式:
bean(idOrNameOfBean)
idOrNameOfBean标记可以是任何弹Spring bean的名称。提供了使用*字符限制的通配符支持,因此,如果您为Spring bean建立一些命名约定,则可以编写bean PCD表达式以选择它们。与其他切点标识符一样,bean PCD可以与&&(且),||(或),!(非)运算符一起使用。
ℹ️
beanPCD仅在Spring AOP中受支持,而不是在native的AspectJ织入 。它是对标准PCD的特定于Spring的扩展,因此, 它不适用于使用@Aspect模式的切面声明。
beanPCD在实例级别(在Spring Bean名称概念上构建)而不是仅在类型级别(基于织入的AOP受到限制)。基于实例的切点标识符是Spring基于代理的AOP框架及其与Spring Bean Factory的紧密集成的特殊功能,在该工厂中,它是自然而直接的,可以按名称识别特定的bean。
组合切点表达式
您可以使用&&,||和 !组合切点表达式。您也可以按名称参考点cut表达式。下面的示例显示了三个切点表达式:
@Pointcut("execution(public * *(..))")
private void anyPublicOperation() {}
@Pointcut("within(com.xyz.myapp.trading..*)")
private void inTrading() {}
@Pointcut("anyPublicOperation() && inTrading()")
private void tradingOperation() {}
如前所述,用较小的命名组件来构建更复杂的切点表达式是一种最佳实践。当通过名称引用切点时,应用了正常的Java可见性规则(您可以在同一类型中看到私有切点、在层次结构中受保护的切点以及任何地方的公共切点等)。可见性不影响切点匹配。
共享公共的切点定义
在使用企业应用程序时,开发人员通常想引用应用程序的模块以及来自多个切面的特定操作集。我们建议定义一个CommonPointcuts切面,以捕获为此目的公共切点表达式。这样的切面通常类似于以下示例:
package com.xyz.myapp;
import org.aspectj.lang.annotation.Aspect;
import org.aspectj.lang.annotation.Pointcut;
@Aspect
public class CommonPointcuts {
/**
* A join point is in the web layer if the method is defined
* in a type in the com.xyz.myapp.web package or any sub-package
* under that.
*/
@Pointcut("within(com.xyz.myapp.web..*)")
public void inWebLayer() {}
/**
* A join point is in the service layer if the method is defined
* in a type in the com.xyz.myapp.service package or any sub-package
* under that.
*/
@Pointcut("within(com.xyz.myapp.service..*)")
public void inServiceLayer() {}
/**
* A join point is in the data access layer if the method is defined
* in a type in the com.xyz.myapp.dao package or any sub-package
* under that.
*/
@Pointcut("within(com.xyz.myapp.dao..*)")
public void inDataAccessLayer() {}
/**
* A business service is the execution of any method defined on a service
* interface. This definition assumes that interfaces are placed in the
* "service" package, and that implementation types are in sub-packages.
*
* If you group service interfaces by functional area (for example,
* in packages com.xyz.myapp.abc.service and com.xyz.myapp.def.service) then
* the pointcut expression "execution(* com.xyz.myapp..service.*.*(..))"
* could be used instead.
*
* Alternatively, you can write the expression using the 'bean'
* PCD, like so "bean(*Service)". (This assumes that you have
* named your Spring service beans in a consistent fashion.)
*/
@Pointcut("execution(* com.xyz.myapp..service.*.*(..))")
public void businessService() {}
/**
* A data access operation is the execution of any method defined on a
* dao interface. This definition assumes that interfaces are placed in the
* "dao" package, and that implementation types are in sub-packages.
*/
@Pointcut("execution(* com.xyz.myapp.dao.*.*(..))")
public void dataAccessOperation() {}
}
您可以在需要切点表达式的任何位置引用定义的切点。例如,要使服务层具有事务性,您可以编写以下内容:
<aop:config>
<aop:advisor
pointcut="com.xyz.myapp.CommonPointcuts.businessService()"
advice-ref="tx-advice"/>
</aop:config>
<tx:advice id="tx-advice">
<tx:attributes>
<tx:method name="*" propagation="REQUIRED"/>
</tx:attributes>
</tx:advice>
<aop:config> 和<aop:advisor>元素在 Schema-based AOP Support (opens new window)中讨论。事务元素在Transaction Management (opens new window)讨论。
示例
Spring AOP用户可能最常使用的切点标识符是execution。execution 表达式的格式如下:
execution(modifiers-pattern? ret-type-pattern declaring-type-pattern?name-pattern(param-pattern)
throws-pattern?)
除returning type pattern(ret-type-pattern),the name pattern,parameters pattern之外的所有部分可选的。 returning type pattern确定该方法的返回类型必须是什么,以便与连接点匹配。*最常用作returning type pattern,他匹配任何返回类型。仅当方法返回给定类型时,全限定的类型名称才匹配。name pattern与方法名称匹配。您可以将*通配符用作name pattern的全部或一部分。如果指定declaring type pattern,请使用.将其加入name pattern组件。parameters pattern稍微复杂一点:()与无参方法匹配,而(..)匹配任何数量的(0个或多个)参数。(*)与任何类型的单参数方法匹配。(*,String)匹配两个参数的方法。第一个可以是任何类型的,而第二个必须是String。有关更多信息,请咨询AspectJ Programming Guide的Language Semantics (opens new window)。
以下示例显示了一些常见的切点表达式:
任何公共方法execution:
execution(public * *(..))以set开头的任何方法execution:
execution(* set*(..))AccountService接口定义的任何方法execution:execution(* com.xyz.service.AccountService.*(..))service包下的任何方法execution:execution(* com.xyz.service.*.*(..))service 包或其子包中的任何方法execution:
execution(* com.xyz.service..*.*(..))service 包下任何连接点(Spring AOP中的方法执行) :
within(com.xyz.service.*)service 包或其子包中的任何连接点(Spring AOP中的方法执行) :
within(com.xyz.service..*)实现
AccountService接口的代理的任何连接点(Spring AOP中的方法执行):this(com.xyz.service.AccountService)
ℹ️“this”更常用于绑定形式。请参阅Declaring Advice (opens new window) 中关于如何使代理对象在通知主体中可用的章节。
实现
AccountService接口的目标对象的任何连接点(Spring AOP中的方法执行):target(com.xyz.service.AccountService)ℹ️“target”更常用于绑定形式。请参阅Declaring Advice (opens new window) 中关于如何使目标对象在通知主体中可用的章节。
单参数且实参是Serializable的任何连接点(Spring AOP中的方法执行):
args(java.io.Serializable)
ℹ️“args”更常用于绑定形式。请参阅Declaring Advice (opens new window) 中关于如何使方法参数在通知主体中可用的章节。
请注意,此示例中给出的切点与execution(* *(java.io.Serializable))不同。如果在运行时传递的参数是Serializable, 则args模式匹配,如果方法签名是声明类型为Serializable的单个参数,则execution模式匹配。
有@Transactional的目标对象的任何连接点(Spring AOP中的方法执行):
@target(org.springframework.transaction.annotation.Transactional)ℹ️你也可以以绑定形式使用“@target”。请参阅Declaring Advice (opens new window) 中关于如何使注解对象在通知主体中可用的章节。
目标对象的声明类型有@Transactional的任何连接点(Spring AOP中的方法执行):
@within(org.springframework.transaction.annotation.Transactional)
ℹ️你也可以以绑定形式使用“@within”。请参阅Declaring Advice (opens new window) 中关于如何使注解对象在通知主体中可用的章节。
有@Transactional的执行方法的任何连接点(Spring AOP中的方法执行):
@annotation(org.springframework.transaction.annotation.Transactional)ℹ️你也可以以绑定形式使用“@annotation”。请参阅Declaring Advice (opens new window) 中关于如何使注解对象在通知主体中可用的章节。
单参数且实参类型为@Classified注解的任何连接点(Spring AOP中的方法执行):
@args(com.xyz.security.Classified)
ℹ️你也可以以绑定形式使用“@args”。请参阅Declaring Advice (opens new window) 中关于如何使注解对象在通知主体中可用的章节。
名为
tradeService的Spring bean的任何连接点(Spring AOP中的方法执行):bean(tradeService)名称匹配通配符表达式
*Service的Spring bean的任何连接点(Spring AOP中的方法执行):bean(*Service)
编写良好的切点
在编译期间,AspectJ处理切点以优化匹配性能。检查代码并确定每个连接点是否匹配(静态或动态)给定的切点是一个昂贵的过程。动态匹配意味着该匹配不能从静态分析中完全确定,并且在代码中增加了测试以确定代码运行时是否存在实际匹配)。在第一次遇到切点声明时,AspectJ将其重写为最佳形式。这是什么意思?基本上,切点以DNF(析取范式)重写,并且对切点的组件进行排序,以便首先检查那些要较容易计算的的组件。这意味着您不必担心理解各个切点标识符的性能,并且可以任何顺序声明切点。
但是,AspectJ只能与所指出的内容一起使用。为了获得最佳的匹配性能,您应该考虑他们试图实现的目标,并在定义中尽可能多地缩小匹配的搜索空间。现有的标识符自然会分为三个组:kinded,scoping和contextual:
- Kinded 标识符选择一种特定的连接点:execution,get,set,call和handler。
- Scoping标识符选择一组感兴趣的连接点(可能是多种):within和withincode
- Contextual标识符基于上下文匹配(并选择性地绑定):this,target和@annotation
良好的切点至少应包括前两种类型(Kinded和Scoping)。您可以包括Contextual标识符以基于切点上下文匹配或绑定上下文以便在通知中使用。仅提供Kinded标识符或仅提供Contextual标识符可以正常工作,但由于额外的处理和分析,可能会影响织入性能(时间和内存)。Scoping标识符匹配非常速地,并且使用它们意味着AspectJ可以很快驳回不应进一步处理的连接点组。如果可能的话,应始终包含一个良好的切点。
# 5.4.4. 声明通知
通知与切点表达式相关联,并在与切点匹配的方法执行之前,之后或周期内执行。切点表达式可以是对已命名切点的简单引用,也可以是声明的切点表达式。
Before通知
您可以通过使用@Before在某个切面声明通知:
import org.aspectj.lang.annotation.Aspect;
import org.aspectj.lang.annotation.Before;
@Aspect
public class BeforeExample {
@Before("com.xyz.myapp.CommonPointcuts.dataAccessOperation()")
public void doAccessCheck() {
// ...
}
}
如果我们使用直接的切点表达式,则可以将上一个示例重写为以下示例:
import org.aspectj.lang.annotation.Aspect;
import org.aspectj.lang.annotation.Before;
@Aspect
public class BeforeExample {
@Before("execution(* com.xyz.myapp.dao.*.*(..))")
public void doAccessCheck() {
// ...
}
}
After Returning通知
After returning通知在匹配的方法执行正常返回后运行。您可以使用@AfterReturning来声明它:
import org.aspectj.lang.annotation.Aspect;
import org.aspectj.lang.annotation.AfterReturning;
@Aspect
public class AfterReturningExample {
@AfterReturning("com.xyz.myapp.CommonPointcuts.dataAccessOperation()")
public void doAccessCheck() {
// ...
}
}
ℹ️您可以在同一切面拥有多个通知声明(以及其他成员)。在这些示例中,我们仅显示一个通知声明,以集中每个示例的效果。
有时,您需要在通知主体中访问返回的实际值。您可以使用@AfterReturning的形式绑定返回值以访问,如以下示例所示:
import org.aspectj.lang.annotation.Aspect;
import org.aspectj.lang.annotation.AfterReturning;
@Aspect
public class AfterReturningExample {
@AfterReturning(
pointcut="com.xyz.myapp.CommonPointcuts.dataAccessOperation()",
returning="retVal")
public void doAccessCheck(Object retVal) {
// ...
}
}
returning属性中使用的名称必须对应于通知方法中的参数名称。当方法执行返回时,返回值将作为相应的参数值传递给通知方法。returning子句还限制了仅匹配到那些返回指定类型的方法执行(在这个案例下为Object,与任何返回值匹配)。
请注意,使用after returning通知时,不可能返回完全不同的引用。
After Throwing 通知
After throwing 通知在匹配的方法执行抛出异常退出后运行。您可以使用@AfterThrowing来声明它:
import org.aspectj.lang.annotation.Aspect;
import org.aspectj.lang.annotation.AfterThrowing;
@Aspect
public class AfterThrowingExample {
@AfterThrowing("com.xyz.myapp.CommonPointcuts.dataAccessOperation()")
public void doRecoveryActions() {
// ...
}
}
通常,您只希望在抛出给定类型的异常时才运行通知,并且通常还需在通知主体中访问抛出的异常。您可以使用throwing属性限制匹配(如果需要--否则别用Throwable)并将抛出的异常绑定到通知参数。以下示例显示了如何做到的:
import org.aspectj.lang.annotation.Aspect;
import org.aspectj.lang.annotation.AfterThrowing;
@Aspect
public class AfterThrowingExample {
@AfterThrowing(
pointcut="com.xyz.myapp.CommonPointcuts.dataAccessOperation()",
throwing="ex")
public void doRecoveryActions(DataAccessException ex) {
// ...
}
}
throwing属性中使用的名称必须对应于通知方法中的参数名称。当方法执行抛出异常退出时,异常将作为相应的参数值传递给通知方法。throwing子句还限制了仅匹配到那些抛出指定类型异常的方法执行(在这个案例下为DataAccessException)。
ℹ️请注意, @AfterThrowing并不表示一般异常处理回调。具体来说, @AfterThrowing的通知方法只能从连接点(用户指定目标方法)本身接收异常,而不是从随附的 @After或@AfterReturning方法中接收异常。
After(Finally)通知
After (finally)通知在匹配的方法执行退出时运行。它是通过使用 @After来声明的。After 通知,必须准备好处理正常和异常返回条件。它通常用于释放资源和类似目的。下面的示例显示了如何使用 after finally通知:
import org.aspectj.lang.annotation.Aspect;
import org.aspectj.lang.annotation.After;
@Aspect
public class AfterFinallyExample {
@After("com.xyz.myapp.CommonPointcuts.dataAccessOperation()")
public void doReleaseLock() {
// ...
}
}
ℹ️请注意, @AspectJ 中的@After通知被定义为"after finally advice",类似于在try-catch语句中的finally 。与仅适用于成功的正常返回的@AfterReturning相比,连接点(用户指定目标方法)正常返回或异常终止时该通知都会被调用。
Around通知
最后一种通知是环绕通知。环绕通知“around”匹配的方法的执行。它有机会在方法运行之前和之后工作,并确定该方法何时,如何以及是否真的可以运行。如果您需要以线程安全的方式在执行方法前后共享状态(例如,启动和停止计时器),通常会使用环绕通知。始终使用满足您要求的最低强度的通知形式(也就是说,如果能用before通知就不要使用环绕通知)。
通过使用@Around注解来声明通知。通知方法的第一个参数必须是ProceedingJoinPoint类型。在通知的主体中,在ProceedingJoinPoint上调用proceed()会导致基础方法运行。proceed方法也可以传Object[]参数。数组中的值用作方法执行的参数。
ℹ️使用带Object[]调用proceed的行为与AspectJ编译器编译的环绕通知proceed的行为有所不同。对于使用传统AspectJ 语言编写的通知,传给proceed参数的数量必须与传给环绕通知的参数相匹配(不是基础连接点的参数数量),并且传递给proceed 的给定位置的参数替代原始连接点的绑定到实体的值(如果现在没有意义,请不要担心)。Spring采用的方法更简单,并且与基于代理的仅执行语义的方法更匹配。如果您编译了为Spring编写的@AspectJ 切面,并使用AspectJ 编译器和注入器和带参数proceed,只需要意识到这种差异。有一种方法可以编写在Spring AOP和AspectJ中100%兼容的此类切面,这在following section on advice parameters (opens new window)部分中进行了讨论。
以下示例显示了如何使用环绕通知:
import org.aspectj.lang.annotation.Aspect;
import org.aspectj.lang.annotation.Around;
import org.aspectj.lang.ProceedingJoinPoint;
@Aspect
public class AroundExample {
@Around("com.xyz.myapp.CommonPointcuts.businessService()")
public Object doBasicProfiling(ProceedingJoinPoint pjp) throws Throwable {
// start stopwatch
Object retVal = pjp.proceed();
// stop stopwatch
return retVal;
}
}
环绕通知返回的值是该方法调用者看到的返回值。例如,一个简单的缓存切面,缓存中有值时直接从缓存返回,缓存中无值时可以调用proceed()返回一个值。请注意,可以在环绕通知的主体中调用一次或多次proceed。
通知参数
Spring提供了各种类型的通知,这意味着您在通知签名中声明所需的参数(正如我们先前看到的returning 和throwing 示例),而不是一直使用Object[]。我们在本节会看到如何使参数和其他上下文值在通知主体中可用。首先,我们看一下如何编写通用通知,以找到通知当前正在通知的方法。
访问当前JoinPoint
任何通知方法都可以将org.aspectj.lang.JoinPoint声明为第一个参数(请注意,环绕通知是需要将JoinPoint的子类---ProceedingJoinPoint声明为第一个参数)。JoinPoint接口提供了大量有用的方法:
getArgs(): 返回方法实参。getThis():返回代理对象。getTarget(): 返回目标对象。getSignature(): 返回被通知的方法描述。toString():打印被通知的方法有用的描述。
更多细节参考 javadoc (opens new window)。
传递参数给通知
我们已经看到了如何绑定返回的值或异常值(使用after returning和after throwing通知)。为了使通知主体可用参数值,您可以使用args的绑定形式。如果您在args表达式中使用参数名称代替类型名称,则在调用通知时将相应实参传递给形参。一个例子应该使这个更清楚。假设您要通知DAO操作执行,该操作以Account对象为第一个参数,并且你需要访问通知主体中的account 。您可以编写以下内容:
@Before("com.xyz.myapp.CommonPointcuts.dataAccessOperation() && args(account,..)")
public void validateAccount(Account account) {
// ...
}
args(account,..)切点表达式有两个目的。首先,它限制了该方法至少有一个参数的那些方法执行的匹配,而该参数是Account的一个实例。其次,它通过account形参使实际Account对象在通知主体中可用。
另一种写法是声明一个切点,该切点在匹配连接点时“provides” Account对象,然后在通知中引用已命名的切点:
@Pointcut("com.xyz.myapp.CommonPointcuts.dataAccessOperation() && args(account,..)")
private void accountDataAccessOperation(Account account) {}
@Before("accountDataAccessOperation(account)")
public void validateAccount(Account account) {
// ...
}
有关更多详细信息,请参见AspectJ programming guide。
代理对象(this),目标对象(target)和注解(@within,@target,@antotation和@args)都可以以类似的方式绑定。接下来的两个示例显示了如何匹配带@Auditable注解的方法执行并提取审计代码:
@Auditable定义如下:
@Retention(RetentionPolicy.RUNTIME)
@Target(ElementType.METHOD)
public @interface Auditable {
AuditCode value();
}
匹配@Auditable方法执行的通知如下:
@Before("com.xyz.lib.Pointcuts.anyPublicMethod() && @annotation(auditable)")
public void audit(Auditable auditable) {
AuditCode code = auditable.value();
// ...
}
通知参数和泛型
Spring AOP可以处理类声明和方法参数中使用的泛型参数。假设您的泛型类型如下:
public interface Sample<T> {
void sampleGenericMethod(T param);
void sampleGenericCollectionMethod(Collection<T> param);
}
您可以通过指定通知参数类型来限制要拦截的方法:
@Before("execution(* ..Sample+.sampleGenericMethod(*)) && args(param)")
public void beforeSampleMethod(MyType param) {
// Advice implementation
}
这种方法不适用于泛型集合。因此,您不能按以下方式定义切点:
@Before("execution(* ..Sample+.sampleGenericCollectionMethod(*)) && args(param)")
public void beforeSampleMethod(Collection<MyType> param) {
// Advice implementation
}
为了完成这项工作,我们必须检查集合的每个元素,这是不合理的,因为我们也无法决定如何处理null值。要实现与此类似的东西,您必须传入Collection<?>类型的参数并手动检查元素的类型。
确定参数名称
通知调用中的绑定参数依赖于在切点表达式中匹配的名称。参数名称无法通过Java反射获得,因此Spring AOP使用以下策略来确定参数名称:
如果参数名已被用户显示定义,则使用它。通知和切点注解都有一个可选的
argNames属性,你可以使用它指定被注解的方法的参数名。这些参数名运行时可用,以下示例显示了如何使用argNames属性:@Before(value="com.xyz.lib.Pointcuts.anyPublicMethod() && target(bean) && @annotation(auditable)", argNames="bean,auditable") public void audit(Object bean, Auditable auditable) { AuditCode code = auditable.value(); // ... use code and bean }如果第一个参数是JoinPoint,ProceedingJoinPoint或JoinPoint.StaticPart类型,则不必在argNames属性中包含它。例如,如果您修改了前面的通知以接收连接点对象,则argNames属性不必包括它:
@Before(value="com.xyz.lib.Pointcuts.anyPublicMethod() && target(bean) && @annotation(auditable)", argNames="bean,auditable") public void audit(JoinPoint jp, Object bean, Auditable auditable) { AuditCode code = auditable.value(); // ... use code, bean, and jp }对Joinpoint,ProceedingJoinPoint和JoinPoint.StaticPart的第一个参数的特殊处理,对于不收集任何其他连接点上下文的通知实例特别方便。在这种情况下,您可以省略argNames属性。例如,以下通知不必声明argNames属性:
@Before("com.xyz.lib.Pointcuts.anyPublicMethod()") public void audit(JoinPoint jp) { // ... use jp }使用“ argNames”属性有点笨拙,因此,如果尚未指定“ argNames”属性,Spring AOP会查看类的调试信息,并尝试从本地变量表确定参数名称。只要启用调试信息(至少
'-g:vars')编译类,则将存在此信息。使用此标志编译的后果是:(1)您的代码稍微易于理解(反向工程),(2)类文件大小非常大(通常是无关紧要的),(3)删除未使用的本地变量的优化不会被编译器应用。换句话说,您通过启用此标志来构建不会遇到任何困难。ℹ️如果一个@AspectJ切面由AspectJ 编译器(ajc)不使用debug信息编译,则无需添加argNames属性,因为编译器保留了所需的信息。
如果没有使用debug信息编译代码,则Spring AOP试图推导绑定变量与参数的配对(例如,如果在切点表达式中只有一个变量,且通知方法仅有一个参数,则配对)。如果绑定的变量给出的信息是模糊的,则会抛出AmbiguousBindingException。
如果以上所有策略失败,则抛出IllegalArgumentException
带参数的proceed
我们早些时候说过,我们将描述如何编写带参数的proceed调用以在Spring AOP和AspectJ都能工作。解决方案是确保通知签名按顺序绑定每个方法参数。以下示例显示了如何做到的:
@Around("execution(List<Account> find*(..)) && " +
"com.xyz.myapp.CommonPointcuts.inDataAccessLayer() && " +
"args(accountHolderNamePattern)")
public Object preProcessQueryPattern(ProceedingJoinPoint pjp,
String accountHolderNamePattern) throws Throwable {
String newPattern = preProcess(accountHolderNamePattern);
return pjp.proceed(new Object[] {newPattern});
}
在许多情况下,您无论如何都会进行这种绑定(如前一个示例)。
通知顺序
当多个通知都想在同一连接点运行时会发生什么?Spring AOP遵循与AspectJ相同的优先规则,以确定通知执行的顺序。最高优先通知“on the way in”首先运行(因此,给定两个before 通知,高优先级的先运行)。连接点的"On the way out" ,最高优先级通知最后运行(因此,给定两个after 通知,高优先级的后运行)。
当在不同切面定义的两个通知都需要在相同的连接点运行时,除非另外指定,否则执行顺序是未定义的。您可以通过指定优先级来控制执行顺序。可以使用一般的Spring方式即在切面类上实现org.springframework.core.Ordered接口或使用@Order注解。给定两个切面,Ordered.getOrder()(或注解值)返回值小的的切面具有更高的优先级。
ℹ️从概念上讲,特定切面的每种不同通知类型都可以直接应用于连接点。结果, @AfterThrowing的通知方法不应从 @After/ @AfterReturning方法中获得异常。
从Spring 5.2.7起,在同一@Aspect类中定义的需要在相同的连接点上运行的通知方法,会根据其通知类型按以下顺序分配优先级,从最高到最低的优先级:
@Around,@Before,@After,@AfterReturning,@AfterThrowing。但是,请注意, @After通知方法将在同一切面的任何@AfterReturning或@AfterThrowing通知方法之后有效地调用,遵循AspectJ的"after finally advice"语义。当在同一@Aspect类中定义的两种相同类型的通知(例如,两种 @After通知方法)都需要在同一连接点上运行时,顺序是不确定的(因为通过javac编译的类的反射没有办法检索源代码声明顺序)。考虑将此类通知方法合并成每个@Aspect类中的一个通知方法,或将通知部分重构到单独的@Aspect类,您可以通过Ordered或 @Order在该切面级别排序。
# 5.4.5. 引入(Introductions )
Introductions (AspectJ中称为 inter-type声明)使一个切面能够声明,通知对象实现给定的接口,并代表这些对象提供该接口的实现。
您可以使用@DeclareParents注解进行引入。该注解用于声明匹配类型具有新父类。例如,给定一个名为UsageTracked的接口和名为DefaultUsageTracked的该接口的实现,以下切面声明了所有服务接口的实现者还实现了UsageTracked接口(例如,通过JMX进行统计信息):
@Aspect
public class UsageTracking {
@DeclareParents(value="com.xzy.myapp.service.*+", defaultImpl=DefaultUsageTracked.class)
public static UsageTracked mixin;
@Before("com.xyz.myapp.CommonPointcuts.businessService() && this(usageTracked)")
public void recordUsage(UsageTracked usageTracked) {
usageTracked.incrementUseCount();
}
}
要实现的接口由注解字段的类型确定。@DeclareParents的value属性是一种AspectJ 类型模式。匹配类型的任何bean都会实现UsageTracked接口。请注意,在上一个示例的前通知中,服务bean可以直接用作UsageTracked接口的实现。如果以编程方式访问bean,您将编写以下内容:
UsageTracked usageTracked = (UsageTracked) context.getBean("myService");
# 5.4.6. Aspect 实例化模型
ℹ️这是一个高级主题。如果您只是从AOP开始,则可以安全地跳过。
默认情况下,应用程序上下文中每个切面都有一个实例。AspectJ称此为单例实例化模型。可以用生命周期定义切面。Spring支持AspectJ的perthis和pertarget实例化模型;当前不支持percflow,percflowbelow和pertypewithin。
您可以通过在@Aspect注解中指定perthis子句来声明perthis切面。考虑以下示例:
@Aspect("perthis(com.xyz.myapp.CommonPointcuts.businessService())")
public class MyAspect {
private int someState;
@Before("com.xyz.myapp.CommonPointcuts.businessService()")
public void recordServiceUsage() {
// ...
}
}
在前面的示例中,perthis子句的效果是,为执行业务服务的每个唯一服务对象创建一个切面实例(每个唯一的对象都绑定到与切点表达式匹配的连接点this)。在服务对象上首次调用方法时,创建了该切面实例。当服务对象脱离作用域时,该切面也脱离作用域。在创建切面实例之前,其中没有任何通知运行。一旦创建了切面实例,且在服务对象是与此切面关联的对象时,就会在匹配的连接点上运行通知。有关per子句的更多信息,请参见AspectJ Programming Guide。
pertarget实例模型的工作方式与perthis完全相同,但它为匹配的连接点处的每个唯一目标对象创建一个切面实例。
# 5.4.7. AOP示例
既然您已经看到了所有组成部分如何工作,我们可以将它们放在一起做一些有用的事情。
由于并发问题(例如,死锁),有时会导致业务服务的执行失败。如果操作被重新执行,则可能在下一次尝试中取得成功。对于在这种情况下重试的业务服务(幂等的操作不需要返回用户以解决冲突),我们要透明地重试操作,以避免客户看到PessimisticLockingFailureException。该要求清楚地跨越了服务层中的多个服务,因此是通过切面实施的理想选择。
因为我们想重试操作,所以我们需要使用环绕通知,以便我们可以多次调用proceed。以下列表显示了基本切面实现:
@Aspect
public class ConcurrentOperationExecutor implements Ordered {
private static final int DEFAULT_MAX_RETRIES = 2;
private int maxRetries = DEFAULT_MAX_RETRIES;
private int order = 1;
public void setMaxRetries(int maxRetries) {
this.maxRetries = maxRetries;
}
public int getOrder() {
return this.order;
}
public void setOrder(int order) {
this.order = order;
}
@Around("com.xyz.myapp.CommonPointcuts.businessService()")
public Object doConcurrentOperation(ProceedingJoinPoint pjp) throws Throwable {
int numAttempts = 0;
PessimisticLockingFailureException lockFailureException;
do {
numAttempts++;
try {
return pjp.proceed();
}
catch(PessimisticLockingFailureException ex) {
lockFailureException = ex;
}
} while(numAttempts <= this.maxRetries);
throw lockFailureException;
}
}
请注意,该切面实现了Ordered接口,因此我们可以将切面的优先级设置为高于事务通知的优先级(每次重试时,我们都希望进行新的事务)。maxRetries和order属性均由Spring配置。主要的行动发生在doConcurrentOperation环绕通知中。请注意,目前,我们将重试逻辑应用于每个businessService()。我们尝试proceed,如果我们以PessimisticLockingFailureException失败,除非我们用尽了所有重试尝试,否则我们会再次尝试。
对应的Spring配置如下:
<aop:aspectj-autoproxy/>
<bean id="concurrentOperationExecutor" class="com.xyz.myapp.service.impl.ConcurrentOperationExecutor">
<property name="maxRetries" value="3"/>
<property name="order" value="100"/>
</bean>
为了完善该切面,以便它仅重试幂等操作,我们可以定义以下Idempotent注解:
@Retention(RetentionPolicy.RUNTIME)
public @interface Idempotent {
// marker annotation
}
然后,我们可以使用注解来注释服务操作的实现。切面变为@Idempotent匹配切点表达式时才重试,如下所示:
@Around("com.xyz.myapp.CommonPointcuts.businessService() && " +
"@annotation(com.xyz.myapp.service.Idempotent)")
public Object doConcurrentOperation(ProceedingJoinPoint pjp) throws Throwable {
// ...
}
# 5.5. 基于Schema的AOP支持
如果您喜欢基于XML的风格,Spring还提供了使用aop名称空间标签定义切面的支持。@AspectJ支持的切点表达式和通知种类XML格式也支持。因此,在本节中,我们将重点放在该语法上,并将读者推荐上一节中的讨论((@AspectJ support (opens new window)),以理解编写切点表达式和通知参数的绑定。
要使用本节中描述的aop 名称空间标签,您需要导入spring-aopschema,如 XML Schema-based configuration (opens new window)中所述。有关如何导入aop名称空间中的标签,请参见the AOP schema (opens new window) 。
在您的Spring配置中,必须将所有切面和通知元素放置在<aop:config>元素中(您可以在应用程序上下文配置中具有多个<aop:config>元素)。一个<aop:config>元素可以包切点,通知和切面元素(请注意,必须按该顺序声明这些内容)。
❗️
<aop:config>配置样式大量利用了spring的 auto-proxying (opens new window)机制。如果您已经通过使用BeanNameAutoProxyCreator或类似的东西来使用明确的auto-proxying ,则可能会导致问题(例如通知不被织入)。建议的用法模式是仅使用aop:config样式或仅使用AutoProxyCreator样式,并且永远不要混合它们。
# 5.5.1. 声明切面
当您使用schema支持时,一个切面是一个常规Java对象,该对象在Spring应用程序上下文中定义为bean。状态和行为是在对象的字段和方法中捕获的,XML中捕获了切点和通知信息。
您可以通过使用<aop:aspect>元素来声明切面,并使用ref属性引用bean,如下示例显示:
<aop:config>
<aop:aspect id="myAspect" ref="aBean">
...
</aop:aspect>
</aop:config>
<bean id="aBean" class="...">
...
</bean>
当然,可以配置切面后面的bean(在这种情况下为aBean),就像其他任何Spring bean一样注入依赖。
# 5.5.2. 声明切面
您可以在<aop:config>元素中声明已命名的切点,让切点定义在几个切面和通知之间共享。
表示服务层中任何业务服务执行的切点表达式可以定义如下:
<aop:config>
<aop:pointcut id="businessService"
expression="execution(* com.xyz.myapp.service.*.*(..))"/>
</aop:config>
请注意,切点表达式本身正在使用与 @AspectJ support (opens new window)中所述的相同AspectJ切点表达式语言。如果您使用基于schema的声明样式,则可以使用切点表达式引用定在类型中(@Aspects)已命名的切点。定义上述切点的另一种方式如下:
<aop:config>
<aop:pointcut id="businessService"
expression="com.xyz.myapp.CommonPointcuts.businessService()"/>
</aop:config>
假设您在Sharing Common Pointcut Definitions (opens new window)中所述具有CommonPointcuts切面。
然后,在一个切面声明一个切点与声明顶层切点非常相似,如以下示例所示:
<aop:config>
<aop:aspect id="myAspect" ref="aBean">
<aop:pointcut id="businessService"
expression="execution(* com.xyz.myapp.service.*.*(..))"/>
...
</aop:aspect>
</aop:config>
与@AspectJ 切面的方式几乎相同,使用基于schema 的定义样式声明的切点可以收集连接点上下文。例如,以下切点将this对象作为连接点上下文收集,并将其传递给通知:
<aop:config>
<aop:aspect id="myAspect" ref="aBean">
<aop:pointcut id="businessService"
expression="execution(* com.xyz.myapp.service.*.*(..)) && this(service)"/>
<aop:before pointcut-ref="businessService" method="monitor"/>
...
</aop:aspect>
</aop:config>
通知必须通过包含匹配的名称参数来声明以接收连接点上下文,如下所示:
public void monitor(Object service) {
// ...
}
当结合切点表达时,&amp;&amp;在XML文档中很笨拙,因此您可以分别使用and,or,not代替例&&,||, 和 !。上一个示例中的切点可以重写为:
<aop:config>
<aop:aspect id="myAspect" ref="aBean">
<aop:pointcut id="businessService"
expression="execution(* com.xyz.myapp.service.*.*(..)) and this(service)"/>
<aop:before pointcut-ref="businessService" method="monitor"/>
...
</aop:aspect>
</aop:config>
请注意,以这种方式定义的切点由其XML id引用,不能用作已命名切点以形成复合切点。因此,基于schema的定义样式中的命名切点支持比@AspectJ样式提供的定义样式更有限制。
# 5.5.3. 声明通知
基于schema的AOP支持使用与@AspectJ 样式相同的五种通知,并且它们具有完全相同的语义。
Before通知
Before通知在匹配的方法执行之前运行。它在<aop:aspect>内通过<aop:before>声明,如以下示例所示:
<aop:aspect id="beforeExample" ref="aBean">
<aop:before
pointcut-ref="dataAccessOperation"
method="doAccessCheck"/>
...
</aop:aspect>
在这里,dataAccessOperation是<aop:config>层定义的切点的id。为了内联定义切点,请用pointcut属性替换pointcut-ref属性,如下:
<aop:aspect id="beforeExample" ref="aBean">
<aop:before
pointcut="execution(* com.xyz.myapp.dao.*.*(..))"
method="doAccessCheck"/>
...
</aop:aspect>
正如我们在对@AspectJ样式的讨论中指出的那样,使用命名的切点可以提高代码的可读性。
method属性标识提供通知主体的方法(doAccessCheck)。必须为包含通知的切面元素引用的bean定义此方法。在执行数据访问操作之前(通过切点表达式匹配的方法执行连接点),bean上的doAccessCheck方法被调用。
After Returning 通知
After returning通知在匹配的方法执行正常完成时运行。它声明在<aop:aspect>内。以下示例显示了如何声明它:
<aop:aspect id="afterReturningExample" ref="aBean">
<aop:after-returning
pointcut-ref="dataAccessOperation"
method="doAccessCheck"/>
...
</aop:aspect>
就像在@AspectJ 样式中一样,您可以在通知主体中获得返回值。为此,请使用returning属性来指定应传递返回值的参数的名称,如以下示例所示:
<aop:aspect id="afterReturningExample" ref="aBean">
<aop:after-returning
pointcut-ref="dataAccessOperation"
returning="retVal"
method="doAccessCheck"/>
...
</aop:aspect>
doAccessCheck方法必须声明一个名为retVal的参数。此参数的类型以与@AfterReturning的描述相同的方式约束匹配。例如,您可以按以下方式声明该方法签名:
public void doAccessCheck(Object retVal) {...
After Throwing 通知
After throwing 通知在匹配的方法抛异常退出时运行。它通过使用after-throwing声明在<aop:aspect>内。以下示例显示了如何声明它:
<aop:aspect id="afterThrowingExample" ref="aBean">
<aop:after-throwing
pointcut-ref="dataAccessOperation"
method="doRecoveryActions"/>
...
</aop:aspect>
与@AspectJ 风格一样,您可以在通知主体中获得异常。为此,请使用throwing属性来指定应用来传递参数的名称:
<aop:aspect id="afterThrowingExample" ref="aBean">
<aop:after-throwing
pointcut-ref="dataAccessOperation"
throwing="dataAccessEx"
method="doRecoveryActions"/>
...
</aop:aspect>
doRecoveryActions方法必须声明一个名为dataAccessEx的参数。此参数的类型以与 @AfterThrowing所述相同的方式约束匹配。例如,方法签名可以声明如下:
public void doRecoveryActions(DataAccessException dataAccessEx) {...
After (Finally) 通知
After (finally)通知在匹配方法执行退出后运行。您可以通过使用after元素来声明它,如以下示例所示:
<aop:aspect id="afterFinallyExample" ref="aBean">
<aop:after
pointcut-ref="dataAccessOperation"
method="doReleaseLock"/>
...
</aop:aspect>
Around 通知
与[前面章节](#5.4.4. 声明通知)所述,你可以使用aop:around元素声明环绕通知。
<aop:aspect id="aroundExample" ref="aBean">
<aop:around
pointcut-ref="businessService"
method="doBasicProfiling"/>
...
</aop:aspect>
如下示例所示,doBasicProfiling通知的实现可能与@AspectJ示例(当然除去注解)完全相同:
public Object doBasicProfiling(ProceedingJoinPoint pjp) throws Throwable {
// start stopwatch
Object retVal = pjp.proceed();
// stop stopwatch
return retVal;
}
通知参数
如果您希望明确指定通知方法的参数名称(不依赖于先前描述的检测策略),则可以使用通知元素的arg-names属性来做到这一点,该通知元素以与通知注解(如Determining Argument Names (opens new window)中所述)中argNames属性相同的方式对待。以下示例显示了如何在XML中指定参数名称:
<aop:before
pointcut="com.xyz.lib.Pointcuts.anyPublicMethod() and @annotation(auditable)"
method="audit"
arg-names="auditable"/>
arg-names属性接受逗号分隔的参数名称列表。
以下基于XSD的方法的示例显示了与许多强类型参数结合使用的通知:
package x.y.service;
public interface PersonService {
Person getPerson(String personName, int age);
}
public class DefaultPersonService implements PersonService {
public Person getPerson(String name, int age) {
return new Person(name, age);
}
}
接下来是切面。请注意,profile(..)方法接受许多强类型参数的,第一个参数恰好是用于进行方法调用的连接点。此参数的存在表明profile(..)应作为around通知,如以下示例所示:
package x.y;
import org.aspectj.lang.ProceedingJoinPoint;
import org.springframework.util.StopWatch;
public class SimpleProfiler {
public Object profile(ProceedingJoinPoint call, String name, int age) throws Throwable {
StopWatch clock = new StopWatch("Profiling for '" + name + "' and '" + age + "'");
try {
clock.start(call.toShortString());
return call.proceed();
} finally {
clock.stop();
System.out.println(clock.prettyPrint());
}
}
}
最后,以下示例XML配置影响特定连接点的环绕通知的执行:
<beans xmlns="http://www.springframework.org/schema/beans"
xmlns:xsi="http://www.w3.org/2001/XMLSchema-instance"
xmlns:aop="http://www.springframework.org/schema/aop"
xsi:schemaLocation="
http://www.springframework.org/schema/beans https://www.springframework.org/schema/beans/spring-beans.xsd
http://www.springframework.org/schema/aop https://www.springframework.org/schema/aop/spring-aop.xsd">
<!-- this is the object that will be proxied by Spring's AOP infrastructure -->
<bean id="personService" class="x.y.service.DefaultPersonService"/>
<!-- this is the actual advice itself -->
<bean id="profiler" class="x.y.SimpleProfiler"/>
<aop:config>
<aop:aspect ref="profiler">
<aop:pointcut id="theExecutionOfSomePersonServiceMethod"
expression="execution(* x.y.service.PersonService.getPerson(String,int))
and args(name, age)"/>
<aop:around pointcut-ref="theExecutionOfSomePersonServiceMethod"
method="profile"/>
</aop:aspect>
</aop:config>
</beans>
考虑下列驱动程序脚本:
import org.springframework.beans.factory.BeanFactory;
import org.springframework.context.support.ClassPathXmlApplicationContext;
import x.y.service.PersonService;
public final class Boot {
public static void main(final String[] args) throws Exception {
BeanFactory ctx = new ClassPathXmlApplicationContext("x/y/plain.xml");
PersonService person = (PersonService) ctx.getBean("personService");
person.getPerson("Pengo", 12);
}
}
使用这样的引导类,我们将获得类似于标准输出的以下输出:
StopWatch 'Profiling for 'Pengo' and '12'': running time (millis) = 0
-----------------------------------------
ms % Task name
-----------------------------------------
00000 ? execution(getFoo)
通知顺序
当需要在相同的连接点(执行中的方法)上运行多个通知时,顺序规则如Advice Ordering (opens new window)所述。各个切面之间的优先级是通过<aop:aspect>元素中的order属性确定的,或者是将@Order注解添加到bean或使bean实现Ordered接口。
ℹ️与在同一@Aspect类中定义的通知方法的优先规则相反,当在
<aop:aspect>同一元素中定义的两个通知都需要在同一连接点上运行时,该优先级是由通知元素的顺序确定的。这些通知元素在封闭式<aop:aspect>元素中声明,从最高到最低的优先级。例如,给出适用于同一连接点的相同
<aop:aspect>元素中定义的around通知和before通知,以确保around通知的优先级高于before通知,即<aop:around>必须在<aop:before>元素之前。作为一般的经验法则,如果您发现适用于同一连接点的相同
<aop:aspect>元素中定义了多个通知,考虑合并<aop:aspect>元素或将通知拆分到分开的<aop:aspect>元素中。
# 5.5.4 Introductions
您可以通过在aop:aspect中使用aop:declare-parents元素进行introduction 。您可以使用aop:declare-parents元素来声明匹配类型具有新的parent。例如,给定一个名为UsageTracked的接口和名为DefaultUsageTracked的该接口的实现,以下切面声明了所有服务接口的实现者还实现了UsageTracked接口。(例如,为了通过JMX暴露统计信息。)
<aop:aspect id="usageTrackerAspect" ref="usageTracking">
<aop:declare-parents
types-matching="com.xzy.myapp.service.*+"
implement-interface="com.xyz.myapp.service.tracking.UsageTracked"
default-impl="com.xyz.myapp.service.tracking.DefaultUsageTracked"/>
<aop:before
pointcut="com.xyz.myapp.CommonPointcuts.businessService()
and this(usageTracked)"
method="recordUsage"/>
</aop:aspect>
然后,usageTracking bean的可能包含以下方法:
public void recordUsage(UsageTracked usageTracked) {
usageTracked.incrementUseCount();
}
要实现的接口由implement-interface属性确定。类型匹配属性的值是AspectJ类型模式。匹配类型的任何bean都会实现UsageTracked接口。请注意,在上一个示例的before 通知中,服务bean可以直接用作UsageTracked接口的实现。要以编程方式访问bean,您可以编写以下内容:
UsageTracked usageTracked = (UsageTracked) context.getBean("myService");
# 5.5.5. Aspect实例化模型
基于schema定义的切面模式唯一支持的实例化模型是单例模型。其他实例化模型可以在未来的版本中得到支持。
# 5.5.6. Advisors
“advisors”的概念来自Spring定义的AOP支持,并且在AspectJ中没有直接等效。advisor就像一个小的独立切面,有一个通知。通知本身由bean代表,必须实现Advice Types in Spring (opens new window)中描述的通知接口之一。advisor可以利用AspectJ 切点表达式。
Spring用<aop:advisor>元素支持advisor概念。您最常看到它与事务通知一起使用,该通知在Spring中也具有自己的名称空间。以下示例显示了advisor:
<aop:config>
<aop:pointcut id="businessService"
expression="execution(* com.xyz.myapp.service.*.*(..))"/>
<aop:advisor
pointcut-ref="businessService"
advice-ref="tx-advice"/>
</aop:config>
<tx:advice id="tx-advice">
<tx:attributes>
<tx:method name="*" propagation="REQUIRED"/>
</tx:attributes>
</tx:advice>
除了前面示例中使用的pointcut-ref属性外,您还可以使用pointcut属性来定义内联切点表达式。
为了定义advisor的优先级,以便通知可以按序执行,请使用order属性来定义advisor的Ordered值。
# 5.5.7. 基于Schema 的AOP示例
本节显示了从[AOP示例](#5.4.7. AOP示例)重写的schema版的示例。
public class ConcurrentOperationExecutor implements Ordered {
private static final int DEFAULT_MAX_RETRIES = 2;
private int maxRetries = DEFAULT_MAX_RETRIES;
private int order = 1;
public void setMaxRetries(int maxRetries) {
this.maxRetries = maxRetries;
}
public int getOrder() {
return this.order;
}
public void setOrder(int order) {
this.order = order;
}
public Object doConcurrentOperation(ProceedingJoinPoint pjp) throws Throwable {
int numAttempts = 0;
PessimisticLockingFailureException lockFailureException;
do {
numAttempts++;
try {
return pjp.proceed();
}
catch(PessimisticLockingFailureException ex) {
lockFailureException = ex;
}
} while(numAttempts <= this.maxRetries);
throw lockFailureException;
}
}
ℹ️该类与@AspectJ示例中使用的类相同,但已删除注解。
相应的Spring配置如下:
<aop:config>
<aop:aspect id="concurrentOperationRetry" ref="concurrentOperationExecutor">
<aop:pointcut id="idempotentOperation"
expression="execution(* com.xyz.myapp.service.*.*(..))"/>
<aop:around
pointcut-ref="idempotentOperation"
method="doConcurrentOperation"/>
</aop:aspect>
</aop:config>
<bean id="concurrentOperationExecutor"
class="com.xyz.myapp.service.impl.ConcurrentOperationExecutor">
<property name="maxRetries" value="3"/>
<property name="order" value="100"/>
</bean>
@Retention(RetentionPolicy.RUNTIME)
public @interface Idempotent {
// marker annotation
}
<aop:pointcut id="idempotentOperation"
expression="execution(* com.xyz.myapp.service.*.*(..)) and
@annotation(com.xyz.myapp.service.Idempotent)"/>
# 5.6. 选择哪种AOP风格
一旦确定一个切面是实现给定要求的最佳方法,您如何在使用Spring AOP或AspectJ以及Aspect 语言(代码)样式, @AspectJ注解样式或Spring XML样式之间做出决定?这些决定受许多因素的影响,包括应用程序要求,开发工具和团队对AOP的熟悉程度。
# 5.6.1. Spring AOP或者完全AspectJ?
使用最简单的功能。Spring AOP比使用AspectJ更简单,因为不需要将AspectJ编译器 /注入器引入到您的开发和构建过程中。如果您只需要通知Spring bean上的操作执行,则Spring AOP是正确的选择。如果您需要通知未由Spring容器管理的对象(例如,通常是域对象),则需要使用AspectJ。如果您希望通知简单的方法执行以外的连接点(例如,字段获取或设置连接点等),则还需要使用AspectJ 。
当您使用AspectJ时,您可以选择AspectJ 语言语法(也称为“代码样式”)或@AspectJ 注解样式。显然,如果您不使用Java 5+,则为您做出了选择:使用代码样式。如果切面在您的设计中起着重要作用,并且您可以将 AspectJ Development Tools (AJDT) (opens new window)插件用于Eclipse,那么AspectJ 语言语法是首选选项。它更干净,更简单,因为该语言是专门设计用于编写切面的。如果您不使用Eclipse或只有一些在应用程序中非主要的切面,则您可能需要考虑使用@AspectJ 样式,在IDE中坚持常规的Java编译,并在构建脚本中添加一个切面编织阶段。
# 5.6.2. @AspectJ 还是 XML?
如果您选择使用Spring AOP,则可以选择@AspectJ 或XML样式。有各种各样的权衡要考虑。
XML样式可能是现有的Spring用户最熟悉的,它得到了真正的POJOs的支持。当使用AOP作为配置企业服务的工具时,XML可能是一个不错的选择(一个很好的测试是,您是否认为点切点表达式是您可能想独立更改的配置的一部分)。借助XML样式,可以说从系统中存在哪些切面可以说是更清楚的。
XML样式有两个缺点。首先,它不会在一个地方完全封装需求的实现。DRY 原则说,应该对系统中的任何知识进行单一的,明确的,权威的表示。当使用XML样式时,如何实现要求的知识将分散在配置文件中的Bean类和XML的声明中。当您使用@AspectJ 样式时,此信息将封装在单个模块中:该切面。其次,XML样式的表达方式比@AspectJ 样式更有限制:仅支持“ 单例”切面实例化模型,并且不可能将在XML中声明的切点组合在一起。例如,在@AspectJ 样式中,您可以写出以下内容:
@Pointcut("execution(* get*())")
public void propertyAccess() {}
@Pointcut("execution(org.xyz.Account+ *(..))")
public void operationReturningAnAccount() {}
@Pointcut("propertyAccess() && operationReturningAnAccount()")
public void accountPropertyAccess() {}
在XML样式中,您可以声明前两个切点:
<aop:pointcut id="propertyAccess"
expression="execution(* get*())"/>
<aop:pointcut id="operationReturningAnAccount"
expression="execution(org.xyz.Account+ *(..))"/>
XML方法的缺点是,您不能通过组合这些定义来定义accountPropertyAccess切点。
@AspectJ 样式支持其他实例化模型和更丰富的切点组合。它具有将切面作为模块化单元的优势。它还具有一个优势,即@AspectJ 切面都可以被Spring AOP和AspectJ理解(并因此消费)。因此,如果稍后您确定需要AspectJ的功能来实现其他要求,则可以轻松地迁移到经典的AspectJ 设置。总而言之,Spring团队更喜欢@AspectJ 样式用于自定义切面除了简单的企业服务配置。
# 5.7. 混合Aspect类型
可以通过使用 auto-proxying支持,schema定义<aop:aspect>切面,<aop:advisor>声明advisors,甚至是相同配置中其他样式的代理和拦截器。所有这些都是通过使用相同的基础支持机制来实现的,并且可以在没有任何困难的情况下共存。
# 5.8. 代理机制
Spring AOP使用JDK 动态代理 或CGLIB为给定目标对象创建代理。JDK 动态代理内置在JDK中,而CGLIB是一个常见的开源类定义库(重新打包到spring-core)。
如果要代理的目标对象至少实现一个接口,则使用JDK动态代理。目标类型实现的所有接口均被代理。如果目标对象未实现任何接口,则将创建CGLIB代理。
如果您想强制使用CGLIB代理(例如,为代理针对目标对象定义的每个方法,不仅是由其接口实现的对象),则可以这样做。但是,您应该考虑以下问题:
- 使用CGLIB,不能通知final方法,因为在运行时生成的子类中不能重写它们。
- 从Spring 4.0开始,由于CGLIB代理实例是通过Objenesis创建的,因此代理对象的构造函数不再被调用。只有当您的JVM不允许绕过构造函数时,您可能会看到Spring AOP支持的双重调用和相应的调试日志条目。
要强制使用CGLIB代理,请设置<aop:config>元素的proxy-target-class属性的值为true,如下:
<aop:config proxy-target-class="true">
<!-- other beans defined here... -->
</aop:config>
当您使用@AspectJ auto-proxy支持时要强制CGLIB代理,请设置<aop:aspectj-autoproxy>的proxy-target-class属性为true,如下所示:
<aop:aspectj-autoproxy proxy-target-class="true"/>
ℹ️多个
<aop:config/>部分在运行时折叠成单个统一的auto-proxy创建者,该创建者应用了任何<aop:config/>的最强代理设置(通常来自不同的xml bean定义文件)。这也适用于<tx:annotation-driven/>和<aop:aspectj-autoproxy/>元素。要明确,在
<tx:annotation-driven/>,<aop:aspectj-autoproxy/>或<aop:config/>元素上,使用proxy-target-class="true"强制他们三个都使用CGLIB代理。
# 5.8.1. 理解AOP代理
Spring AOP是基于代理的。在编写自己的切面或使用Spring框架提供的任何基于AOP切面之前,您的上一个语句的实际含义至关重要。
首先考虑具有纯净的,未代理的,没有特殊性的,直接的对象引用的情况,如以下代码段所示:
public class SimplePojo implements Pojo {
public void foo() {
// this next method invocation is a direct call on the 'this' reference
this.bar();
}
public void bar() {
// some logic...
}
}
如果您在对象引用上调用方法,则该方法直接在该对象引用上调用,如以下图像和列表所示:
public class Main {
public static void main(String[] args) {
Pojo pojo = new SimplePojo();
// this is a direct method call on the 'pojo' reference
pojo.foo();
}
}
当客户端代码具有代理时,情况会略有变化。考虑以下图和代码段:
public class Main {
public static void main(String[] args) {
ProxyFactory factory = new ProxyFactory(new SimplePojo());
factory.addInterface(Pojo.class);
factory.addAdvice(new RetryAdvice());
Pojo pojo = (Pojo) factory.getProxy();
// this is a method call on the proxy!
pojo.foo();
}
}
这里要理解的关键是,Main类的main(..)方法内的客户端代码具有对代理的引用。这意味着该对象引用上的方法调用是对代理上的调用。结果,代理可以将与该特定方法调用相关的所有拦截器(通知)委派。但是,一旦调用最终到达了目标对象(在这种情况下,SimplePojo引用),它可能会自行调用任何方法,例如this.bar()或this.foo(),而不是代理调用。这具有重要的含义。这意味着自我调用不会导致与方法调用相关的通知有机会运行。
好的,那该怎么办?最好的方法(在这里宽松地使用了“最佳”一词)是重构代码,以免自我调用。这确实需要您一些工作,但这是最好的,最少的侵入性方法。下一个方法绝对是可怕的,我们不愿指出这一点,正是因为它是如此可怕。您可以(对我们来说很痛苦)完全将逻辑与Spring AOP捆绑起来,如以下示例所示:
public class SimplePojo implements Pojo {
public void foo() {
// this works, but... gah!
((Pojo) AopContext.currentProxy()).bar();
}
public void bar() {
// some logic...
}
}
这完全将您的代码与Spring aop耦合在一起,并且使class本身意识到它正在AOP上下文中使用。在创建代理时,它还需要一些其他配置,如以下示例所示:
public class Main {
public static void main(String[] args) {
ProxyFactory factory = new ProxyFactory(new SimplePojo());
factory.addInterface(Pojo.class);
factory.addAdvice(new RetryAdvice());
factory.setExposeProxy(true);
Pojo pojo = (Pojo) factory.getProxy();
// this is a method call on the proxy!
pojo.foo();
}
}
最后,必须指出的是,AspectJ 没有这个自我调动问题,因为它不是基于代理的AOP框架。
# 5.9. 以编程方式创建@AspectJ切面的代理
除了通过使用<aop:config>或<aop:aspectj-autoproxy>来声明配置中的切面,还可以通过编程方式创建通知目标对象的代理。有关Spring AOP API的全部详细信息,请参见下一章。在这里,我们要专注于使用@AspectJ 切面自动创建代理的能力。
您可以使用org.springframework.aop.aspectj.annotation.AspectJProxyFactory类来为一个或多个@AspectJ 切面通知的目标对象创建代理。该class的基本用法非常简单,如以下示例所示:
// create a factory that can generate a proxy for the given target object
AspectJProxyFactory factory = new AspectJProxyFactory(targetObject);
// add an aspect, the class must be an @AspectJ aspect
// you can call this as many times as you need with different aspects
factory.addAspect(SecurityManager.class);
// you can also add existing aspect instances, the type of the object supplied must be an @AspectJ aspect
factory.addAspect(usageTracker);
// now get the proxy object...
MyInterfaceType proxy = factory.getProxy();
有关更多信息,请参见javadoc (opens new window)。
# 5.10. Spring应用程序使用AspectJ
到目前为止,我们在本章中涵盖的所有内容都是纯Spring AOP。在本节中,我们查看如何使用AspectJ 编译器或织入器,如果您的需求超出了Spring AOP提供的设施。
Spring带有小AspectJ 切面库,在您的发行版中可以独立使用spring-aspects.jar。您需要将其添加到您的classpath中,以便使用其中的切面。 Using AspectJ to Dependency Inject Domain Objects with Spring (opens new window)和 Other Spring aspects for AspectJ (opens new window) 讨论该库的内容以及如何使用它。 Configuring AspectJ Aspects by Using Spring IoC (opens new window)讨论了如何使用AspectJ编译器织入的依赖性注入切面。最后,在 Load-time Weaving with AspectJ in the Spring Framework (opens new window)为使用AspectJ的Spring加载时织入应用程序提供了介绍。
# 5.10.1. 在Spring中使用AspectJ 依赖注入domain对象
Spring容器实例化和配置应用程序上下文中定义的bean。考虑到包含要应用的配置的bean定义的名称,也可以要求bean factory配置预先存在的对象。spring-aspects.jar包含注解驱动的切面,该切面利用了这种能力以允许对任何对象的依赖注入。这种支持旨在用于在任何容器控制之外创建的对象。域对象通常属于此类别,因为它们通常是使用new操作符或通过ORM工具编程创建的。
@Configurable的注解标记使得类有Spring驱动配置的资格。在最简单的情况下,您可以将其纯粹用作标记注解,如以下示例所示:
package com.xyz.myapp.domain;
import org.springframework.beans.factory.annotation.Configurable;
@Configurable
public class Account {
// ...
}
当其用作标记接口时,Spring通过使用bean定义(通常是原型作用域)的全限定类名称(com.xyz.myapp.domain.Account)配置被注解类的新实例。由于bean的默认名称是其类型的全限定的名称,因此声明原型定义的一种方便方法是省略id属性,如以下示例所示:
<bean class="com.xyz.myapp.domain.Account" scope="prototype">
<property name="fundsTransferService" ref="fundsTransferService"/>
</bean>
如果要明确指定要使用的原型bean定义的名称,则可以在注解中直接定义,如下示例显示:
package com.xyz.myapp.domain;
import org.springframework.beans.factory.annotation.Configurable;
@Configurable("account")
public class Account {
// ...
}
Spring现在寻找一个名为“account”的bean定义,并将其用作配置新Account实例的定义。
您也可以使用autowiring 来避免完全指定专用的Bean定义。要使Spring应用autowiring ,请使用@Configurable的autowire属性。您可以指定@Configurable(autowire=Autowire.BY_TYPE)或@Configurable(autowire=Autowire.BY_NAME),分别按类型或按名称进行自动注入。作为替代方案,最好通过@Autowired或@Inject在字段或方法级别定义注解驱动的依赖注入。
最后,您可以通过使用dependencyCheck属性(例如,@Configurable(autowire=Autowire.BY_NAME,dependencyCheck=true))启用Spring依赖检查。如果此属性设置为true,Spring 验证所有属性在他们被配置后(不是原型或集合)。
请注意,只使用该注解本身无济于事。spring-aspects.jar中的AnnotationBeanConfigurerAspect在注解存在时起作用。本质上,该切面说:“从用@Configurable注解的类型的新对象的初始化返回后,根据注解的属性配置新创建的对象”。在这种情况下,“初始化”是指新实例化的对象(例如,new实例化的对象)以及正在进行反序列化的对象(例如,通过 readResolve() (opens new window))。
ℹ️上面段落中的关键短语之一是“本质上”。在大多数情况下,“从新对象的初始化返回之后”的确切语义是可以的。在这种情况下,“初始化”意味着在对象构造后将依赖项注入。这意味着依赖项在类的构造体中不可用。如果您希望在构造函数实体运行之前注入依赖项,并因此可以在构造函数的正文中使用,则需要在@Configurable声明上定义它,如下:
@Configurable(preConstruction = true)您可以在 AspectJ Programming Guide (opens new window)的 in this appendix (opens new window)中找到有关AspectJ 中各种切点类型的语言语义的更多信息。
为此,必须使用AspectJ 织入器将带注解的类型进行织入。您可以使用构建时的Ant 或Maven 任务来执行此操作(例如, AspectJ Development Environment Guide (opens new window))或加载时的织入(请参阅 Load-time Weaving with AspectJ in the Spring Framework (opens new window))。AnnotationBeanConfigurerAspect本身需要通过Spring配置以获取用于配置新对象的 bean factory的引用。如果使用基于Java的配置,则可以将@EnableSpringConfigured添加到任何@Configuration类,如下:
@Configuration
@EnableSpringConfigured
public class AppConfig {
}
如果您喜欢基于XML的配置,则spring上下文名称空间定义了一个方便的context:spring-configured元素,您可以使用以下方式:
<context:spring-configured/>
在对该切面进行配置之前,创建的@Configurable对象的实例导致发出的消息发送给调试日志,并且没有对对象进行配置。一个示例可能是Spring配置中的bean,当Spring初始化域对象时会创建域对象。在这种情况下,您可以使用depends-on属性来手动指定bean依赖的配置切面。以下示例显示了如何使用depends-on属性:
<bean id="myService"
class="com.xzy.myapp.service.MyService"
depends-on="org.springframework.beans.factory.aspectj.AnnotationBeanConfigurerAspect">
<!-- ... -->
</bean>
ℹ️除非您真的要在运行时依靠其语义,否则请勿通过Bean配置器切面激活@Configurable处理。特别是,请确保您在Spring容器中的常规bean上不使用@Configurable。这样做会导致双初始化,一次通过容器,一次通过切面。
单元测试Configurable 对象
@Configurable支持的目标之一是在没有与硬编码查找相关的困难的情况下对域对象进行独立的单元测试。如果@Configurable类尚未通过AspectJ织入,则注解在单位测试过程中没有影响。您可以在测试的对象中设置mock 或stub 属性引用,并正常测试。如果@Configurable类已通过AspectJ织入,则您仍然可以正常在容器外部进行单元测试,但是每次构造一个@Configurable对象,都会提示它尚未在Spring配置的警告消息。
与多应用程序上下文一起工作
用于实现@Configurable支持的AnnotationBeanConfigurerAspect是AspectJ 单例切面。单例切面的作用域与static成员的作用域相同:每个classloader有一个切面实例来定义类型。这意味着,如果您在同一classloader层次结构中定义了多个应用程序上下文,则需要考虑在哪里定义@EnableSpringConfigured的bean以及将spring-aspects.jar放置在哪个classpath。
考虑具有共享父级应用程序上下文的典型Spring Web应用程序配置,该配置定义了共同的业务服务,支持这些服务所需的一切以及每个Servlet的一个子应用程序上下文(其中包含该servlet的特定定义)。所有这些上下文都在同一类加载层次结构中共存,因此AnnotationBeanConfigurerAspect只能对其中一个进行引用。在这种情况下,我们建议在共享(parent)应用程序上下文中定义@EnableSpringConfigured bean。这定义了您可能想要注入域对象的服务。结果是,您无法通过使用@Configurable 机制来配置针对子(Servlet特定)上下文中定义的bean的域对象(这可能不是您想做的事情)。
在同一容器中部署多个Web应用程序时,请确保每个Web应用程序通过使用自己的classLoader加载spring-aspects.jar中的类型(例如,通过将spring-aspects.jar放置在'WEB-INF/lib'中)。如果仅将spring-aspects.jar添加到容器范围的classpath (因此由共享parent classloader),则所有Web应用程序都共享相同的切面实例(这可能不是您想要的)。
# 5.10.2. 其他的Spring AspectJ切面
除了@Configurable切面,spring-aspects.jar还包含一个可以用来驱动spring事务管理(@Transactional注解的类和方法)的切面。这主要针对想要在spring容器之外使用Spring Framework的事务支持的用户。
解释 @Transactional注解的切面是AnnotationTransactionAspect。当您使用此切面时,必须注解实现类(或类中方法或两者都),而不是类实现的接口(如果有)。AspectJ 遵循Java的规则,即不继承接口的注解。
类上的@Transactional注解指定执行类中任何公共操作的默认事务语义。
类中方法上的@Transactional注解覆盖了类注解(如果存在)给出的默认事务语义。任何可见性的方法都可以注解,包括私有方法。直接注解非公共方法是获得此类方法执行事务划分的唯一方法。
💡从spring 4.2以来,spring-aspects提供了一个类似的切面,为标准的javax.transaction.Transactional注解提供了完全相同的功能。查看JtaAnnotationTransactionAspect以获取更多详细信息。
对于想要使用Spring配置和事务管理支持但不想(或不能)使用注解的AspectJ程序员,spring-aspects.jar还包含您可以扩展的abstract切面,以提供您自己的点切点定义。有关更多信息,请参见AbstractBeanConfigurerAspect和AbstractTransactionAspect切面。例如,以下片段显示了如何编写一个切面,以配置域模型中定义的所有对象实例,使用原型bean定义匹配全限定类名称:
public aspect DomainObjectConfiguration extends AbstractBeanConfigurerAspect {
public DomainObjectConfiguration() {
setBeanWiringInfoResolver(new ClassNameBeanWiringInfoResolver());
}
// the creation of a new bean (any object in the domain model)
protected pointcut beanCreation(Object beanInstance) :
initialization(new(..)) &&
CommonPointcuts.inDomainModel() &&
this(beanInstance);
}
# 5.10.3. 使用Spring Ioc配置AspectJ 切面
当您在spring应用程序中使用AspectJ切面时,自然而然地想要和期望能够使用Spring配置此类切面。AspectJ运行时本身负责切面创建,并且通过Spring配置AspectJ创建的切面的手段取决于该切面使用的AspectJ 实例化模型(per-xxx子句)。
大多数切面是单例切面。配置这些切面很容易。您可以创建一个bean定义,该定义像通常一样引用切面类,并包括factory-method="aspectOf"bean属性。这样可以确保Spring通过向AspectJ 询问而不是尝试创建实例本身来获得该切面实例。下面的示例显示了如何使用factory-method="aspectOf"属性:
<bean id="profiler" class="com.xyz.profiler.Profiler"
factory-method="aspectOf">
<property name="profilingStrategy" ref="jamonProfilingStrategy"/>
</bean>
非单例切面很难配置。但是,可以通过创建原型bean定义并使用spring-aspects.jar的@Configurable支持来进行此操作,一旦由 AspectJ运行时创建了bean,就可以配置切面实例。
如果您有一些想用AspectJ 织入(例如,使用 load-time织入域模型类)的@AspectJ切面,或与Spring AOP一起使用的其他@AspectJ 方面,并且这些方面都在Spring中配置,您需要告诉Spring AOP @AspectJ自动代理支持,哪些在配置中定义@AspectJ子集应该被自动代理。您可以使用在<aop:aspectj-autoproxy/>声明中的一个或多个<include/>元素进行此操作。每个<include/>元素都指定了一个名称模式,并且只有与至少一个模式匹配的bean用于Spring AOP自动代理配置。以下示例显示了如何使用<include/>元素:
<aop:aspectj-autoproxy>
<aop:include name="thisBean"/>
<aop:include name="thatBean"/>
</aop:aspectj-autoproxy>
ℹ️不要被
<aop:aspectj-autoproxy/>元素误导。使用它会导致创建Spring AOP代理。这里会使用@AspectJ风格切面,但是不涉及AspectJ 运行时。
# 5.10.4. Spring中的AspectJ Load-time Weaving
加载时间织入(LTW)是指将其加载到Java Virtual Machine(JVM)时,将其织入到应用程序类文件的过程。本节的重点是在Spring框架的特定上下文中配置和使用LTW。本节不是LTW的一般介绍。有关LTW的细节的完整详细信息和仅使用AspectJ配置LTW,请参见 LTW section of the AspectJ Development Environment Guide (opens new window)。
Spring框架在LTW上的价值是可以实现对织入过程的更细粒度的控制。'Vanilla' AspectJ LTW 是通过使用Java(5+)代理来实现的,该代理通过在启动JVM时指定VM参数来打开。因此,它是JVM范围内的设置,在某些情况下可能很好,但通常太粗糙了。启用Spring的LTW使您可以以每个级别的ClassLoader的基础打开LTW,这更细粒度,并且在“single-JVM-multiple-application”环境中更有意义(例如在典型的应用程序服务器中)。
此外, 在某些环境 (opens new window)中,此支持可以实现加载时间织入,而无需对应用程序服务器的启动脚本进行任何修改:通过添加-javaagent:path/to/aspectjweaver.jar或(如本节中稍后所述)-javaagent:path/to/spring-instrument.jar。开发人员配置应用程序上下文以启用加载时间注入,而不是依靠通常负责部署配置(例如启动脚本)的管理员。
让我们首先浏览使用Spring的 AspectJ LTW的快速示例,然后介绍示例中元素的详细细节。有关完整的示例,请参见Petclinic sample application (opens new window)。
示例
假设您是一个应用程序开发人员,你的任务是诊断系统中某些性能问题的原因。我们将开启简单的分析切面,而不打破分析工具,这使我们能够快速获得一些性能指标。然后,我们可以在此后立即将更细粒度的分析工具应用于该特定区域。
ℹ️此处介绍的示例使用XML配置。您还可以使用Java configuration的 (opens new window)@AspectJ 。具体来说,您可以使用@EnableLoadTimeWeaving替代
<context:load-time-weaver/>。
以下示例显示了分析切面,这不是异常复杂的。这是一个使用 @AspectJ风格的切面声明的基于时间的分析器:
package foo;
import org.aspectj.lang.ProceedingJoinPoint;
import org.aspectj.lang.annotation.Aspect;
import org.aspectj.lang.annotation.Around;
import org.aspectj.lang.annotation.Pointcut;
import org.springframework.util.StopWatch;
import org.springframework.core.annotation.Order;
@Aspect
public class ProfilingAspect {
@Around("methodsToBeProfiled()")
public Object profile(ProceedingJoinPoint pjp) throws Throwable {
StopWatch sw = new StopWatch(getClass().getSimpleName());
try {
sw.start(pjp.getSignature().getName());
return pjp.proceed();
} finally {
sw.stop();
System.out.println(sw.prettyPrint());
}
}
@Pointcut("execution(public * foo..*.*(..))")
public void methodsToBeProfiled(){}
}
我们还需要创建一个META-INF/aop.xml文件,以告知我们 AspectJ织入器我们想要织入ProfilingAspect到我们的类中。此文件约定,在Java类路径存在的META-INF/aop.xml是标准的AspectJ。以下示例显示aop.xml文件:
<!DOCTYPE aspectj PUBLIC "-//AspectJ//DTD//EN" "https://www.eclipse.org/aspectj/dtd/aspectj.dtd">
<aspectj>
<weaver>
<!-- only weave classes in our application-specific packages -->
<include within="foo.*"/>
</weaver>
<aspects>
<!-- weave in just this aspect -->
<aspect name="foo.ProfilingAspect"/>
</aspects>
</aspectj>
现在,我们可以转到Spring特定的配置部分。我们需要配置LoadTimeWeaver(稍后解释)。该加载时间织入器是负责将一个或多个META-INF/aop.xml文件中的切面配置织入到应用程序中的类中的基本组件。好处是,它不需要大量配置(您可以指定更多选项,但稍后会详细介绍),如以下示例:
<?xml version="1.0" encoding="UTF-8"?>
<beans xmlns="http://www.springframework.org/schema/beans"
xmlns:xsi="http://www.w3.org/2001/XMLSchema-instance"
xmlns:context="http://www.springframework.org/schema/context"
xsi:schemaLocation="
http://www.springframework.org/schema/beans
https://www.springframework.org/schema/beans/spring-beans.xsd
http://www.springframework.org/schema/context
https://www.springframework.org/schema/context/spring-context.xsd">
<!-- a service object; we will be profiling its methods -->
<bean id="entitlementCalculationService"
class="foo.StubEntitlementCalculationService"/>
<!-- this switches on the load-time weaving -->
<context:load-time-weaver/>
</beans>
现在已经有所有必需的工件(该切面,META-INF/aop.xml文件和弹簧Spring),我们可以使用main(..)方法创建以下驱动程序类,以演示LTW:
package foo;
import org.springframework.context.support.ClassPathXmlApplicationContext;
public final class Main {
public static void main(String[] args) {
ApplicationContext ctx = new ClassPathXmlApplicationContext("beans.xml", Main.class);
EntitlementCalculationService entitlementCalculationService =
(EntitlementCalculationService) ctx.getBean("entitlementCalculationService");
// the profiling aspect is 'woven' around this method execution
entitlementCalculationService.calculateEntitlement();
}
}
我们有最后一件事要做。本节的简介确实说,可以在Spring的per-ClassLoader选择性地打开LTW,这是事实。但是,在此示例中,我们使用Java代理(Spring提供)打开LTW。我们使用以下命令运行前面显示的Main类:
java -javaagent:C:/projects/foo/lib/global/spring-instrument.jar foo.Main
-javaagent是一个用于指定和 agents to instrument programs that run on the JVMd (opens new window)的标志。Spring带有这样的代理:InstrumentationSavingAgent,其打包在spring-instrument.jar中,作为前面示例中-javaagent的值。
Main程序执行的输出看起来像下一个示例。(我已经在calculateEntitlement()实现中介绍了一个Thread.sleep(..)语句,以便分析器实际上捕获了除0毫秒以外的其他东西(01234毫秒不是AOP引入的开销)。以下列表显示当我们运行我们的Profiler时得到的结果:
Calculating entitlement
StopWatch 'ProfilingAspect': running time (millis) = 1234
------ ----- ----------------------------
ms % Task name
------ ----- ----------------------------
01234 100% calculateEntitlement
由于该LTW是通过使用成熟的AspectJ来实现的,因此我们不仅限于通知Spring beans。Main程序的以下轻微变化会产生相同的结果:
package foo;
import org.springframework.context.support.ClassPathXmlApplicationContext;
public final class Main {
public static void main(String[] args) {
new ClassPathXmlApplicationContext("beans.xml", Main.class);
EntitlementCalculationService entitlementCalculationService =
new StubEntitlementCalculationService();
// the profiling aspect will be 'woven' around this method execution
entitlementCalculationService.calculateEntitlement();
}
}
请注意,在前面的程序中,我们如何在spring容器中引导spring容器,然后在Spring的上下文之外完全创建一个StubEntitlementCalculationService的新实例。profiling通知仍然被织入。
诚然,示例很简单。但是,Spring的LTW支持的基础知识都在较早的示例中引入了,本节的其余部分详细介绍了每个配置和用法背后的原因。
ℹ️此示例中使用的
ProfilingAspect可能是基本的,但非常有用。这是开发时间切面的一个很好的例子,开发人员可以在开发过程中使用,然后在将被部署到UAT或生产的应用程序的构建时轻松地排除在外。
Aspects
您在LTW中使用的切面必须是AspectJ 切面。您可以用AspectJ 语言本身编写它们,也可以以 @AspectJ 风格中编写您的切面。然后,您的切面既是有效的AspectJ 切面,也是Spring AOP切面。此外,需要在类路径上提供编译的切面类。
'META-INF/aop.xml'
通过Java 类路径上的一个或多个META-INF/aop.xml文件(直接或更通常是在jar中)配置AspectJ LTW基础设施。
该文件的结构和内容在AspectJ reference documentation (opens new window)的LTW部分详细介绍。因为aop.xml文件是100%的AspectJ,所以我们在这里没有进一步描述它。
所需的库(JARS)
您至少需要以下库来使用Spring Framework对AspectJ LTW的支持:
spring-aop.jaraspectjweaver.jar
如果您使用Spring-provided agent to enable instrumentation (opens new window),则还需要:
spring-instrument.jar
Spring配置
Spring LTW支持中的关键组件是LoadTimeWeaver接口(在org.springframework.instrument.classloading 包中),并且Spring发行版中有它的许多实现。LoadTimeWeaver负责在运行时添加一个或多个java.lang.instrument.ClassFileTransformers到ClassLoader,这为各种感兴趣的应用打开了大门,其中之一恰好是切面的LTW。
ℹ️如果您不熟悉运行时类文件转换的想法,请在继续之前,请参阅java.lang.instrument包的Javadoc API文档。虽然该文档并不全面,但至少您可以看到关键接口和类(如您在本节中阅读时引用)。
为特定的ApplicationContext配置LoadTimeWeaver可以像添加一行一样容易。(请注意,您几乎肯定需要使用ApplicationContext作为您的Spring容器 - 通常,BeanFactory还不够,因为LTW支持使用了BeanFactoryPostProcessors。)
要启用Spring Framework的LTW支持,您需要配置一个LoadTimeWeaver,通常使用@EnableLoadTimeWeaving注解来完成,如下所示:
@Configuration
@EnableLoadTimeWeaving
public class AppConfig {
}
另外,如果您喜欢基于XML的配置,请使用<context:load-time-weaver/>元素。请注意,该元素是在context名称空间中定义的。下面的示例显示了如何使用<context:load-time-weaver/>:
<?xml version="1.0" encoding="UTF-8"?>
<beans xmlns="http://www.springframework.org/schema/beans"
xmlns:xsi="http://www.w3.org/2001/XMLSchema-instance"
xmlns:context="http://www.springframework.org/schema/context"
xsi:schemaLocation="
http://www.springframework.org/schema/beans
https://www.springframework.org/schema/beans/spring-beans.xsd
http://www.springframework.org/schema/context
https://www.springframework.org/schema/context/spring-context.xsd">
<context:load-time-weaver/>
</beans>
前面的配置自动为您定义和注册了许多LTW特异性基础架构bean(例如LoadTimeWeaver和AspectJWeavingEnabler)。默认的LoadTimeWeaver是DefaultContextLoadTimeWeaver类,它试图装饰自动检测到的LoadTimeWeaver。“自动检测到”的LoadTimeWeaver的确切类型取决于您的运行时环境。下表总结了各种LoadTimeWeaver实现:
| 运行时环境 | LoadTimeWeaver实现 |
|---|---|
| Apache Tomcat (opens new window) | TomcatLoadTimeWeaver |
| GlassFish (opens new window)(限制EAR 部署) | GlassFishLoadTimeWeaver |
| Red Hat的JBoss AS (opens new window) 或WildFly (opens new window) | JBossLoadTimeWeaver |
| IBM的WebSphere (opens new window) | WebSphereLoadTimeWeaver |
| Oracle的WebLogic (opens new window) | WebLogicLoadTimeWeaver |
以Spring InstrumentationSavingAgent启动的JVM(java -javaagent:path/to/spring-instrument.jar) | InstrumentationLoadTimeWeaver |
| Fallback,期望基础ClassLoader遵循共同的约定(即addTransformer,并且是可选的getThrowawayClassLoader方法) | ReflectiveLoadTimeWeaver |
请注意,该表仅列出使用DefaultContextLoadTimeWeaver时自动探测的LoadTimeWeaver。您可以准确指定要使用的LoadTimeWeaver实现。
要使用Java配置指定特定的LoadTimeWeaver,请实现LoadTimeWeavingConfigurer接口,并覆盖getLoadTimeWeaver()方法。下面的示例指定了ReflectiveLoadTimeWeaver:
@Configuration
@EnableLoadTimeWeaving
public class AppConfig implements LoadTimeWeavingConfigurer {
@Override
public LoadTimeWeaver getLoadTimeWeaver() {
return new ReflectiveLoadTimeWeaver();
}
}
如果使用基于XML的配置,则可以将全限定类名指定为<context:load-time-weaver/>元素上的weaver-class属性的值。同样,下面的示例指定了ReflectiveLoadTimeWeaver:
<?xml version="1.0" encoding="UTF-8"?>
<beans xmlns="http://www.springframework.org/schema/beans"
xmlns:xsi="http://www.w3.org/2001/XMLSchema-instance"
xmlns:context="http://www.springframework.org/schema/context"
xsi:schemaLocation="
http://www.springframework.org/schema/beans
https://www.springframework.org/schema/beans/spring-beans.xsd
http://www.springframework.org/schema/context
https://www.springframework.org/schema/context/spring-context.xsd">
<context:load-time-weaver
weaver-class="org.springframework.instrument.classloading.ReflectiveLoadTimeWeaver"/>
</beans>
通过配置定义和注册的LoadTimeWeaver可以稍后使用众所周知的名称LoadTimeWeaver从spring容器中检索。请记住,LoadTimeWeaver仅作为Spring LTW基础架构添加一个或多个ClassFileTransformers的机制。进行LTW的实际ClassFileTransformer是ClassPreProcessorAgentAdapter(来自org.aspectj.weaver.loadtime软件包)类。有关更多详细信息,请参见ClassPreProcessorAgentAdapter类的类级别Javadoc,因为实际上如何实现织入的细节超出了本文档的范围。
还剩下最终的一个配置属性要讨论:aspectjWeaving属性(或aspectj-weaving如果您使用XML)。此属性控制LTW是否已启用。它接受三个可能的值之一,如果不存在该属性,则默认值是autodetect。下表总结了三个可能的值:
| 注解值 | XML值 | 说明 |
|---|---|---|
| ENABLED | on | AspectJ 织入开启,切面在load-time时织入 |
| DISABLED | off | LTW 关闭,没有切面在load-time织入 |
| AUTODETECT | autodetect | 如果Spring LTW基础架构至少可以找到一个META-INF/aop.xm文件,那么AspectJ 织入开启。否则关闭。这是默认值。 |
特定环境的配置
最后一节包含应用程序服务器和Web容器等环境中使用Spring的LTW支持时所需的任何其他设置和配置。
Tomcat, JBoss, WebSphere, WebLogic
Tomcat,Jboss/Wildfly,IBM 的WebSphere 应用程序服务器和Oracle WebLogic 服务器都提供了能够具有本地instrumentation的通用应用程序ClassLoader。Spring的本地LTW可能利用这些类加载器实现来提供AspectJ织入。如前所述,您可以简单地启用load-time织入。具体来说,您无需修改JVM启动脚本去添加-javaagent:path/to/spring-instrument.jar。
请注意,在JBOSS上,您可能需要禁用应用程序服务器扫描,以防止在应用程序实际启动之前加载类。快速解决方法是将其添加到您的工件中,其中一个名为WEB-INF/jboss-scanning.xml的文件,其中包括以下内容:
<scanning xmlns="urn:jboss:scanning:1.0"/>
通用Java应用程序
当在特定的不支持LoadTimeWeaver实现的环境中需要类instrumentation时,JVM代理是一般解决方案。对于这种情况,Spring提供了InstrumentationLoadTimeWeaver,它需要特定于Spring的JVM代理,spring-instrument.jar。由@EnableLoadTimeWeaving和<context:load-time-weaver/>设置自动探测。
要使用它,您必须通过提供以下JVM选项来启动使用Spring代理的虚拟机:
-javaagent:/path/to/spring-instrument.jar
请注意,这需要修改JVM启动脚本,这可能会阻止您在应用程序服务器环境中使用此脚本(取决于服务器和操作策略)。也就是说,对于单次jvm部署(例如独立的Spring启动应用程序),您通常会在任何情况下控制整个JVM设置。
# 5.11. 其他资料
有关AspectJ的更多信息,请参见AspectJ website (opens new window)。
Eclipse AspectJ by Adrian Colyer et. al. (Addison-Wesley, 2005)提供了AspectJ语言的全面介绍和参考
AspectJ in Action, Second Edition by Ramnivas Laddad (Manning, 2009) 强烈推荐。这本书的重点是AspectJ,但是探索了许多一般的AOP主题(一定深度)。
# 6. Spring AOP APIs
上一章描述了Spring对@AspectJ和基于schema的切面定义的支持。在本章中,我们讨论了较低级别的Spring AOP API。对于通用应用,我们建议将Spring AOP与上一章中所述的AspectJ切点一起使用。
# 6.1. Spring中的切点API
本节介绍了Spring如何处理关键的切点概念。
# 6.1.1. 概念
Spring的切点模型可以独立于通知类型重复使用切点。您可以使用相同的切点指向不同的通知。
org.springframework.aop.Pointcut是核心接口,用于针对特定类和方法的通知。完整接口如下:
public interface Pointcut {
ClassFilter getClassFilter();
MethodMatcher getMethodMatcher();
}
将Pointcut接口分为两个部分,可以重复使用类和方法匹配部分和细粒度组合操作(例如,和另一种方法匹配器执行“联合”操作)。
ClassFilter接口用于将切点限制在给定的一组目标类中。如果matches()方法始终返回true,则所有目标类都是匹配的。以下列表显示ClassFilter接口定义:
public interface ClassFilter {
boolean matches(Class clazz);
}
MethodMatcher接口通常更重要。完整接口如下:
public interface MethodMatcher {
boolean matches(Method m, Class targetClass);
boolean isRuntime();
boolean matches(Method m, Class targetClass, Object[] args);
}
matches(Method, Class)方法用于测试该切点是否与目标类上的给定方法匹配。当创建AOP代理以避免在每个方法调用中进行测试时,可以执行此计算。如果两个参数的matches方法返回true,并且MethodMatcher的isRuntime()方法返回true,则在每个方法调用中都调用了三参数的matches 方法。这使得在目标通知启动之前切点可以查找传递给方法调用的参数。
大多数MethodMatcher实现都是静态的,这意味着他们的isRuntime()方法返回false。在这种情况下,三参数的matches方法不会被调用。
💡如果可能,尝试让切点是静态的,以允许AOP框架在AOP代理创建时缓存切点计算的结果。
# 6.1.2. 切点操作
Spring支持对切点的操作(尤其是union和intersection)。
union是指任何一个切点匹配的方法。intersection是指两个切点匹配的方法。Union 通常更有用。您可以使用org.springframework.aop.support.Pointcuts类中的静态方法或使用同一软件包中的ComposablePointcut类来组合点。但是,使用AspectJ 切点表达式通常是一种更简单的方法。
# 6.1.3. AspectJ 表达式切点
自2.0以来,Spring使用的最重要类型的切点是org.springframework.aop.aspectj.AspectJExpressionPointcut。这是一个使用AspectJ提供的库来解析AspectJ 切点表达式字符串的切点。
请参阅上一章 (opens new window),以讨论支持的AspectJ 切点原语。
# 6.1.4. 方便的切点实现
Spring提供了几个方便的切点实现。您可以直接使用其中的一些;其他是用于特定应用程序的子类切点。
静态切点
静态切点基于方法和目标类,无法考虑该方法的参数。对于大多数用法,静态切点就足够了,而且是最好的。首次调用方法时,Spring只计算一次静态切点。之后,无需在每次方法调用时在计算切点。
本节的其余部分介绍了Spring附带的一些静态切点实现。
正则表达式切点
指定静态点的一种明显方法是正则表达式。除了Spring,几个AOP框架使这成为可能。org.springframework.aop.support.JdkRegexpMethodPointcut是使用JDK中支持的正则表达式的通用正则表达式切点。
使用JdkRegexpMethodPointcut类,您可以提供模式字符串列表。如果其中的任何一个是匹配的,那么切点将计算为true。(因此,最终的切点实际上是指定模式的结合。)
以下展示了如何使用JdkRegexpMethodPointcut:
<bean id="settersAndAbsquatulatePointcut"
class="org.springframework.aop.support.JdkRegexpMethodPointcut">
<property name="patterns">
<list>
<value>.*set.*</value>
<value>.*absquatulate</value>
</list>
</property>
</bean>
Spring提供了一个名为RegexpMethodPointcutAdvisor的类,它还可以引用Advice(请记住,Advice可以是拦截器,before 通知,throws 通知和其他)。这种场景下,Spring使用JdkRegexpMethodPointcut。使用RegexpMethodPointcutAdvisor简化了装配,因为一个Bean封装了切点和通知,如下示例显示:
<bean id="settersAndAbsquatulateAdvisor"
class="org.springframework.aop.support.RegexpMethodPointcutAdvisor">
<property name="advice">
<ref bean="beanNameOfAopAllianceInterceptor"/>
</property>
<property name="patterns">
<list>
<value>.*set.*</value>
<value>.*absquatulate</value>
</list>
</property>
</bean>
您可以在任何Adivce类型下使用RegexpMethodPointcutAdvisor。
属性驱动的切点
静态切点的一种重要类型是元数据驱动的切点。它使用元数据属性的值(通常为源级元数据)。
动态切点
与静态切点相比,动态切点的计算更为昂贵。他们考虑了方法参数以及静态信息。这意味着每个方法调用时都要对它们进行计算,并且不能缓存结果,因为参数会有所不同。
主要示例是控制流切点。
控制流切点
Spring控制流切点在概念上类似于AspectJ 的cflow切点,尽管功能较差。(当前无法指定此类切点运行在由另一个切点匹配的连接点下)控制流切点匹配当前调用堆栈。例如,如果通过com.mycompany.web软件包或SomeCaller类中的方法调用联接点,则可能会触发。使用org.springframework.aop.support.ControlFlowPointcut类指定控制流切点。
ℹ️在运行时计算控制流切点比其他动态切点要昂贵得多,在Java 1.4中,成本大约是其他动态切点的五倍。
# 6.1.5. 切点基类
Spring提供了有用的切点超类,以帮助您实现自己的切点。
由于静态切点是最有用的,因此您可能应该子类化StaticMethodMatcherPointcut。这需要仅实现一个抽象方法(尽管您可以覆盖其他方法来自定义行为)。以下示例显示了如何子类化StaticMethodMatcherPointcut:
class TestStaticPointcut extends StaticMethodMatcherPointcut {
public boolean matches(Method m, Class targetClass) {
// return true if custom criteria match
}
}
还有用于动态切点的超类。您可以在任何通知类型下使用自定义切点。
# 6.1.6. 自定义切点
由于Spring AOP中的切点是Java类,而不是语言功能(如AspectJ),因此您可以声明自定义切点,无论是静态还是动态。Spring中的自定义切点可以很复杂。但是,如果可以的话,我们建议使用AspectJ 切点表达式语言。
ℹ️Spring的后期版本可能会提供对JAC提供的“语义上的切点”的支持,例如,“所有改变目标对象中实例变量的方法”。
# 6.2. Spring通知API
现在,我们可以检查Spring AOP如何处理通知。
# 6.2.1. 通知的生命周期
每个通知都是Spring bean。可以在所有被通知的对象上共享通知实例,也可以独享通知实例。这对应于 per-class或 per-instan通知。
最常使用的是Per-class通知。它适合通用通知,例如事务通知。这些不取决于代理对象的状态或添加新状态。他们只是对方法和参数起作用。
Per-instance 通知适合introductions,以支持混合类型。在这种情况下,通知将状态添加到代理对象中。
您可以在相同的AOP代理中使用共享和per-instance通知的混合。
# 6.2.2. Spring中的通知类型
Spring提供了几种通知类型,并且可以扩展以支持任意通知类型。本节介绍了基本概念和标准通知类型。
拦截环绕通知
Spring最基本的通知类型是拦截环绕通知。
Spring符合AOP Alliance接口--用于使用方法拦截的通知的使用。实现MethodInterceptor和环绕通知的类也应实现以下接口:
public interface MethodInterceptor extends Interceptor {
Object invoke(MethodInvocation invocation) throws Throwable;
}
以下示例显示了一个简单的MethodInterceptor实现:
public class DebugInterceptor implements MethodInterceptor {
public Object invoke(MethodInvocation invocation) throws Throwable {
System.out.println("Before: invocation=[" + invocation + "]");
Object rval = invocation.proceed();
System.out.println("Invocation returned");
return rval;
}
}
注意MethodInvocation的proceed()方法的调用。这将使得拦截器链向连接点执行。大多数拦截器调用此方法并返回其返回值。但是,MethodInterceptor与任何环绕通知一样,可以返回其他值或抛异常,而不是调用该方法。但是,没有充分的理由不要这样做。
ℹ️MethodInterceptor实现提供了与其他符合AOP联盟的AOP实现的互操作性。本节其余部分讨论的其他通知类型以特定于Spring的方式实现了常见的AOP概念。尽管使用最特定的通知类型具有优势,但如果您可能想在另一个AOP框架中运行该切面,请坚持使用MethodInterceptor。请注意,切点目前在框架之间不具互通性,而AOP联盟当前也未定义切点接口。
Before通知
更简单的通知类型是before 通知。这不需要MethodInvocation对象,因为仅在进入该方法之前就被调用。
before通知的主要优点是无需调用proceed()方法,因此没有可能不慎未能沿着拦截器链进行处理。
以下列表显示MethodBeforeAdvice接口:
public interface MethodBeforeAdvice extends BeforeAdvice {
void before(Method m, Object[] args, Object target) throws Throwable;
}
(尽管一般的对象适用于字段拦截并且Spring不太可能实现它,但Spring的API设计将允许field before通知。)
请注意,返回类型是void。在通知运行之前,通知可以插入自定义行为,但不能更改返回值。如果before通知引发异常,它将停止进一步执行拦截器链。异常传播备份了拦截器链。如果它是未受检或在调用方法的签名上,则将其直接传递给客户端。否则,AOP代理将其包装在未受检的异常中。
下面的示例显示了Spring的before 通知,该通知计算所有方法调用:
public class CountingBeforeAdvice implements MethodBeforeAdvice {
private int count;
public void before(Method m, Object[] args, Object target) throws Throwable {
++count;
}
public int getCount() {
return count;
}
}
💡Before通知能在任何切点使用
Throws通知
如果连接点抛出了异常,则在连接点返回后调用Throws 通知。Spring提供强类型的Throws通知。请注意,这意味着org.springframework.aop.ThrowsAdvic接口不包含任何方法。这是一个标签接口,识别给定对象实现一种或多个强类型通知方法。这些应该为下形式:
afterThrowing([Method, args, target], subclassOfThrowable)
只有最后一个参数是必须的。该方法签名可能具有一个或四个参数,具体取决于通知方法是否对该方法和参数感兴趣。接下来的两个列表是throws 通知的示例。
如果抛出了RemoteException(包括其子类),则调用以下通知:
public class RemoteThrowsAdvice implements ThrowsAdvice {
public void afterThrowing(RemoteException ex) throws Throwable {
// Do something with remote exception
}
}
与前面的通知不同,下一个示例声明了四个参数,因此它可以访问调用的方法,方法参数和目标对象。如果抛出了ServletException,则调用以下通知:
public class ServletThrowsAdviceWithArguments implements ThrowsAdvice {
public void afterThrowing(Method m, Object[] args, Object target, ServletException ex) {
// Do something with all arguments
}
}
最后一个示例说明了如何在处理RemoteException和ServletException的单个类中使用这两种方法。任何数量的throws 通知方法都可以在单个类中组合。以下清单显示了最后一个示例:
public static class CombinedThrowsAdvice implements ThrowsAdvice {
public void afterThrowing(RemoteException ex) throws Throwable {
// Do something with remote exception
}
public void afterThrowing(Method m, Object[] args, Object target, ServletException ex) {
// Do something with all arguments
}
}
ℹ️如果throws通知方法本身引发异常,则它覆盖了原始异常(也就是说,它将更改抛出的异常给用户)。用以覆盖的异常通常是RuntimeException,它与任何方法签名兼容。但是,如果throws通知方法引发了受检的异常,则必须与目标方法的声明异常匹配,因此,在某种程度上与特定的目标方法签名耦合。请勿抛出与目标方法签名不相容的未受检异常!
💡Throws 通知能在任何切点使用
After Returning通知
Spring中的After Returning通知必须实现org.springframework.aop.AfterReturningAdvice接口,如以下列表显示:
public interface AfterReturningAdvice extends Advice {
void afterReturning(Object returnValue, Method m, Object[] args, Object target)
throws Throwable;
}
after returning通知可以访问返回值(无法修改),调用的方法,方法的参数和目标对象。
以下after returning通知计算所有成功的没有抛出异常的方法调用:
public class CountingAfterReturningAdvice implements AfterReturningAdvice {
private int count;
public void afterReturning(Object returnValue, Method m, Object[] args, Object target)
throws Throwable {
++count;
}
public int getCount() {
return count;
}
}
此通知不会改变执行路径。如果抛出异常,则thrown up拦截器链,而不是返回值。
💡 After returning 通知能在任何切点使用
Introduction通知
春季将Introduction通知作为一种特殊的拦截通知。
Introduction需要一个IntroductionAdvisor和一个实现以下接口的IntroductionInterceptor:
public interface IntroductionInterceptor extends MethodInterceptor {
boolean implementsInterface(Class intf);
}
从AOP Alliance MethodInterceptor接口继承的invoke()方法必须实现introduction。也就是说,如果被调用方法在introduced的接口上,则introduction 拦截器负责处理方法调用 - 它无法调用proceed()。
Introduction 通知不能与任何点切点一起使用,因为它仅适用于类,而不是方法。您只能通过IntroductionAdvisor使用introduction 通知,其具有以下方法:
public interface IntroductionAdvisor extends Advisor, IntroductionInfo {
ClassFilter getClassFilter();
void validateInterfaces() throws IllegalArgumentException;
}
public interface IntroductionInfo {
Class<?>[] getInterfaces();
}
这里没有MethodMatcher,因此,没有Pointcut与introduction通知相关联。只有类过滤是合乎逻辑的。
getInterfaces()方法返回该通知器引入的接口。
内部使用validateInterfaces()方法,以查看是否可以由配置的IntroductionInterceptor实现引入的接口。
考虑Spring测试套件中的一个示例,假设我们要将以下接口引入到一个或多个对象:
public interface Lockable {
void lock();
void unlock();
boolean locked();
}
我们希望能够将被通知的对象转换为Lockable,无论其类型如何,并调用lock和unlock方法。如果我们调用lock()方法,我们希望所有setter 方法都抛出LockedException。因此,我们可以添加一个切面,可以提供使对象不可变的能力,而无需任何知识:一个很好的AOP例子。
首先,我们需要一个IntroductionInterceptor来进行繁重的工作。在这种情况下,我们扩展了org.springframework.aop.support.DelegatingIntroductionInterceptor类。我们可以直接实现IntroductionInterceptor,但是使用DelegatingIntroductionInterceptor是大多数情况下最好的。
DelegatingIntroductionInterceptor旨在委托introduction到实际的被引入接口的实现,从而隐藏拦截的使用。您可以使用构造函数参数将委托人设置为任何对象。默认委托(当使用无参构造器时)是this。因此,在下一个示例中,委托是DelegatingIntroductionInterceptor的子类--LockMixin。给定委托(默认情况下,本身),DelegatingIntroductionInterceptor实例查找代表实现的所有接口(IntroductionInterceptor除外),并支持针对任何一个的引入。诸如LockMixin之类的子类可以调用suppressInterface(Class intf)方法来阻止不应暴露的接口。但是,无论IntroductionInterceptor准备支持多少个接口,IntroductionAdvisor控制哪个接口暴露。引入的接口掩盖了目标对同一接口的任何实现。
因此,LockMixin扩展了DelegatingIntroductionInterceptor并实现Lockable本身。超类自动接收可以支持Lockable的引入,因此我们无需指定。我们可以以这种方式引入任何数量的接口。
注意locked实例变量的使用。这有效地增加了目标对象中的其他状态。
以下示例显示了示例lLockMixin类:
public class LockMixin extends DelegatingIntroductionInterceptor implements Lockable {
private boolean locked;
public void lock() {
this.locked = true;
}
public void unlock() {
this.locked = false;
}
public boolean locked() {
return this.locked;
}
public Object invoke(MethodInvocation invocation) throws Throwable {
if (locked() && invocation.getMethod().getName().indexOf("set") == 0) {
throw new LockedException();
}
return super.invoke(invocation);
}
}
通常,您无需覆盖invoke()方法。DelegatingIntroductionInterceptor实现(如果引入该方法,则调用delegate,否则将继续处理连接点)通常就足够了。在当前情况下,我们需要添加检查:如果处于锁定模式,则不能调用setter 方法。
所需的引入只需要持有独特的LockMixin实例并指定引入的接口(在这种情况下,仅Lockable)。一个更复杂的示例可能引用引入拦截器(将定义为原型)。在这种情况下,没有与LockMixin相关配置,因此我们使用new来创建它。以下示例显示了我们的LockMixinAdvisor类:
public class LockMixinAdvisor extends DefaultIntroductionAdvisor {
public LockMixinAdvisor() {
super(new LockMixin(), Lockable.class);
}
}
我们可以非常简单地应用此advisor ,因为它不需要配置。(但是,如果没有IntroductionAdvisor,就不可能使用IntroductionInterceptor)与往常一样,advisor 必须是per-instance,因为它是有状态的。对于每个通知的对象,我们需要一个不同的LockMixinAdvisor实例,因此需要每个被通知对象持有一个LockMixin。advisor 包括通知对象状态的一部分。
我们可以使用Advised.addAdvisor()方法或(建议的方式)在XML配置中应用此通知器。下面讨论的所有代理创建选择,包括“自动代理创建者”,正确处理引入和状态混入。
# 6.3. Spring中的Advisor API
在Spring,Advisor 是一个仅包含与切点表达式关联的单个通知对象的切面。
除了介绍的特殊情况外,任何advisor 都可以与任何通知一起使用。org.springframework.aop.support.DefaultPointcutAdvisor是最常用的advisor类。它可以与MethodInterceptor,BeforeAdvice或ThrowsAdvice一起使用。
可以在同一AOP代理中将advisor 和通知类型混合使用。例如,您可以在一种代理配置中使用拦截around 通知,throws 通知和before 通知。Spring会自动创建必要的拦截器链。
# 6.4. 使用ProxyFactoryBean 创建AOP代理
如果您为业务对象使用Spring IOC容器(ApplicationContext或BeanFactory)(您应该是!),则需要使用Spring的AOP FactoryBean实现之一。(请记住,工厂bean引入了间接层,让其创建不同类型的对象。)
ℹ️SpringAOP支持还使用under the covers的工厂bean。
在Spring创建AOP代理的基本方法是使用org.springframework.aop.framework.ProxyFactoryBean。这可以完全控制切点,任何适用的通知及其顺序。但是,如果您不需要这样的控制,则可以选择更简单的选项。
# 6.4.1. 基础
与其他Spring FactoryBean实现一样,ProxyFactoryBean引入了间接层。如果定义一个名为foo的ProxyFactoryBean,则引用foo的对象看不到ProxyFactoryBean实例本身,而是由ProxyFactoryBean中的getObject()方法实现创建的对象。此方法创建一个包装目标对象的AOP代理。
使用ProxyFactoryBean或其他IOC感知的类创建AOP代理的最重要好处之一是,通知和切点也可以由IOC管理。这是一个强大的功能,可以实现其他AOP框架难以实现的方法。例如,通知本身可以引用应用程序对象(除了目标对象,应在任何AOP框架中可用),从而受益于依赖注入所提供的可拔插性。
# 6.4.2. JavaBean属性
与Spring提供的大多数FactoryBean实现相同,ProxyFactoryBean类本身就是Javabean。它的属性用于:
- 指定你想代理的目标
- 指定是否使用CGLIB (稍后描述,参考 JDK- and CGLIB-based proxies (opens new window)).
一些关键的属性从 org.springframework.aop.framework.ProxyConfig (Spring所有AOP代理工厂的超类)继承。这些关键的属性包括:
proxyTargetClass:true表示代理目标类而不是目标类的接口。如果此属性值设置为true, 将创建CGLIB 代理 (参考JDK- and CGLIB-based proxies (opens new window))。optimize: 控制是否将积极的优化应用于通过CGLIB创建的代理。除非您完全了解相关的AOP代理如何处理优化,否则您不应该使用此设置。 目前仅用于CGLIB代理。它对JDK动态代理没有影响。frozen: 如果代理配置是frozen,则不再允许对配置进行更改。这既可以用作轻微的优化,也是在您不希望调用者能够在创建代理后修改代理(通过Advised接口)的情况。该属性的默认值为false,因此允许更改(例如添加其他通知)。exposeProxy:确定是否应将当前代理暴露在ThreadLocal中,以便目标可以访问。如果目标需要获得代理,并且将exposeProxy属性设置为true,则目标可以使用AopContext.currentProxy()方法。
其他特定于 ProxyFactoryBean 的属性包括:
proxyInterfaces:字符串接口名称的数组。如果不提供此项,则使用目标类的CGLIB代理(参考 JDK- and CGLIB-based proxies (opens new window)).interceptorNames: Advisor,拦截器或其他通知名称的字符串数组。顺序是重要的,基于先到先得原则。也就是说,列表中的第一个拦截器是第一个能够拦截调用的拦截器。这些名称是当前工厂中的bean名称,包括祖先工厂的Bean名称。您不能在此处提及bean的引用,因为这样做会导致ProxyFactoryBean忽略了通知的单例设置。
您可以使用星号(*)附加在拦截器名称后。这样做会导致所有匹配的advisor 应用。您可以在 Using “Global” Advisors (opens new window)中找到使用此功能的示例。
singleton: 无论getObject()方法多久一次调用,工厂应返回单例对象。几个FactoryBean实现提供了这种方法。默认值是true。如果您想使用有状态的通知(例如,对于状态混合),请使用原型通知以及设置singleton 为false。
# 6.4.3. JDK和CGLIB代理
本节是有关如何创建基于JDK的代理或针对特定目标对象的基于CGLIB的代理的最终文档。
ℹ️在创建基于JDK或CGLIB的代理方面,ProxyFactoryBean的行为在Spring的版本1.2.x和2.0之间发生了变化。现在,ProxyFactoryBean表现自动探测接口(如TransactionProxyFactoryBean)相似的语义。
如果要代理的目标对象的类(以下简称为目标类)不会实现任何接口,则会创建基于CGLIB的代理。这是最简单的场景,因为JDK代理是基于接口的,没有接口意味着JDK代理甚至是不可能的。您可以插入目标bean,并通过设置interceptorNames属性来指定拦截器列表。请注意,即使将ProxyFactoryBean的proxyTargetClass属性设置为false,也会创建基于CGLIB的代理。(这样做是没有意义的,最好是从bean定义中删除,因为它充其量是多余的,而且令人困惑。)
如果目标类实现一个(或多个)接口,则创建的代理类型取决于ProxyFactoryBean的配置。
如果将ProxyFactoryBean的proxyTargetClass属性设置为true,则创建了基于CGLIB的代理。这是有道理的,并且符合至少令人惊讶的原则。即使将ProxyFactoryBean的proxyInterfaces属性设置为一个或多个全限定的接口名称,proxyTargetClass属性设置为true也会导致CGLIB代理生效。
如果将ProxyFactoryBean的proxyInterfaces属性设置为一个或多个全限定的接口名称,则创建了基于JDK的代理。创建的代理实现了proxyInterfaces属性中指定的所有接口。如果目标类碰巧比proxyInterfaces属性中指定的接口实现了更多的接口,那么这一切都很好,但是返回的代理并未实现这些其他接口。
如果尚未设置ProxyFactoryBean的proxyInterfaces属性,但是目标类的确实现了一个(或更多)接口,则ProxyFactoryBean 自动探测,即目标类确实实现了至少一个接口,则基于JDK的代理被创建。实际代理的接口是目标类实现的所有接口。实际上,这与提供目标类实现的每个接口的列表即设置proxyInterfaces属性相同。但是,它的工作要少得多,并且不容易出现书写错误。
# 6.4.4. 代理接口
考虑ProxyFactoryBean一个简单的示例。此示例涉及:
- 代理的目标bean。这是示例中的personTarget定义
- 提供通知的
Advisor和Interceptor` - 一个AOP代理bean定义,用于指定目标对象(personTargetbean),代理接口以及要应用的通知。
以下列表显示了一个示例:
<bean id="personTarget" class="com.mycompany.PersonImpl">
<property name="name" value="Tony"/>
<property name="age" value="51"/>
</bean>
<bean id="myAdvisor" class="com.mycompany.MyAdvisor">
<property name="someProperty" value="Custom string property value"/>
</bean>
<bean id="debugInterceptor" class="org.springframework.aop.interceptor.DebugInterceptor">
</bean>
<bean id="person"
class="org.springframework.aop.framework.ProxyFactoryBean">
<property name="proxyInterfaces" value="com.mycompany.Person"/>
<property name="target" ref="personTarget"/>
<property name="interceptorNames">
<list>
<value>myAdvisor</value>
<value>debugInterceptor</value>
</list>
</property>
</bean>
请注意,interceptorNames属性列出了字符串列表,该属性将拦截器或advisors 的bean名称保存在当前工厂中。您可以使用advisors,interceptors,before, after returning, throws 通知。advisors 的顺序非常重要。
ℹ️您可能想知道为什么列表不持有bean引用。这样做的原因是,如果ProxyFactoryBean的singleton属性设置为false,则必须能够返回独立的代理实例。如果任何advisors 本身都是原型,则需要返回一个独立的实例,因此有必要从工厂获得原型的实例。持有引用是不够的。
前面显示的person定义可以代替Person实施,如下:
Person person = (Person) factory.getBean("person");
与普通的Java对象一样,在同一IOC上下文中的其他bean可以表达对其的强类型的依赖。以下示例显示了如何做到的:
<bean id="personUser" class="com.mycompany.PersonUser">
<property name="person"><ref bean="person"/></property>
</bean>
此示例中的PersonUser类暴露了Person属性。就它而言,AOP代理可以透明地代替“真实”person 的实施。但是,它的类将是一个动态的代理类。可以将其转换为Advised接口(稍后讨论)。
您可以使用匿名的内部bean隐藏目标和代理之间的区别。只有ProxyFactoryBean定义是不同的。该通知仅用于完整性。以下示例显示了如何使用匿名内部bean:
<bean id="myAdvisor" class="com.mycompany.MyAdvisor">
<property name="someProperty" value="Custom string property value"/>
</bean>
<bean id="debugInterceptor" class="org.springframework.aop.interceptor.DebugInterceptor"/>
<bean id="person" class="org.springframework.aop.framework.ProxyFactoryBean">
<property name="proxyInterfaces" value="com.mycompany.Person"/>
<!-- Use inner bean, not local reference to target -->
<property name="target">
<bean class="com.mycompany.PersonImpl">
<property name="name" value="Tony"/>
<property name="age" value="51"/>
</bean>
</property>
<property name="interceptorNames">
<list>
<value>myAdvisor</value>
<value>debugInterceptor</value>
</list>
</property>
</bean>
使用匿名内部bean的优势是只有一个Person类型的对象。如果我们要防止应用程序上下文的用户获得对不明智的对象的引用,或者需要避免使用Spring IOC 自动装配产生任何歧义,这将很有用。可以说,还有一个优势,因为ProxyFactoryBean定义是自包含的,有时候能够从工厂获得未通知的目标实际上可能是一个优势(例如,在某些测试场景中)。
# 6.4.5. 代理类
如果您需要代理类而不是接口,该怎么办?
想象一下,在我们之前的示例中,没有Person接口。我们需要通知一个未实施任何业务接口的名为Person的类。在这种情况下,您可以配置Spring以使用CGLIB代理而不是动态代理。为此,请将ProxyFactoryBean的proxyTargetClass属性设置为true。虽然最好编程到接口而不是类,但是在使用旧版代码时,通知不实现接口的类很有用。(通常,Spring不是规定的。尽管它可以轻松应用良好的做法,但它避免了强制特定的方法。)
如果需要,即使您确实有接口,也可以强制使用CGLIB。
CGLIB代理通过在运行时生成目标类的子类来起作用。Spring配置此生成的子类以委派方法调用到源对象。该子类用Decorator 模式(装饰模式)实现,并在通知中织入。
Final方法不能被通知也不能被复写- 无需将CGLIB添加到您的类路径。从Spring 3.2起,CGLIB重新打包并包含在spring-core jar中。换句话说,基于CGLIB的AOP和JDK动态代理都可以“开箱即用”。
CGLIB代理和动态代理之间的性能差异很小。在这种情况下,性能不应是决定性的。
# 6.4.6. 使用“Global” Advisors
通过将星号附加到拦截器名称上,所有匹配的advisors 被添加到advisor链中。如果您需要添加一组标准的“Global” advisor,这可能会派上用场。以下示例定义了两个“Global” advisor:
<bean id="proxy" class="org.springframework.aop.framework.ProxyFactoryBean">
<property name="target" ref="service"/>
<property name="interceptorNames">
<list>
<value>global*</value>
</list>
</property>
</bean>
<bean id="global_debug" class="org.springframework.aop.interceptor.DebugInterceptor"/>
<bean id="global_performance" class="org.springframework.aop.interceptor.PerformanceMonitorInterceptor"/>
# 6.5. 简洁的代理定义
尤其是在定义事务代理时,您可能会得到许多类似的代理定义。父和子bean定义以及内部bean定义的使用可能会导致更清晰,更简洁的代理定义。
首先,我们为代理创建一个父模板bean定义,如下:
<bean id="txProxyTemplate" abstract="true"
class="org.springframework.transaction.interceptor.TransactionProxyFactoryBean">
<property name="transactionManager" ref="transactionManager"/>
<property name="transactionAttributes">
<props>
<prop key="*">PROPAGATION_REQUIRED</prop>
</props>
</property>
</bean>
这永远不会实例化,因此实际上是不完整的。然后,每个需要创建的代理都是子bean定义,它将父代理作为内部bean定义包裹起来。以下示例显示了这样的bean:
<bean id="myService" parent="txProxyTemplate">
<property name="target">
<bean class="org.springframework.samples.MyServiceImpl">
</bean>
</property>
</bean>
您可以从父模板中覆盖属性。在下面的示例中,我们覆盖事务传播设置:
<bean id="mySpecialService" parent="txProxyTemplate">
<property name="target">
<bean class="org.springframework.samples.MySpecialServiceImpl">
</bean>
</property>
<property name="transactionAttributes">
<props>
<prop key="get*">PROPAGATION_REQUIRED,readOnly</prop>
<prop key="find*">PROPAGATION_REQUIRED,readOnly</prop>
<prop key="load*">PROPAGATION_REQUIRED,readOnly</prop>
<prop key="store*">PROPAGATION_REQUIRED</prop>
</props>
</property>
</bean>
请注意,在父bean示例中,我们通过将abstract属性设置为true,将父bean的定义明确标记为抽象,所以其无法实例化。
应用程序上下文(但不是简单的bean工厂),默认情况下,预初始化所有单例bean 。因此,重要的是(至少对于单例bean),如果您有一个(父)bean的定义,您打算仅用作模板,则必须确保将abstract属性设置为true。否则,应用程序上下文实际上试图预初始化它。
# 6.6. 使用ProxyFactory编程式创建AOP代理
很容易通过Spring编程创建AOP代理。这使您可以在不依赖Spring IOC的情况下使用Spring AOP。
目标对象实现的接口会自动代理。以下列表显示了针对目标对象的代理创建,其中包含一个拦截器和一个通知:
ProxyFactory factory = new ProxyFactory(myBusinessInterfaceImpl);
factory.addAdvice(myMethodInterceptor);
factory.addAdvisor(myAdvisor);
MyBusinessInterface tb = (MyBusinessInterface) factory.getProxy();
第一步是构建一个org.springframework.aop.framework.ProxyFactory类型的对象。您可以使用目标对象(如前面的示例中)创建它,或者指定在构造函数中要代理的接口。
您可以添加通知(将拦截器作为一种专用通知),advisors或两者兼而有之,在ProxyFactory的生命周期中维护他们。如果添加了IntroductionInterceptionAroundAdvisor,则可以使代理实现其他接口。
关于ProxyFactory(从AdvisedSupport继承)也有一些便利方法,可让您添加其他通知类型,例如before 和throws 通知。AdvisedSupport是ProxyFactory和ProxyFactoryBean的超类。
💡在大多数应用程序中,将AOP代理创建与IOC框架集成是最佳实践。我们建议您将Java代码与AOP进行外部化配置。
# 6.7. 维护被通知的对象
无论你如何创建AOP代理,都可以使用org.springframework.aop.framework.Advised接口来维护它们。无论其实现哪些其他接口,任何AOP代理都可以转换为该接口。该接口包括以下方法:
Advisor[] getAdvisors();
void addAdvice(Advice advice) throws AopConfigException;
void addAdvice(int pos, Advice advice) throws AopConfigException;
void addAdvisor(Advisor advisor) throws AopConfigException;
void addAdvisor(int pos, Advisor advisor) throws AopConfigException;
int indexOf(Advisor advisor);
boolean removeAdvisor(Advisor advisor) throws AopConfigException;
void removeAdvisor(int index) throws AopConfigException;
boolean replaceAdvisor(Advisor a, Advisor b) throws AopConfigException;
boolean isFrozen();
getAdvisors()方法返回已添加到工厂的Advisor,拦截器或其他通知类型。如果添加了Advisor,则该索引的advisor返回是您添加的对象。如果您添加了拦截器或其他通知类型,则Spring使用总是返回true的切点将其包裹在advisor 中。因此,如果您添加了MethodInterceptor,则该索引返回的advisor 是一个DefaultPointcutAdvisor,它返回您的MethodInterceptor和与所有类和方法匹配的切点。
可以使用addAdvisor()方法来添加任何Advisor。通常,Advisor持有的切点和通知是通用的DefaultPointcutAdvisor,您可以将其与任何通知或切点一起使用(但不能用于introductions)。
默认情况下,即使创建代理,也可以添加或删除advisors 或拦截器。唯一的限制是不可能添加或删除introduction advisor,因为工厂的现有代理未显示接口更改。(您可以从工厂获得新的代理,以避免此问题。)
下面的示例显示,转换AOP代理到Advised的接口并检查和维护其通知:
Advised advised = (Advised) myObject;
Advisor[] advisors = advised.getAdvisors();
int oldAdvisorCount = advisors.length;
System.out.println(oldAdvisorCount + " advisors");
// Add an advice like an interceptor without a pointcut
// Will match all proxied methods
// Can use for interceptors, before, after returning or throws advice
advised.addAdvice(new DebugInterceptor());
// Add selective advice using a pointcut
advised.addAdvisor(new DefaultPointcutAdvisor(mySpecialPointcut, myAdvice));
assertEquals("Added two advisors", oldAdvisorCount + 2, advised.getAdvisors().length);
ℹ️生产中的业务对象是否可以修改建议有待商榷,尽管这是合法使用案例。但是,它在开发中可能非常有用(例如,在测试中)。有时,我们发现能够以拦截器或其他通知的形式添加测试代码非常有用,这能进入我们要测试的方法调用。(例如,通知可以为该方法创建的事务,在标记返回的事务回滚之前也许可以运行SQL以检查数据库是否正确更新。)
根据您创建代理的方式,通常可以设置一个frozen标志。在这种情况下,Advised的isFrozen()方法返回true,并且通过添加或删除来修改通知的任何尝试都会导致AopConfigException。在某些情况下,冻结通知对象状态的能力很有用(例如,防止调用代码删除安全拦截器)。
# 6.8. 使用"auto-proxy"
到目前为止,我们已经考虑了使用ProxyFactoryBean或类似的factory bean 明确创建AOP代理。
Spring还使我们可以使用“auto-proxy” bean 定义,该定义可以自动代理选定的bean 定义。这是在Spring的“bean post processor”基础架构上构建的,该基础架构可以修改任何bean 定义作为容器加载。
在此模型中,您在XML bean定义文件中设置了一些特殊的bean定义,以配置自动代理基础架构。这使您可以声明有资格进行自动代理的目标。您不需要使用ProxyFactoryBean。
有两种方法可以做到这一点:
- 通过使用在当前上下文中指定特定bean类的auto-proxy创建者。
- 一种自动创建的特殊情况,值得分别考虑:由源级元数据属性驱动的自动创建。
# 6.8.1. Auto-proxy bean定义
本节涵盖了由org.springframework.aop.framework.autoproxy软件包提供的自动创建器。
BeanNameAutoProxyCreator
BeanNameAutoProxyCreator类是BeanPostProcessor,它会自动为bean创建具有符合文字值或通配符的名称的bean代理。以下示例显示了如何创建BeanNameAutoProxyCreator bean:
<bean class="org.springframework.aop.framework.autoproxy.BeanNameAutoProxyCreator">
<property name="beanNames" value="jdk*,onlyJdk"/>
<property name="interceptorNames">
<list>
<value>myInterceptor</value>
</list>
</property>
</bean>
与ProxyFactoryBean一样,有一个interceptorNames属性,而不是拦截器列表,以允许原型advisors的正确行为。命名为“interceptors”可以是advisors 或任何通知类型。
就自动代理而言,使用BeanNameAutoProxyCreator的主要点是将相同的配置始终应用于多个对象,并具有最小的配置。它是将声明性事务应用于多个对象的流行选择。
在前面示例中,其名称匹配的bean定义(例如jdkMyBean和onlyJdk)是具有目标类的普通旧bean定义。AOP代理是由BeanNameAutoProxyCreator自动创建的。所有匹配的bean类也适用相同的通知。请注意,如果使用advisors(而不是前一个示例中的拦截器),则切点可能对不同的bean类应用。
DefaultAdvisorAutoProxyCreator
一个更通用,更强大的自动创造器是DefaultAdvisorAutoProxyCreator。其自动化在当前上下文中应用合格的advisors ,而无需在自动代理的advisors bean定义中包含特定的bean名称。它具有一致的配置的优先并且避免与BeanNameAutoProxyCreator重复的配置。
使用这种机制包括:
- 定义
DefaultAdvisorAutoProxyCreatorbean 定义。 - 在相同或相关的上下文中指定任何数量的advisors 。请注意,这些必须是advisors ,而不是拦截器或其他通知。这是必要的,因为必须有一个计算的切点,以检查候选bean定义的每个通知资格。
DefaultAdvisorAutoProxyCreator会自动计算每个advisor中包含的切点,以查看它应该适用于每个业务对象(例如businessObject1和businessObject2)的通知(如果有)。
这意味着可以自动将任何数量的advisors 应用于每个业务对象。如果在任何advisors 中的切点没有匹配的业务对象,则不会代理该对象。由于bean定义是针对新业务对象添加的,因此,如有必要,它们将自动代理。
一般而言,自动代理的优势是使调用者或依赖项获得一个未被通知的对象。在此ApplicationContext上调用getBean("businessObject1")返回AOP代理,而不是目标业务对象。(前面显示的“内部bean”惯用语也提供了此好处。)
以下示例创建了DefaultAdvisorAutoProxyCreatorbean和本节中讨论的其他元素:
<bean class="org.springframework.aop.framework.autoproxy.DefaultAdvisorAutoProxyCreator"/>
<bean class="org.springframework.transaction.interceptor.TransactionAttributeSourceAdvisor">
<property name="transactionInterceptor" ref="transactionInterceptor"/>
</bean>
<bean id="customAdvisor" class="com.mycompany.MyAdvisor"/>
<bean id="businessObject1" class="com.mycompany.BusinessObject1">
<!-- Properties omitted -->
</bean>
<bean id="businessObject2" class="com.mycompany.BusinessObject2"/>
如果您想一致地将相同的通知应用于许多业务对象,那么DefaultAdvisorAutoProxyCreator非常有用。基础架构定义到位后,您可以添加新的业务对象,而无需包含特定的代理配置。您还可以轻松地删除其他切面(例如,跟踪或性能监视切面),对配置的更改最小。
DefaultAdvisorAutoProxyCreator支持过滤(通过使用命名约定,因此只能计算某些advisors ,该advisors 允许在同一工厂使用多个不同的配置好的AdvisorAutoProxyCreators)和优先级。Advisors可以实现org.springframework.core.Ordered接口确保正确顺序。前面示例中使用的TransactionAttributeSourceAdvisor具有可配置的顺序。默认设置是无序的。
# 6.9. 使用TargetSource实现
Spring提供了在org.springframework.aop.TargetSource接口中表达的TargetSource的概念。该接口负责返回实现连接点的“目标对象”。每次AOP代理处理方法调用时,TargetSource实现都请求一个目标实例。
使用Spring AOP的开发人员通常不需要直接使用TargetSource实现,但这提供了一种强大的手段来支持池,热交换和其他复杂的目标。例如,通过使用池来管理实例,TargetSource池可以为每个调用返回不同目标实例。
如果您不指定TargetSource,则使用默认实现来包装本地对象。每个调用都会返回相同的目标(如您所期望的)。
本节的其余部分描述了Spring提供的标准目标来源以及如何使用它们。
💡当使用自定义目标源时,您的目标通常需要是原型而不是单例bean定义。这允许Spring在需要时创建一个新的目标实例。
# 6.9.1. 热交换目标源
org.springframework.aop.target.HotSwappableTargetSource可以切换AOP代理的目标,同时让调用者保持对它的引用。
更改目标源的目标立即生效。HotSwappableTargetSource是线程安全的。
您可以使用HotSwappableTargetSource上的swap()方法更改目标,如下所示:
HotSwappableTargetSource swapper = (HotSwappableTargetSource) beanFactory.getBean("swapper");
Object oldTarget = swapper.swap(newTarget);
以下示例显示了所需的XML定义:
<bean id="initialTarget" class="mycompany.OldTarget"/>
<bean id="swapper" class="org.springframework.aop.target.HotSwappableTargetSource">
<constructor-arg ref="initialTarget"/>
</bean>
<bean id="swappable" class="org.springframework.aop.framework.ProxyFactoryBean">
<property name="targetSource" ref="swapper"/>
</bean>
前面的swap()调用更改了可交换bean的目标。持有该bean的客户端不知道此变化,但会立即指向新目标。
尽管此示例没有添加任何通知(不需要添加通知以使用TargetSource),但是任何TargetSource都可以与任意通知一起使用。
# 6.9.2. 目标源池
使用池化目标源提供了与无状态会话EJB相似的编程模型,在该模型中,维护相同实例的池,方法调用将用于池中的免费对象。
Spring池和SLSB池之间的关键区别在于,Spring池可以应用于任何POJO。使用Spring,该服务可以以非侵入性方式应用。
Spring提供了对Commons Pool 2.2的支持,该池提供了相当有效的池化实现。您需要应用程序类路径上存在commons-pool jar包来使用此功能。您还可以子类化org.springframework.aop.target.AbstractPoolingTargetSource来支持任何其他池API。
ℹ️也支持 Commons Pool 1.5+,但从Spring 4.2起就过时了。
以下列表显示了一个示例配置:
<bean id="businessObjectTarget" class="com.mycompany.MyBusinessObject"
scope="prototype">
... properties omitted
</bean>
<bean id="poolTargetSource" class="org.springframework.aop.target.CommonsPool2TargetSource">
<property name="targetBeanName" value="businessObjectTarget"/>
<property name="maxSize" value="25"/>
</bean>
<bean id="businessObject" class="org.springframework.aop.framework.ProxyFactoryBean">
<property name="targetSource" ref="poolTargetSource"/>
<property name="interceptorNames" value="myInterceptor"/>
</bean>
请注意,目标对象(前面示例中的businessObjectTarget)必须是原型。这使得PoolingTargetSource实现创建了目标的新实例,以根据需要增长池。请参阅javadoc of AbstractPoolingTargetSource (opens new window)和您希望使用的有关其属性信息的具体子类。maxSize是最基本的且必须的属性。
在这种情况下,myInterceptor是拦截器的名称,需要在同一IOC上下文中定义。但是,您无需指定拦截器即可使用池。如果您只需要池而没有其他通知,不要设置interceptorNames属性。
您可以配置Spring,以便能够将任何池对象转换为org.springframework.aop.target.PoolingConfig接口,该接口通过introduction暴露了有关池的配置和当前大小的信息。您需要定义类似于以下的advisor :
<bean id="poolConfigAdvisor" class="org.springframework.beans.factory.config.MethodInvokingFactoryBean">
<property name="targetObject" ref="poolTargetSource"/>
<property name="targetMethod" value="getPoolingConfigMixin"/>
</bean>
该advisor 是通过在AbstractPoolingTargetSource类上调用便利方法来获得的,因此可以使用MethodInvokingFactoryBean。该advisor 的名称(这里的poolConfigAdvisor)必须在ProxyFactoryBean中的拦截器名单中。
转换定义如下:
PoolingConfig conf = (PoolingConfig) beanFactory.getBean("businessObject");
System.out.println("Max pool size is " + conf.getMaxSize());
ℹ️池无状态服务对象通常是不需要的。我们不认为这应该是默认选择,因为大多数无状态对象自然是线程安全的,并且如果资源被缓存,实例池是有问题的。
通过使用auto-proxying可以使用更简单的池。您可以设置任何自动创建者使用的TargetSource实现。
# 6.9.3. 原型目标源
设置“原型”目标源类似于设置池目标源。在这种情况下,在每个方法调用上都会创建目标的新实例。尽管在现代JVM中创建新对象的成本不高,但包装新对象的成本(满足其IOC依赖性)可能更昂贵。因此,您不应该在没有充分理由的情况下使用这种方法。
为此,您可以修改前面显示如下所示的poolTargetSource定义(为了清楚起见,我们还更改了名称):
<bean id="prototypeTargetSource" class="org.springframework.aop.target.PrototypeTargetSource">
<property name="targetBeanName" ref="businessObjectTarget"/>
</bean>
唯一的属性是目标bean的名称。继承用于目标源实现,以确保命名一致。与池目标源一样,目标bean必须是原型bean定义。
# 6.9.4. ThreadLocal 目标源
如果您需要为每个传入请求创建一个对象(每个线程),则ThreadLocal目标源很有用。ThreadLocal概念提供了JDK范围的设施,可将资源透明地存储在线程内。设置ThreadLocalTargetSource几乎与其他类型的目标源所解释的相同,如以下示例所示:
<bean id="threadlocalTargetSource" class="org.springframework.aop.target.ThreadLocalTargetSource">
<property name="targetBeanName" value="businessObjectTarget"/>
</bean>
ℹ️当在多线程和多个类加载器环境中使用时,ThreadLocal实例存在严重的问题(可能导致内存泄漏)。您应该始终考虑将ThreadLocal包装在其他类中,并且永远不要直接使用ThreadLocal本身(在包装器类中除外)。另外,您应该始终记住在本地线程正确设置和删除(后者仅涉及到ThreadLocal.set(null)调用)。无论如何,都应不设置,因为设置可能会导致有问题的行为。Spring的ThreadLocal 支持为您做到这一点,应始终考虑使用ThreadLocal实例,而无需其他适当的处理代码。
# 6.10. 定义新的通知类型
Spring AOP设计为可扩展的。虽然目前在内部使用拦截实施策略,但除了环绕通知的拦截,before通知,throws通知, after returning通知,还可以支持任意通知类型。
org.springframework.aop.framework.adapter软件包是一个SPI软件包,可在不更改核心框架的情况下添加新的自定义通知类型的支持。自定义通知类型的唯一约束是它必须实现org.aopalliance.aop.Advice标记接口。
有关更多信息,请参见org.springframework.aop.framework.adapter (opens new window)。
# 7. Null-safety
尽管Java不允许您使用其类型系统表达null安全性,但Spring Framework现在在org.springframework.lang软件包中提供以下注解,以使您声明API和字段的空值属性:
@Nullable(opens new window):表明特定参数,返回值或字段可以为null。@NonNull(opens new window): 表明特定的参数,返回值或字段不能为null(在@NonNullApi和@NonNullFields分别应用的参数 /返回值和字段上不需要)。@NonNullApi(opens new window): 软件包级别的注解,默认语义为声明参数和返回值非空。@NonNullFields(opens new window): 软件包级别的注解,默认语义为声明字段非空。
Spring框架本身利用了这些注解,但也可以在任何基于Spring的Java项目中使用它们来声明null-safe API和可选的null-safe字段。泛型参数,可变参数和数组元素尚不支持,但会在即将发布的版本中支持,请参阅SPR-15942 (opens new window) 获取有关最新信息。预计在Spring框架发行版(包括minor 次要版本)之间进行Nullability 声明微调。方法内部使用的类型的Nullability 不在此功能的范围之内。
ℹ️其他常见的库(例如Reactor和 Spring Data)提供了null-safe的API,这些API使用类似的nullability 布置,为Spring应用程序开发人员提供一致的整体体验。
# 7.1. 使用案例
除了提供有关Spring框架nullability的明确声明之外,这些注解还可以被IDE(例如IDEA 或Eclipse)使用,以提供与null-safety相关的有用警告,以在运行时避免NullPointerException。
由于Kotlin支持null-safety (opens new window) ,因此它们还用于在Kotlin项目中使用Spring API null-safe。Kotlin support documentation (opens new window)中提供了更多详细信息。
# 7.2. JSR-305元注解
Spring注解用JSR 305 (opens new window)注解进行元标注。JSR-305元注解使IDEA 或Kotlin等工具供应商以通用的方式提供 null-safety 支持,而无需对Spring注解进行硬编码。
不必或不建议将JSR-305依赖添加到工程类路径上以利用Spring null-safe API。只有在其代码库中使用null-safety注解的基于Spring的库等项目才能添加com.google.code.findbugs:jsr305:3.0.2,并配置Gradle配置的compileOnly属性或maven配置的provided属性以避免编译警告。
# 8. Data Buffers和Codecs(数据缓冲区和编解码器)
Java NIO 提供了ByteBuffer,但是许多库构建了自己的对性能有益字节缓冲区API,尤其是针对重复使用缓冲区和/或使用直接缓冲区的网络操作。例如,Netty具有ByteBuf层次结构,Undertow 使用XNIO,Jetty使用池化的字节缓冲区并释放回调等。spring-core提供了一组抽象来与各种字节缓冲区API一起使用,如下:
DataBufferFactory(opens new window)抽象 数据缓冲区的创建DataBuffer(opens new window) 代表一个字节缓冲区,可以 pooled (opens new window)(池化)DataBufferUtils(opens new window) 提供数据缓冲区的实用方法- Codecs (opens new window) 解码或编码流数据缓冲流到更高级别的对象
# 8.1. DataBufferFactory
DataBufferFactory用一下两种方式之一创建数据缓冲区:
- 分配一个新的数据缓冲区,可选地预先指定容量,即使DataBuffer的实现可以根据需求增长和收缩,这将更有效。
- 包装现有的byte[]或java.nio.ByteBuffer,通过DataBuffer实现来装饰给定的数据,并且不涉及分配。
请注意,WebFlux应用程序不会直接创建DataBufferFactory,而是通过ServerHttpResponse或客户端上的ClientHttpRequest访问它。工厂的类型取决于基础客户端或服务器,例如Reactor Netty的NettyDataBufferFactory,其他的DefaultDataBufferFactory。
# 8.2. DataBuffer
DataBuffer接口提供了与java.nio.ByteBuffer相似的操作,但也带来了一些其他好处,其中一些受到Netty ByteBuf的启发。以下是一部分好处清单:
- 读写独立位置,即不需要调用flip()以在读写之间进行交替。
- 与java.lang.StringBuilder一样,容量按需扩容。
- 池化缓冲区和通过PooledDatabuffer
PooledDataBuffer(opens new window)引用计数。 - 将缓冲区视为
java.nio.ByteBuffer,InputStream, orOutputStream。 - 确定给定字节的索引或最后一个索引。
# 8.3. PooledDataBuffer
正如ByteBuffer (opens new window)中所解释的那样,字节缓冲区可以是直接的或非直接的。直接缓冲区可能位于Java堆之外,这消除了对本机I/O操作复制的需求。这使得直接缓冲区对于接收和发送数据特别有用,但是它们的创建和释放也更昂贵,这造就了池化缓冲区的想法。
PooledDataBuffer是DataBuffer的扩展,可帮助引用计数,这对于字节缓冲区池至关重要。它是如何工作的?当分配PooledDataBuffer时,引用计数为1。调用retain()递增计数,调用release()减低计数。只要计数高于0,缓冲区就可以保证不释放。当计数减少到0时,可以释放池的缓冲区,实际上,这可能意味着缓冲区的保留内存返回到内存池。
请注意,与其直接在PooledDataBuffer上操作,在大多数情况下,最好使用DataBufferUtils中的便利方法,这些方便方法仅在PooledDataBuffer的实例时才将发布或保留到DataBuffer中。
# 8.4. DataBufferUtils
DataBufferUtils提供了许多实用程序方法来在数据缓冲区上操作:
- 将数据缓冲区流加入可能具有zero copy的单个缓冲区,例如通过复合缓冲区(如果基础字节缓冲区API支持)。
- 将InputStream或NIO Channel转换为
Flux<DataBuffer>,反之亦然,Publisher<DataBuffer>转换为OutputStream或NIO Channel。 - 如果缓冲区是PooledDataBuffer的实例,则释放或保留DataBuffer的方法
- 从字节流或从特定字节计数中跳过。
# 8.5. 编解码器
org.springframework.core.codec软件包提供以下策略接口:
Encoder编码Publisher<T>到数据缓冲区流Decoder解码Publisher<DataBuffer>为高级对象
spring-core模块提供字节byte[],ByteBuffer,DataBuffer,Resource和String编码器和解码器实现。spring-web模块添加了 Jackson JSON, Jackson Smile, JAXB2,Protocol Buffers以及其他编码器和解码器。请参阅WebFlux部分中的Codecs (opens new window) 。
# 8.6. 使用DataBuffer
使用数据缓冲区时,必须特别注意确保释放缓冲区,因为它们可能会池化pooled (opens new window)。我们将使用编解码器来说明其工作原理,但这些概念更普遍地适用。让我们看看编解码器必须在内部进行哪些编解码来管理数据缓冲区。
在创建更高级别的对象之前,Decoder是最后读取输入数据缓冲区的,因此必须如下释放它们:
- 如果解码器只是简单地读取每个输入缓冲区并准备立即释放它,则可以通过DataBufferUtils.release(dataBuffer))进行此操作。
- 如果Decoder使用Flux或Mono操作,例如flatMap,reduce,以及其他内部预取数据项的其他操作,或者使用诸如filter,skip和其他leave out操作,则doOnDiscard(PooledDataBuffer.class, DataBufferUtils::release)必须添加到组合链中,以确保在丢弃之前释放此类缓冲区,可能也出导致错误或取消信号。
- 如果Decoder以任何其他方式保留一个或多个数据缓冲区,则必须确保在完全读取时释放它们,或者在读取和释放缓存数据缓冲区之前发生错误或取消信号。
请注意,DataBufferUtils#join提供了一种安全有效的方法,将数据缓冲区流汇总到单个数据缓冲区中。同样,skipUntilByteCount和takeUntilByteCount也是用于使用解码器的其他安全方法。
Encoder分配了其他人必须读取(并释放)的数据缓冲区。因此,编码器没有太多事情要做。但是,如果在用数据填充缓冲区时发生序列化错误,则编码器必须注意释放数据缓冲区。例如:
DataBuffer buffer = factory.allocateBuffer();
boolean release = true;
try {
// serialize and populate buffer..
release = false;
}
finally {
if (release) {
DataBufferUtils.release(buffer);
}
}
return buffer;
Encoder的消费者负责释放其收到的数据缓冲区。在WebFlux应用程序中,Encoder的输出用于写入HTTP服务器响应或客户端HTTP请求,在这种情况下,释放数据缓冲区的责任是将代码写入服务器响应或客户端。
请注意,在Netty上运行时,会有调试选项以解决troubleshooting buffer leaks (opens new window)(缓冲区泄漏的故障排除 )。
# 9. Logging
从Spring框架5.0以来,Spring在spring-jcl模块中携带了自己的Commons Logging 桥接实现。该实现检查类路径中是否存在 Log4j 2.x API和 SLF4J 1.7 API,并将发现的第一个作为日志记录实现,如果 Log4j 2.x和SLF4J都不可用则使用Java平台的核心日志设施(也称为JUL 或java.util.logging)。
将Log4j 2.x或Logback (或其他SLF4J 提供者)放在您的类路径中,而无需任何额外的桥接,然后让框架自动适应您的选择。有关更多信息,请参见 Spring Boot Logging Reference Documentation (opens new window)。
ℹ️Spring的Commons Logging变体仅用于核心框架和扩展中的基础架构日志记录。对于应用程序代码中的日志需求,请选择直接使用Log4j 2.x, SLF4J, 和JUL。
如以下示例,可以通过org.apache.commons.logging.LogFactory检索日志实现:
public class MyBean {
private final Log log = LogFactory.getLog(getClass());
// ...
}
# 10. 附录
# 10.1. XML Schema
附录的这一部分列出了与核心容器相关的XML模式。
# 10.1.1. uti Schema
顾名思义,util标签处理常见的实用程序配置问题,例如配置集合,引用常数等。要使用util模式中的标签,您需要在Spring XML配置文件顶部具有以下序言(代码片段引用正确架构,以便您可以使用util命名空间中的标签):
<?xml version="1.0" encoding="UTF-8"?>
<beans xmlns="http://www.springframework.org/schema/beans"
xmlns:xsi="http://www.w3.org/2001/XMLSchema-instance"
xmlns:util="http://www.springframework.org/schema/util"
xsi:schemaLocation="
http://www.springframework.org/schema/beans https://www.springframework.org/schema/beans/spring-beans.xsd
http://www.springframework.org/schema/util https://www.springframework.org/schema/util/spring-util.xsd">
<!-- bean definitions here -->
</beans>
使用<util:constant/>
考虑以下bean定义:
<bean id="..." class="...">
<property name="isolation">
<bean id="java.sql.Connection.TRANSACTION_SERIALIZABLE"
class="org.springframework.beans.factory.config.FieldRetrievingFactoryBean" />
</property>
</bean>
前面的配置使用Spring FactoryBean实现(FieldRetrievingFactoryBean)将bean上isolation属性的值设置为java.sql.Connection.TRANSACTION_SERIALIZABLE。这一切都很好,但是它是冗长的,(不必要地)将Spring的内部管道暴露给最终用户。
以下基于XML模式的版本更简洁,清楚地表达了开发人员的意图(“注入此常量”),并且可读性更好:
<bean id="..." class="...">
<property name="isolation">
<util:constant static-field="java.sql.Connection.TRANSACTION_SERIALIZABLE"/>
</property>
</bean>
从字段值设置bean属性或构造函数参数
FieldRetrievingFactoryBean (opens new window)是检索静态或非静态字段值的FactoryBean。它通常用于检索publicstaticfinal常量,然后可以用此来为另一个bean设置属性值或构造函数参数。
下面的示例显示了使用staticField (opens new window)属性如何暴露static字段:
<bean id="myField"
class="org.springframework.beans.factory.config.FieldRetrievingFactoryBean">
<property name="staticField" value="java.sql.Connection.TRANSACTION_SERIALIZABLE"/>
</bean>
还有一个方便用法,将static字段指定为bean名称,如下示例显示:
<bean id="java.sql.Connection.TRANSACTION_SERIALIZABLE"
class="org.springframework.beans.factory.config.FieldRetrievingFactoryBean"/>
这确实意味着bean id不再有任何选择(因此,任何其他引用它的bean也必须使用此更长的名称),但是这种形式非常方便用作内部bean,因为不必为bean引用指定id,如以下示例所示:
<bean id="..." class="...">
<property name="isolation">
<bean id="java.sql.Connection.TRANSACTION_SERIALIZABLE"
class="org.springframework.beans.factory.config.FieldRetrievingFactoryBean" />
</property>
</bean>
您还可以访问另一个bean的非静态(实例)字段,如FieldRetrievingFactoryBean (opens new window)类中的API文档中所述。
在Spring中将枚举值注入到bean作为属性或构造函数参数很容易做到。您实际上不必做任何事情或了解Spring内部细节(甚至是诸如FieldRetrievingFactoryBean)。以下示例显示了注入枚举值:
package javax.persistence;
public enum PersistenceContextType {
TRANSACTION,
EXTENDED
}
现在考虑以下类型的PersistenceContextType的setter方法和相应的bean定义:
package example;
public class Client {
private PersistenceContextType persistenceContextType;
public void setPersistenceContextType(PersistenceContextType type) {
this.persistenceContextType = type;
}
}
<bean class="example.Client">
<property name="persistenceContextType" value="TRANSACTION"/>
</bean>
使用<util:property-path/>
考虑以下示例:
<!-- target bean to be referenced by name -->
<bean id="testBean" class="org.springframework.beans.TestBean" scope="prototype">
<property name="age" value="10"/>
<property name="spouse">
<bean class="org.springframework.beans.TestBean">
<property name="age" value="11"/>
</bean>
</property>
</bean>
<!-- results in 10, which is the value of property 'age' of bean 'testBean' -->
<bean id="testBean.age" class="org.springframework.beans.factory.config.PropertyPathFactoryBean"/>
前面的配置使用Spring FactoryBean实现(PropertyPathFactoryBean)创建一个称为testBean.age的bean,其值等于testBean的age属性。
现在考虑以下示例,该示例添加了一个<util:property-path/>元素:
<!-- target bean to be referenced by name -->
<bean id="testBean" class="org.springframework.beans.TestBean" scope="prototype">
<property name="age" value="10"/>
<property name="spouse">
<bean class="org.springframework.beans.TestBean">
<property name="age" value="11"/>
</bean>
</property>
</bean>
<!-- results in 10, which is the value of property 'age' of bean 'testBean' -->
<util:property-path id="name" path="testBean.age"/>
<property-path/>元素的path属性的值遵循beanName.beanProperty的形式。在这种情况下,它取了名为testBean的age属性。该age的值为10。
使用<util:property-path/>设置bean属性或构造函数参数
PropertyPathFactoryBean是FactoryBean,可以计算给定目标对象上的属性路径。可以直接指定目标对象,也可以通过bean名称指定目标对象。然后,您可以在另一个bean定义中使用此值作为属性值或构造函数参数。
以下示例显示了在另一个bean中使用路径的示例:
<!-- target bean to be referenced by name -->
<bean id="person" class="org.springframework.beans.TestBean" scope="prototype">
<property name="age" value="10"/>
<property name="spouse">
<bean class="org.springframework.beans.TestBean">
<property name="age" value="11"/>
</bean>
</property>
</bean>
<!-- results in 11, which is the value of property 'spouse.age' of bean 'person' -->
<bean id="theAge"
class="org.springframework.beans.factory.config.PropertyPathFactoryBean">
<property name="targetBeanName" value="person"/>
<property name="propertyPath" value="spouse.age"/>
</bean>
在下面的示例中,路径值在内部bean中得到:
<!-- results in 12, which is the value of property 'age' of the inner bean -->
<bean id="theAge"
class="org.springframework.beans.factory.config.PropertyPathFactoryBean">
<property name="targetObject">
<bean class="org.springframework.beans.TestBean">
<property name="age" value="12"/>
</bean>
</property>
<property name="propertyPath" value="age"/>
</bean>
还有一个简短形式,其中bean名称是属性路径。如以下示例:
<!-- results in 10, which is the value of property 'age' of bean 'person' -->
<bean id="person.age"
class="org.springframework.beans.factory.config.PropertyPathFactoryBean"/>
此形式确实意味着bean名称别无选择。对其的任何引用也必须使用相同的id,即路径。如果用作内bean,则根本不需要引用它,如以下示例所示:
<bean id="..." class="...">
<property name="age">
<bean id="person.age"
class="org.springframework.beans.factory.config.PropertyPathFactoryBean"/>
</property>
</bean>
您可以在实际定义中专门设置结果类型。对于大多数用例,这不是必需的,但有时可能有用。有关此功能的更多信息,请参见Javadoc。
使用<util:properties/>
考虑以下示例:
<!-- creates a java.util.List instance with values loaded from the supplied 'sourceList' -->
<bean id="emails" class="org.springframework.beans.factory.config.ListFactoryBean">
<property name="sourceList">
<list>
<value>pechorin@hero.org</value>
<value>raskolnikov@slums.org</value>
<value>stavrogin@gov.org</value>
<value>porfiry@gov.org</value>
</list>
</property>
</bean>
前面的配置使用Spring FactoryBean实现(ListFactoryBean)来创建java.util.List实例,并从提供的sourceList获取的值初始化它。
以下示例使用<util:list/>元素来更简洁的表示:
<!-- creates a java.util.List instance with the supplied values -->
<util:list id="emails">
<value>pechorin@hero.org</value>
<value>raskolnikov@slums.org</value>
<value>stavrogin@gov.org</value>
<value>porfiry@gov.org</value>
</util:list>
您还可以通过使用<util:list/>元素上的list-class属性来实例化和填充确切List类型。例如,如果我们确实需要用java.util.LinkedList进行实例化,则可以使用以下配置:
<util:list id="emails" list-class="java.util.LinkedList">
<value>jackshaftoe@vagabond.org</value>
<value>eliza@thinkingmanscrumpet.org</value>
<value>vanhoek@pirate.org</value>
<value>d'Arcachon@nemesis.org</value>
</util:list>
如果未提供list-class属性,则容器会选择List实现。
使用<util:map/>
考虑以下示例:
<!-- creates a java.util.Map instance with values loaded from the supplied 'sourceMap' -->
<bean id="emails" class="org.springframework.beans.factory.config.MapFactoryBean">
<property name="sourceMap">
<map>
<entry key="pechorin" value="pechorin@hero.org"/>
<entry key="raskolnikov" value="raskolnikov@slums.org"/>
<entry key="stavrogin" value="stavrogin@gov.org"/>
<entry key="porfiry" value="porfiry@gov.org"/>
</map>
</property>
</bean>
前面的配置使用Spring FactoryBean实现(MapFactoryBean)来创建java.util.Map实例,并使用从提供的'sourceMap'中获取的键值对初始化。
以下示例使用<util:map/>元素来更简洁的表示:
<!-- creates a java.util.Map instance with the supplied key-value pairs -->
<util:map id="emails">
<entry key="pechorin" value="pechorin@hero.org"/>
<entry key="raskolnikov" value="raskolnikov@slums.org"/>
<entry key="stavrogin" value="stavrogin@gov.org"/>
<entry key="porfiry" value="porfiry@gov.org"/>
</util:map>
您还可以通过在<util:map/>元素上使用'map-class'属性来实例化和填充的Map确切类型。例如,如果我们确实需要实例化java.util.TreeMap,则可以使用以下配置:
<util:map id="emails" map-class="java.util.TreeMap">
<entry key="pechorin" value="pechorin@hero.org"/>
<entry key="raskolnikov" value="raskolnikov@slums.org"/>
<entry key="stavrogin" value="stavrogin@gov.org"/>
<entry key="porfiry" value="porfiry@gov.org"/>
</util:map>
如果未提供'map-class'属性,则容器会选择Map实现。
使用<util:set/>
考虑以下示例:
<!-- creates a java.util.Set instance with values loaded from the supplied 'sourceSet' -->
<bean id="emails" class="org.springframework.beans.factory.config.SetFactoryBean">
<property name="sourceSet">
<set>
<value>pechorin@hero.org</value>
<value>raskolnikov@slums.org</value>
<value>stavrogin@gov.org</value>
<value>porfiry@gov.org</value>
</set>
</property>
</bean>
前面的配置使用Spring FactoryBean实现(SetFactoryBean)来创建java.util.Set实例,并使用从提供的sourceSet中获取的值初始化。
以下示例使用<util:set/>元素来更简洁的表示:
<!-- creates a java.util.Set instance with the supplied values -->
<util:set id="emails">
<value>pechorin@hero.org</value>
<value>raskolnikov@slums.org</value>
<value>stavrogin@gov.org</value>
<value>porfiry@gov.org</value>
</util:set>
您还可以通过使用<util:set/>元素上的set-class属性来实例化和填充的确切Set类型。例如,如果我们确实需要实例化java.util.TreeSet,则可以使用以下配置:
<util:set id="emails" set-class="java.util.TreeSet">
<value>pechorin@hero.org</value>
<value>raskolnikov@slums.org</value>
<value>stavrogin@gov.org</value>
<value>porfiry@gov.org</value>
</util:set>
如果未提供set-class属性,则容器会选择Set实现。
# 10.1.2. aopSchema
aop标签涉及Spring中所有AOP 配置,包括Spring自己的基于代理的AOP框架以及Spring集成的AspectJ AOP 框架。这些标签在标题为Aspect Oriented Programming with Spring (opens new window)的章节中得到了全面介绍。
为了完整使用aop模式中的标签,您需要在Spring XML配置文件的顶部引入以下文件头:
<?xml version="1.0" encoding="UTF-8"?>
<beans xmlns="http://www.springframework.org/schema/beans"
xmlns:xsi="http://www.w3.org/2001/XMLSchema-instance"
xmlns:aop="http://www.springframework.org/schema/aop"
xsi:schemaLocation="
http://www.springframework.org/schema/beans https://www.springframework.org/schema/beans/spring-beans.xsd
http://www.springframework.org/schema/aop https://www.springframework.org/schema/aop/spring-aop.xsd">
<!-- bean definitions here -->
</beans>
# 10.1.3. contextSchema
context标签涉及与ApplicationContext有关的配置 - 不仅是通常对最终用户很重要的bean,而且Spring中很多内部bean,例如BeanfactoryPostProcessors。如以下配置片段引入:
<?xml version="1.0" encoding="UTF-8"?>
<beans xmlns="http://www.springframework.org/schema/beans"
xmlns:xsi="http://www.w3.org/2001/XMLSchema-instance"
xmlns:context="http://www.springframework.org/schema/context"
xsi:schemaLocation="
http://www.springframework.org/schema/beans https://www.springframework.org/schema/beans/spring-beans.xsd
http://www.springframework.org/schema/context https://www.springframework.org/schema/context/spring-context.xsd">
<!-- bean definitions here -->
</beans>
使用<property-placeholder/>
该元素激活$ {…}占位符的替换,这些占位符可以根据指定的属性文件(作为Spring resource location (opens new window))解析。该元素是一种便利机制,为您设置了PropertySourcesPlaceholderConfigurer (opens new window)。如果您需要对特定的PropertySourcesPlaceholderConfigurer设置进行更多控制,则可以明确地将其定义为bean。
使用<annotation-config/>
该元素激活Spring基础架构以检测bean类中的注解:
- Spring的
@Configuration(opens new window) 模型 @Autowired/@Inject(opens new window) 和@Value- JSR-250的
@Resource,@PostConstruct和@PreDestroy - JPA的
@PersistenceContext和@PersistenceUnit` - Spring的
@EventListener(opens new window)
另外,您可以选择明确激活这些注解的BeanPostProcessors。
ℹ️该元素不会激活Spring
@Transactional(opens new window)注解的处理;您可以使用<tx:annotation-driven/>。同样,Spring的缓存注解也需要明确启用 (opens new window) 。
使用<component-scan/>
该元素在 annotation-based container configuration (opens new window)中详细介绍。
使用<load-time-weaver/>
该元素在 load-time weaving with AspectJ in the Spring Framework (opens new window)中详细介绍。
使用<spring-configured/>
该元素在using AspectJ to dependency inject domain objects with Spring (opens new window)中详细介绍。
使用mbean-export/>
该元素在configuring annotation-based MBean export (opens new window)中详细介绍。
# 10.1.4. Beans Schema
最后一点,beans schema中有很多元素。这些元素自框架诞生以来就一直存在。此处未显示beans结构中各种元素的示例,因为它们在 dependencies and configuration in detail (opens new window)中详细介绍(实际上是在整个chapter (opens new window)中)。
请注意,您可以将零或更多的键值对添加到<bean/>XML定义中。如果有的话,使用此额外的元数据完全取决于您自己的自定义逻辑(如果您按照标题为XML Schema Authoring (opens new window)的附录中所述编写自己的自定义元素)。
以下示例在<bean/>上下文中使用了<meta/>元素(请注意,在没有任何逻辑解释的情况下,元数据实际上是无用的)。
<?xml version="1.0" encoding="UTF-8"?>
<beans xmlns="http://www.springframework.org/schema/beans"
xmlns:xsi="http://www.w3.org/2001/XMLSchema-instance"
xsi:schemaLocation="
http://www.springframework.org/schema/beans https://www.springframework.org/schema/beans/spring-beans.xsd">
<bean id="foo" class="x.y.Foo">
<meta key="cacheName" value="foo"/>
<property name="name" value="Rick"/>
</bean>
</beans>
在上一个示例中,您可以假设有一些逻辑可以使用bean定义并使用所提供元数据设置一些缓存基础架构。
# 10.2. XML Schema创作
自2.0版本以来,Spring具有将基于schema的扩展添加到基本的Spring XML格式的机制,用于定义和配置bean。本节介绍了如何编写自己的自定义XML Bean定义解析器,并将此类解析器集成到Spring IOC容器中。
为了帮助使用schema感知XML编辑器去创作配置文件,Spring的可扩展XML配置机制基于XML架构。如果您不熟悉标准Spring发行版附带的XML配置扩展,则应首先阅读XML Schemas (opens new window)。
创建新的XML配置扩展:
- Author (opens new window) 一个XML schema来描述你的自定义元素
- Code (opens new window) 一个自定义
NamespaceHandler实现 - Code (opens new window) 一个或多个
BeanDefinitionParser实现(解析工作在此完成) - 在Spring Register (opens new window) 你的心新 artifacts
我们可以创建一个XML扩展名(自定义XML元素),该扩展名使我们能够配置SimpleDateFormat类型的对象(来自java.text软件包)。完成后,我们将能够定义类型为SimpleDateFormat的bean定义:
<myns:dateformat id="dateFormat"
pattern="yyyy-MM-dd HH:mm"
lenient="true"/>
(我们在本附录稍后包含更详细的示例。第一个简单示例的目的是引导您浏览进行自定义扩展的基本步骤。)
# 10.2.1. 编写Schema
创建XML配置扩展名与Spring的IOC容器一起使用,从创建XML架构来描述扩展程序开始。对于我们的示例,我们使用以下架构来配置SimpleDateFormat对象:
<!-- myns.xsd (inside package org/springframework/samples/xml) -->
<?xml version="1.0" encoding="UTF-8"?>
<xsd:schema xmlns="http://www.mycompany.example/schema/myns"
xmlns:xsd="http://www.w3.org/2001/XMLSchema"
xmlns:beans="http://www.springframework.org/schema/beans"
targetNamespace="http://www.mycompany.example/schema/myns"
elementFormDefault="qualified"
attributeFormDefault="unqualified">
<xsd:import namespace="http://www.springframework.org/schema/beans"/>
<xsd:element name="dateformat">
<xsd:complexType>
<xsd:complexContent>
<xsd:extension base="beans:identifiedType"> 1️⃣
<xsd:attribute name="lenient" type="xsd:boolean"/>
<xsd:attribute name="pattern" type="xsd:string" use="required"/>
</xsd:extension>
</xsd:complexContent>
</xsd:complexType>
</xsd:element>
</xsd:schema>
1️⃣指示的行包含所有可识别标签的扩展基础(这意味着它们具有我们可以用作bean标识符的id属性)。我们可以使用此属性,因为我们导入了Spring提供的beans命名空间。
前面的架构使我们可以通过使用<myns:dateformat/>元素在XML应用程序上下文文件中配置SimpleDateFormat对象,如下示例显示:
<myns:dateformat id="dateFormat"
pattern="yyyy-MM-dd HH:mm"
lenient="true"/>
请注意,在我们创建基础架构类后,前面XML片段基本与以下XML片段相同:
<bean id="dateFormat" class="java.text.SimpleDateFormat">
<constructor-arg value="yyyy-HH-dd HH:mm"/>
<property name="lenient" value="true"/>
</bean>
第二个配置片段在容器中创建一个bean(由类型为SimpleDateFormat的dateFormat标识),并设置了几个属性。
ℹ️基于schema的方法来创建配置格式,可以与具有schema感知XML编辑器的IDE紧密集成。通过使用适当的架构,您可以使用自动补全来让用户在枚举中定义的几个配置选项之间进行选择。
# 10.2.2. 编码NamespaceHandler
除了schema外,我们还需要一个NamespaceHandler将这个特定名称空间的所有元素解析。在此示例中,NamespaceHandler应该关注myns:dateformat元素的解析。
NamespaceHandler接口有三个方法:
init(): 允许对NamespaceHandler的初始化,并在使用处理程序之前由Spring调用。BeanDefinition parse(Element, ParserContext):当Spring遇到顶层元素时(未嵌套在bean定义或不同的名称空间中)时调用。此方法本身可以注册bean定义,或返回bean定义。BeanDefinitionHolder decorate(Node, BeanDefinitionHolder, ParserContext): 当Spring遇到不同名称空间的属性或嵌套元素时调用。使用 scopes that Spring supports (opens new window)修饰一个或多个bean定义。我们首先要突出显示一个简单的示例,而无需修饰,然后在一个更高级的示例中显示修饰。
尽管您可以为整个命名空间编码自己的NamespaceHandler(因此提供了解析名称空间中每个元素的代码),但通常情况下,每个顶层XML 元素在Spring XML配置文件中都会产生单个bean定义(如在我们的情况下,其中一个<myns:dateformat/>元素会产生单个SimpleDateFormat bean定义)。Spring设有许多方便类,以支持这种情况。在下面的示例中,我们使用NamespaceHandlerSupport类:
package org.springframework.samples.xml;
import org.springframework.beans.factory.xml.NamespaceHandlerSupport;
public class MyNamespaceHandler extends NamespaceHandlerSupport {
public void init() {
registerBeanDefinitionParser("dateformat", new SimpleDateFormatBeanDefinitionParser());
}
}
您可能会注意到,该类实际上没有很多解析逻辑。确实,NamespaceHandlerSupport类具有内置的委托概念。它支持任何数量的BeanDefinitionParser实例的注册,并将其委派给其何时需要在其名称空间中解析元素的BeanDefinitionParser。这种干净的关注点使NamespaceHandler将其在其名称空间中所有自定义元素的解析进行编排,同时委派给BeanDefinitionParsers来完成XML解析的基本工作。这意味着每个BeanDefinitionParser仅包含解析单个自定义元素的逻辑,正如我们在下一步中所看到的那样。
# 10.2.3. 使用BeanDefinitionParser
如果NamespaceHandler遇到已映射到特定的bean定义解析器的类型的XML元素(在这种情况下为dateformat),则使用BeanDefinitionParser。换句话说,BeanDefinitionParser负责解析schema中定义的一个不重复的顶层XML元素。在解析器中,我们可以访问XML元素(也可以访问其子元素),以便我们可以看到自定义XML内容:
package org.springframework.samples.xml;
import org.springframework.beans.factory.support.BeanDefinitionBuilder;
import org.springframework.beans.factory.xml.AbstractSingleBeanDefinitionParser;
import org.springframework.util.StringUtils;
import org.w3c.dom.Element;
import java.text.SimpleDateFormat;
public class SimpleDateFormatBeanDefinitionParser extends AbstractSingleBeanDefinitionParser { 1️⃣
protected Class getBeanClass(Element element) {
return SimpleDateFormat.class; 2️⃣
}
protected void doParse(Element element, BeanDefinitionBuilder bean) {
// this will never be null since the schema explicitly requires that a value be supplied
String pattern = element.getAttribute("pattern");
bean.addConstructorArgValue(pattern);
// this however is an optional property
String lenient = element.getAttribute("lenient");
if (StringUtils.hasText(lenient)) {
bean.addPropertyValue("lenient", Boolean.valueOf(lenient));
}
}
}
1️⃣我们使用Spring提供的AbstractSingleBeanDefinitionParser来处理很多创建单个BeanDefinition的基本工作。
2️⃣我们为我们的AbstractSingleBeanDefinitionParser超类提供了我们的BeanDefinition代表的类型。
在这个简单的示例中,这就是我们需要做的。我们的单个BeanDefinition的创建由AbstractSingleBeanDefinitionParser超类处理,bean定义唯一标识符的提取和设置也是如此。
# 10.2.4. 注册处理器和Schema
编码已完成。剩下的要做的就是使Spring XML解析基础架构意识到我们的自定义元素。我们通过在两个特殊用途属性文件中注册自定义namespaceHandler和自定义XSD文件来做到这一点。这些属性文件都放在应用程序中的META-INF目录中,例如,可以与您的二进制类一起分布在JAR文件中。Spring XML解析基础架构通过消费这些特殊属性文件自动拾取您的新扩展名,其格式在接下来的两个部分中详细介绍。
编写META-INF/spring.handlers
名为spring.handlers的属性文件包含XML Schema URIs到名称空间处理程序类的映射。就我们的示例而言,我们需要编写以下内容:
http\://www.mycompany.example/schema/myns=org.springframework.samples.xml.MyNamespaceHandler
(:字符是Java属性格式中的有效分割符,因此URI中的:字符需要用反斜杠来转义。)
键值对的第一部分(键)是与您的自定义名称空间扩展程序关联的URI,并且需要完全匹配targetNamespace属性的值,如自定义XSD架构中指定的那样。
编写 META-INF/spring.schemas
名为spring.schemas的属性文件包含XML Schema 定位(作为xsi:schemaLocation属性的一部分)到类路径资源的映射。需要此文件来防止Spring使用默认的EntityResolver,该EntityResolver需要网络访问才能检索schema文件。如果您在此属性文件中指定映射,则Spring搜索类路径上的schema(在这种情况下为org.springframework.samples.xml软件包中的myns.xsd)。以下片段显示了我们需要为自定义schema添加的行:
http\://www.mycompany.example/schema/myns/myns.xsd=org/springframework/samples/xml/myns.xsd
(请记住,:需要转义)。
鼓励您将XSD文件(或文件列表)直接与类路径上的NamespaceHandler及BeanDefinitionParser类一起部署。
# 10.2.5. 在Spring XML配置中使用自定义扩展
使用您自己实现的自定义扩展名与使用Spring提供的“自定义”扩展没有区别。以下示例使用上一步中开发的在Spring XML配置文件中的自定义<dateFormat/>元素:
<?xml version="1.0" encoding="UTF-8"?>
<beans xmlns="http://www.springframework.org/schema/beans"
xmlns:xsi="http://www.w3.org/2001/XMLSchema-instance"
xmlns:myns="http://www.mycompany.example/schema/myns"
xsi:schemaLocation="
http://www.springframework.org/schema/beans https://www.springframework.org/schema/beans/spring-beans.xsd
http://www.mycompany.example/schema/myns http://www.mycompany.com/schema/myns/myns.xsd">
<!-- as a top-level bean -->
<myns:dateformat id="defaultDateFormat" pattern="yyyy-MM-dd HH:mm" lenient="true"/> 1️⃣
<bean id="jobDetailTemplate" abstract="true">
<property name="dateFormat">
<!-- as an inner bean -->
<myns:dateformat pattern="HH:mm MM-dd-yyyy"/>
</property>
</bean>
</beans>
1️⃣我们的自定义bean
# 10.2.6. 更多示例
本节介绍了一些自定义XML扩展程序的更详细的示例。
在自定义元素中嵌套自定义元素
本节中介绍的示例显示了您如何编写满足以下配置目标所需的各种artifacts :
<?xml version="1.0" encoding="UTF-8"?>
<beans xmlns="http://www.springframework.org/schema/beans"
xmlns:xsi="http://www.w3.org/2001/XMLSchema-instance"
xmlns:foo="http://www.foo.example/schema/component"
xsi:schemaLocation="
http://www.springframework.org/schema/beans https://www.springframework.org/schema/beans/spring-beans.xsd
http://www.foo.example/schema/component http://www.foo.example/schema/component/component.xsd">
<foo:component id="bionic-family" name="Bionic-1">
<foo:component name="Mother-1">
<foo:component name="Karate-1"/>
<foo:component name="Sport-1"/>
</foo:component>
<foo:component name="Rock-1"/>
</foo:component>
</beans>
前面的配置嵌套了自定义扩展。实际上由<foo:component/>元素配置的类是Component类(如下一个示例显示)。请注意,Component类是如何不暴露Component属性的设置器方法。这使得很难(或不可能)使用setter注入为Component类配置bean定义。以下清单显示Component类:
package com.foo;
import java.util.ArrayList;
import java.util.List;
public class Component {
private String name;
private List<Component> components = new ArrayList<Component> ();
// mmm, there is no setter method for the 'components'
public void addComponent(Component component) {
this.components.add(component);
}
public List<Component> getComponents() {
return components;
}
public String getName() {
return name;
}
public void setName(String name) {
this.name = name;
}
}
该问题的典型解决方案是创建一个自定义的FactoryBean,以公开components属性的setter 属性。以下列表显示了这样的自定义工厂:
package com.foo;
import org.springframework.beans.factory.FactoryBean;
import java.util.List;
public class ComponentFactoryBean implements FactoryBean<Component> {
private Component parent;
private List<Component> children;
public void setParent(Component parent) {
this.parent = parent;
}
public void setChildren(List<Component> children) {
this.children = children;
}
public Component getObject() throws Exception {
if (this.children != null && this.children.size() > 0) {
for (Component child : children) {
this.parent.addComponent(child);
}
}
return this.parent;
}
public Class<Component> getObjectType() {
return Component.class;
}
public boolean isSingleton() {
return true;
}
}
这效果很好,但是它向最终用户暴露了很多Spring通道。我们将要做的是编写一个自定义扩展,该扩展掩盖了所有Spring通道。如果我们坚持上述步骤,我们首先创建XSD架构以定义我们自定义标签的结构,如以下列表所示:
<?xml version="1.0" encoding="UTF-8" standalone="no"?>
<xsd:schema xmlns="http://www.foo.example/schema/component"
xmlns:xsd="http://www.w3.org/2001/XMLSchema"
targetNamespace="http://www.foo.example/schema/component"
elementFormDefault="qualified"
attributeFormDefault="unqualified">
<xsd:element name="component">
<xsd:complexType>
<xsd:choice minOccurs="0" maxOccurs="unbounded">
<xsd:element ref="component"/>
</xsd:choice>
<xsd:attribute name="id" type="xsd:ID"/>
<xsd:attribute name="name" use="required" type="xsd:string"/>
</xsd:complexType>
</xsd:element>
</xsd:schema>
再次遵循前面描述的过程,然后创建一个自定义NamespaceHandler:
package com.foo;
import org.springframework.beans.factory.xml.NamespaceHandlerSupport;
public class ComponentNamespaceHandler extends NamespaceHandlerSupport {
public void init() {
registerBeanDefinitionParser("component", new ComponentBeanDefinitionParser());
}
}
接下来是自定义BeanDefinitionParser。请记住,我们正在创建一个描述ComponentFactoryBean的BeanDefinition。以下列表显示了我们的自定义BeanDefinitionParser实现:
package com.foo;
import org.springframework.beans.factory.config.BeanDefinition;
import org.springframework.beans.factory.support.AbstractBeanDefinition;
import org.springframework.beans.factory.support.BeanDefinitionBuilder;
import org.springframework.beans.factory.support.ManagedList;
import org.springframework.beans.factory.xml.AbstractBeanDefinitionParser;
import org.springframework.beans.factory.xml.ParserContext;
import org.springframework.util.xml.DomUtils;
import org.w3c.dom.Element;
import java.util.List;
public class ComponentBeanDefinitionParser extends AbstractBeanDefinitionParser {
protected AbstractBeanDefinition parseInternal(Element element, ParserContext parserContext) {
return parseComponentElement(element);
}
private static AbstractBeanDefinition parseComponentElement(Element element) {
BeanDefinitionBuilder factory = BeanDefinitionBuilder.rootBeanDefinition(ComponentFactoryBean.class);
factory.addPropertyValue("parent", parseComponent(element));
List<Element> childElements = DomUtils.getChildElementsByTagName(element, "component");
if (childElements != null && childElements.size() > 0) {
parseChildComponents(childElements, factory);
}
return factory.getBeanDefinition();
}
private static BeanDefinition parseComponent(Element element) {
BeanDefinitionBuilder component = BeanDefinitionBuilder.rootBeanDefinition(Component.class);
component.addPropertyValue("name", element.getAttribute("name"));
return component.getBeanDefinition();
}
private static void parseChildComponents(List<Element> childElements, BeanDefinitionBuilder factory) {
ManagedList<BeanDefinition> children = new ManagedList<BeanDefinition>(childElements.size());
for (Element element : childElements) {
children.add(parseComponentElement(element));
}
factory.addPropertyValue("children", children);
}
}
最后,需要通过修改META-INF/spring.handlers和META-INF/spring.schemas文件,以在Spring XML基础架构上注册各种artifacts。
# in 'META-INF/spring.handlers'
http\://www.foo.example/schema/component=com.foo.ComponentNamespaceHandler
# in 'META-INF/spring.schemas'
http\://www.foo.example/schema/component/component.xsd=com/foo/component.xsd
在一般元素上自定义属性
编写自己的自定义解析器和相关artifacts 并不困难。然而,这有时不是正确的做法。考虑一个场景,您需要将元数据添加到现有的bean定义中。在这种情况下,您当然不想编写自己的整个自定义扩展。相反,您只想向现有bean定义元素添加一个附加属性。
假设您为service对象定义一个bean定义(该service对象未知)访问了群集的 JCache (opens new window),并且要确保在周围的群集中急切地启动命名的JCache实例。以下列表显示了这样的定义:
<bean id="checkingAccountService" class="com.foo.DefaultCheckingAccountService"
jcache:cache-name="checking.account">
<!-- other dependencies here... -->
</bean>
然后,当'jcache:cache-name'属性被解析时,我们可以创建另一个BeanDefinition。然后,此BeanDefinition为我们初始化了命名的JCache。我们还可以为'checkingAccountService'修改现有的BeanDefinition,以使其依赖这种新的JCache初始化的BeanDefinition。以下列表显示了我们的JCacheInitializer:
package com.foo;
public class JCacheInitializer {
private String name;
public JCacheInitializer(String name) {
this.name = name;
}
public void initialize() {
// lots of JCache API calls to initialize the named cache...
}
}
现在,我们可以移步自定义扩展。首先,我们需要撰写描述自定义属性的XSD架构,如下:
<?xml version="1.0" encoding="UTF-8" standalone="no"?>
<xsd:schema xmlns="http://www.foo.example/schema/jcache"
xmlns:xsd="http://www.w3.org/2001/XMLSchema"
targetNamespace="http://www.foo.example/schema/jcache"
elementFormDefault="qualified">
<xsd:attribute name="cache-name" type="xsd:string"/>
</xsd:schema>
接下来,我们需要创建关联的NamespaceHandler,如下所示:
package com.foo;
import org.springframework.beans.factory.xml.NamespaceHandlerSupport;
public class JCacheNamespaceHandler extends NamespaceHandlerSupport {
public void init() {
super.registerBeanDefinitionDecoratorForAttribute("cache-name",
new JCacheInitializingBeanDefinitionDecorator());
}
}
接下来,我们需要创建解析器。请注意,在这种情况下,由于我们要解析XML属性,因此我们编写BeanDefinitionDecorator而不是BeanDefinitionParser。以下列表显示了我们的BeanDefinitionDecorator实现:
package com.foo;
import org.springframework.beans.factory.config.BeanDefinitionHolder;
import org.springframework.beans.factory.support.AbstractBeanDefinition;
import org.springframework.beans.factory.support.BeanDefinitionBuilder;
import org.springframework.beans.factory.xml.BeanDefinitionDecorator;
import org.springframework.beans.factory.xml.ParserContext;
import org.w3c.dom.Attr;
import org.w3c.dom.Node;
import java.util.ArrayList;
import java.util.Arrays;
import java.util.List;
public class JCacheInitializingBeanDefinitionDecorator implements BeanDefinitionDecorator {
private static final String[] EMPTY_STRING_ARRAY = new String[0];
public BeanDefinitionHolder decorate(Node source, BeanDefinitionHolder holder,
ParserContext ctx) {
String initializerBeanName = registerJCacheInitializer(source, ctx);
createDependencyOnJCacheInitializer(holder, initializerBeanName);
return holder;
}
private void createDependencyOnJCacheInitializer(BeanDefinitionHolder holder,
String initializerBeanName) {
AbstractBeanDefinition definition = ((AbstractBeanDefinition) holder.getBeanDefinition());
String[] dependsOn = definition.getDependsOn();
if (dependsOn == null) {
dependsOn = new String[]{initializerBeanName};
} else {
List dependencies = new ArrayList(Arrays.asList(dependsOn));
dependencies.add(initializerBeanName);
dependsOn = (String[]) dependencies.toArray(EMPTY_STRING_ARRAY);
}
definition.setDependsOn(dependsOn);
}
private String registerJCacheInitializer(Node source, ParserContext ctx) {
String cacheName = ((Attr) source).getValue();
String beanName = cacheName + "-initializer";
if (!ctx.getRegistry().containsBeanDefinition(beanName)) {
BeanDefinitionBuilder initializer = BeanDefinitionBuilder.rootBeanDefinition(JCacheInitializer.class);
initializer.addConstructorArg(cacheName);
ctx.getRegistry().registerBeanDefinition(beanName, initializer.getBeanDefinition());
}
return beanName;
}
}
最后,需要通过修改META-INF/spring.handlers和META-INF/spring.schemas文件,以在Spring XML基础架构上注册各种artifacts。
# in 'META-INF/spring.handlers'
http\://www.foo.example/schema/jcache=com.foo.JCacheNamespaceHandler
# in 'META-INF/spring.schemas'
http\://www.foo.example/schema/jcache/jcache.xsd=com/foo/jcache.xsd
# 10.3. 应用程序启动步骤
附录的这一部分列出了核心容器所使用的现有StartupSteps。
⚠️有关每个启动步骤的名称和详细信息不是公共约定的一部分,并且可能会更改;这被认为是核心容器的实现细节,并将遵循其行为变化。
| 核心容器中定义的应用程序启动步骤 | ||
|---|---|---|
| 名称 | 描述 | 标签 |
spring.beans.instantiate | 实例化bean和它的依赖 | beanNamebean名, beanType注入点需要的类型 |
spring.beans.smart-initialize | 初始化SmartInitializingSingleton beans. | beanName bean名 |
spring.context.annotated-bean-reader.create | 创建 AnnotatedBeanDefinitionReader. | |
spring.context.base-packages.scan | 扫描基础包 | packages 要扫描的包数组 |
spring.context.beans.post-process | Beans后置处理阶段 | |
spring.context.bean-factory.post-process | 调用BeanFactoryPostProcessor beans. | postProcessor 当前后置处理器 |
spring.context.beandef-registry.post-process | 调用BeanDefinitionRegistryPostProcessor beans. | postProcessor 当前后置处理器 |
spring.context.component-classes.register | 通过AnnotationConfigApplicationContext#register注册组件类 | classes 要注册类数组 |
spring.context.config-classes.enhance | 使用CGLIB代理增强配置类 | classCount 要增强的类数量 |
spring.context.config-classes.parse | 使用ConfigurationClassPostProcessor配置类解析阶段 | classCount 要处理的类数量 |
spring.context.refresh | 应用程序上下文解析阶段 |
# 参考
# 服务定位器模式
服务定位器模式(Service Locator Pattern)用在我们想使用 JNDI 查询定位各种服务的时候。考虑到为某个服务查找 JNDI 的代价很高,服务定位器模式充分利用了缓存技术。在首次请求某个服务时,服务定位器在 JNDI 中查找服务,并缓存该服务对象。当再次请求相同的服务时,服务定位器会在它的缓存中查找,这样可以在很大程度上提高应用程序的性能。以下是这种设计模式的实体。
服务(Service) - 实际处理请求的服务。对这种服务的引用可以在 JNDI 服务器中查找到。
Context / 初始的 Context - JNDI Context 带有对要查找的服务的引用。
服务定位器(Service Locator) - 服务定位器是通过 JNDI 查找和缓存服务来获取服务的单点接触。
缓存(Cache) - 缓存存储服务的引用,以便复用它们。
客户端(Client) - Client 是通过 ServiceLocator 调用服务的对象。
